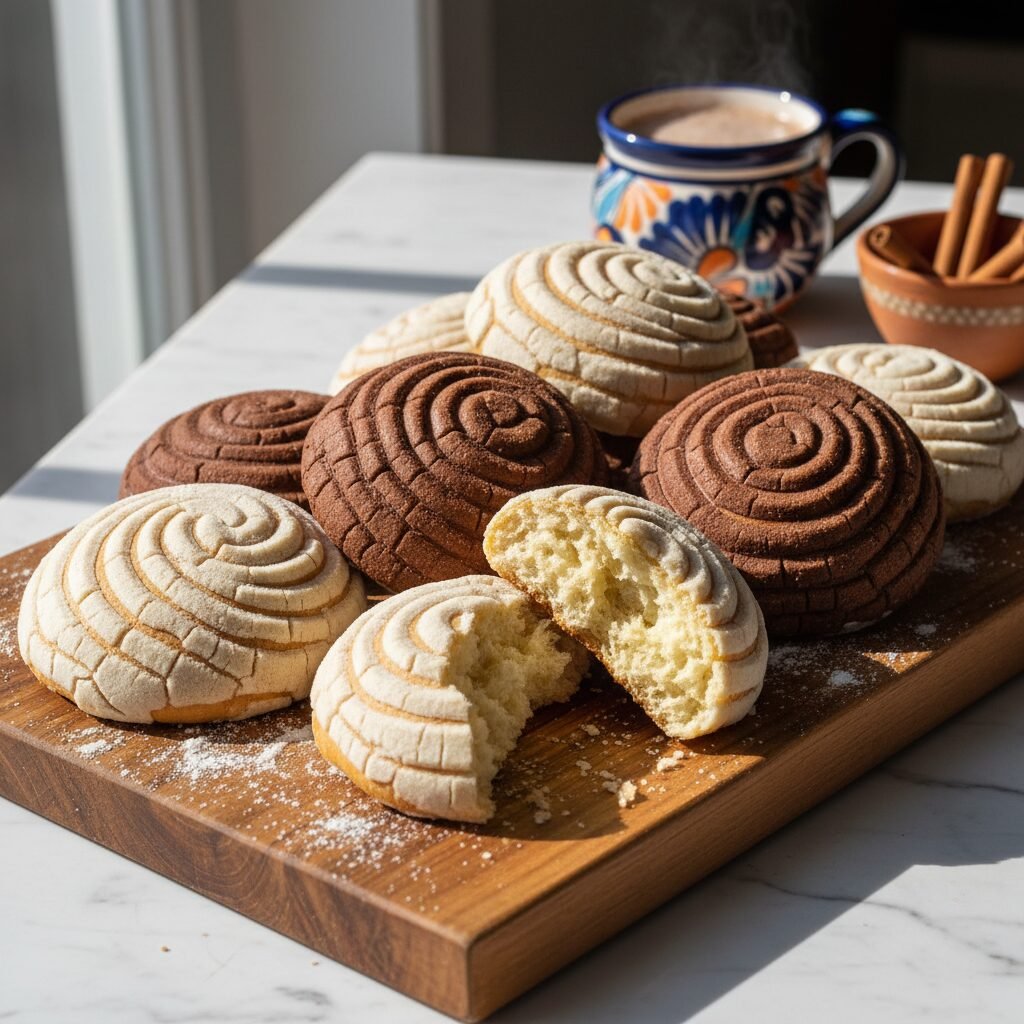
Fluffy Homemade Conchas (Authentic Mexican Sweet Bread)
Pan Dulce Recipe
Step into your own personal panadería with this incredible recipe for homemade conchas! Imagine the scent of freshly baked sweet bread filling your kitchen, the pillowy-soft texture, and that iconic crunchy, sugary topping. This recipe breaks down every step to make these beloved Mexican treats perfectly, ready to be dunked in a warm cup of coffee or hot chocolate.
30 minutes (plus 2.5 hours proofing time)
20 minutes
3 hours 20 minutes
16 conchas
Breakfast & Brunch
Baking
Mexican
N/A
Why You’ll Love This Recipe
- Pillowy-soft and perfectly sweet dough
- Crisp, buttery, shell-patterned topping
- Authentic flavor that tastes just like a Mexican bakery
- Perfect for breakfast, snacks, or dessert
Equipment You’ll Need
- Stand mixer with dough hook attachment (or a large mixing bowl)
- 2 large baking sheets
- Parchment paper
- Small saucepan
- Measuring cups and spoons
- Kitchen scale (recommended for accuracy)
- Bench scraper
- Concha stamp or a small sharp knife
- Small bowls for topping variations
- Pastry brush
Ingredients
- For the Dough:
- 1/2 cup whole milk
- 1/4 cup water
- 2 1/4 teaspoons (1 packet) active dry yeast
- 1/2 cup granulated sugar, divided
- 4 cups all-purpose flour, plus more for dusting
- 1 teaspoon salt
- 2 large eggs, at room temperature
- 1 large egg yolk, at room temperature
- 1/2 cup unsalted butter, softened to room temperature
- 1 teaspoon pure vanilla extract
- For the Topping:
- 1 cup all-purpose flour
- 1 cup powdered sugar
- 1/2 cup vegetable shortening, at room temperature
- 1 teaspoon pure vanilla extract
- 2 tablespoons unsweetened cocoa powder (for chocolate topping, optional)
- Pink food coloring (for strawberry topping, optional)
Instructions
- First, activate the yeast. Gently warm the milk and water in a small saucepan until it’s lukewarm (about 110°F). Pour it into the bowl of your stand mixer. Sprinkle the yeast and 1 teaspoon of the granulated sugar over the liquid. Let it sit for 5-10 minutes until it becomes foamy.
- To the yeast mixture, add the remaining granulated sugar, 4 cups of flour, salt, eggs, and egg yolk. Attach the dough hook and mix on low speed until a shaggy dough forms.
- Increase the speed to medium-low and add the softened butter, one tablespoon at a time, waiting for each piece to incorporate before adding the next. Add the vanilla extract. Continue to knead for 8-10 minutes, until the dough is smooth, elastic, and pulls away from the sides of the bowl. It will be slightly sticky.
- Lightly grease a large bowl with oil or butter. Form the dough into a ball and place it in the bowl, turning it once to coat. Cover the bowl with plastic wrap or a damp kitchen towel and let it rise in a warm, draft-free place for 1.5 to 2 hours, or until doubled in size.
- While the dough is rising, prepare the topping. In a medium bowl, combine the flour and powdered sugar. Add the shortening and vanilla, and use your fingertips or a pastry cutter to work the mixture until it forms a smooth, thick paste. If it’s too crumbly, add a tiny bit more shortening; if too sticky, a little more flour.
- If you want different flavors, divide the topping paste into separate bowls. Leave one plain (vanilla), mix cocoa powder into another for chocolate, and a drop of pink food coloring into a third for strawberry.
- Once the dough has doubled, gently punch it down and turn it out onto a lightly floured surface. Divide the dough into 16 equal pieces (a kitchen scale is great for this). Roll each piece into a smooth, tight ball.
- Place the dough balls on two large baking sheets lined with parchment paper, leaving about 3 inches of space between them.
- Now for the fun part! Divide your topping paste into 16 equal portions and roll each into a ball. Flatten one ball of topping between your palms into a thin, flat circle about the size of the dough ball.
- Gently press the topping circle onto the top of a dough ball, draping it over the top and slightly down the sides. Repeat with the remaining dough balls and topping.
- Using a concha stamp or a small, sharp knife, carefully press the classic shell pattern into the topping. Be careful not to cut through the topping into the dough itself.
- Cover the baking sheets loosely with plastic wrap and let the conchas rise for a second time in a warm place for 45-60 minutes, or until they are puffy.
- Preheat your oven to 350°F (175°C) about 20 minutes before the second rise is complete.
- Bake for 18-22 minutes, or until the bottoms are golden brown and the bread sounds hollow when tapped. The topping should remain pale.
- Let the conchas cool on the baking sheet for a few minutes before transferring them to a wire rack to cool completely. Enjoy the incredible aroma!
Expert Cooking Tips
- For the softest dough, use room temperature ingredients (eggs, butter). This helps everything incorporate smoothly.
- Don’t rush the kneading! A properly kneaded dough (passing the ‘windowpane test’) is the secret to a light, airy crumb.
- When applying the topping, be gentle! You don’t want to deflate the beautifully risen dough balls.
- Bake one sheet at a time in the center of the oven for the most even cooking and browning.
- If your kitchen is cold, you can create a warm spot for proofing by placing the dough bowl in an oven that is turned off but has the light on.
Substitutions and Variations
For a dairy-free version, you can substitute the whole milk with an unsweetened plant-based milk like almond or soy, and use a high-quality vegan butter in place of the dairy butter. The vegetable shortening in the topping is already dairy-free. For the yeast, instant yeast can be used in place of active dry yeast; simply mix it in with the dry ingredients and add the warm liquids, no need to proof it first.
Common Mistakes to Avoid
The most common mistake is using liquid that is too hot, which will kill the yeast and prevent your dough from rising. Always test the temperature; it should feel like a warm bath. Another issue is under-baking; the conchas may look done on top because the topping stays pale, so be sure to check the bottoms for a golden-brown color. Lastly, don’t make the topping too dry or it will crack and fall off during the second rise and baking.
Serving Suggestions
Conchas are traditionally enjoyed for breakfast or as an afternoon snack (‘merienda’). They are absolutely divine when dunked into a steaming mug of Mexican hot chocolate (chocolate Mexicano) or a spiced café de olla. You can also simply enjoy them with a glass of cold milk or a hot cup of coffee.
Storage and Reheating Tips
Store your homemade conchas in an airtight container or a large zip-top bag at room temperature for up to 3 days. They tend to dry out, so to bring back their softness, you can microwave one for 10-15 seconds before enjoying.
Nutrition Facts (Estimated)
| Serving Size | 1 concha |
| Calories | 285 kcal |
| Fat | 9 g |
| Saturated Fat | 4.5 g |
| Unsaturated Fat | 4 g |
| Trans Fat | 0 g |
| Cholesterol | 35 mg |
| Sodium | 155 mg |
| Carbohydrates | 43 g |
| Fiber | 1.5 g |
| Sugar | 18 g |
| Protein | 5 g |
Frequently Asked Questions
Can I make this recipe without a stand mixer?
Absolutely! You can knead the dough by hand on a lightly floured surface. It will take about 15-20 minutes of steady kneading to develop the gluten and achieve a smooth, elastic dough. It’s a great arm workout!
Why didn’t my dough rise?
There are a few common reasons. Your yeast may have been old or expired. The liquid used to activate it might have been too hot or too cold. Or, the room where you let it rise might have been too chilly. Yeast loves a warm, cozy environment to work its magic.
Can I freeze conchas?
Yes! Conchas freeze beautifully. Let them cool completely after baking, then wrap them individually in plastic wrap and place them in a freezer-safe bag. They can be frozen for up to 3 months. To serve, let them thaw at room temperature or warm them gently in the microwave or oven.
My topping was too crumbly to work with, what went wrong?
This usually means the ratio of dry to wet ingredients was slightly off. It can be easily fixed! Try adding a bit more shortening, about a teaspoon at a time, and working it in with your fingers until you have a smooth, pliable paste.
Conclusion
There is truly nothing like biting into a warm, homemade concha you’ve made from scratch. The soft bread and sweet, crunchy topping are a match made in heaven. I hope you and your family love this recipe as much as I do! If you make these, please snap a picture and tag me on social media – I can’t wait to see your beautiful creations!