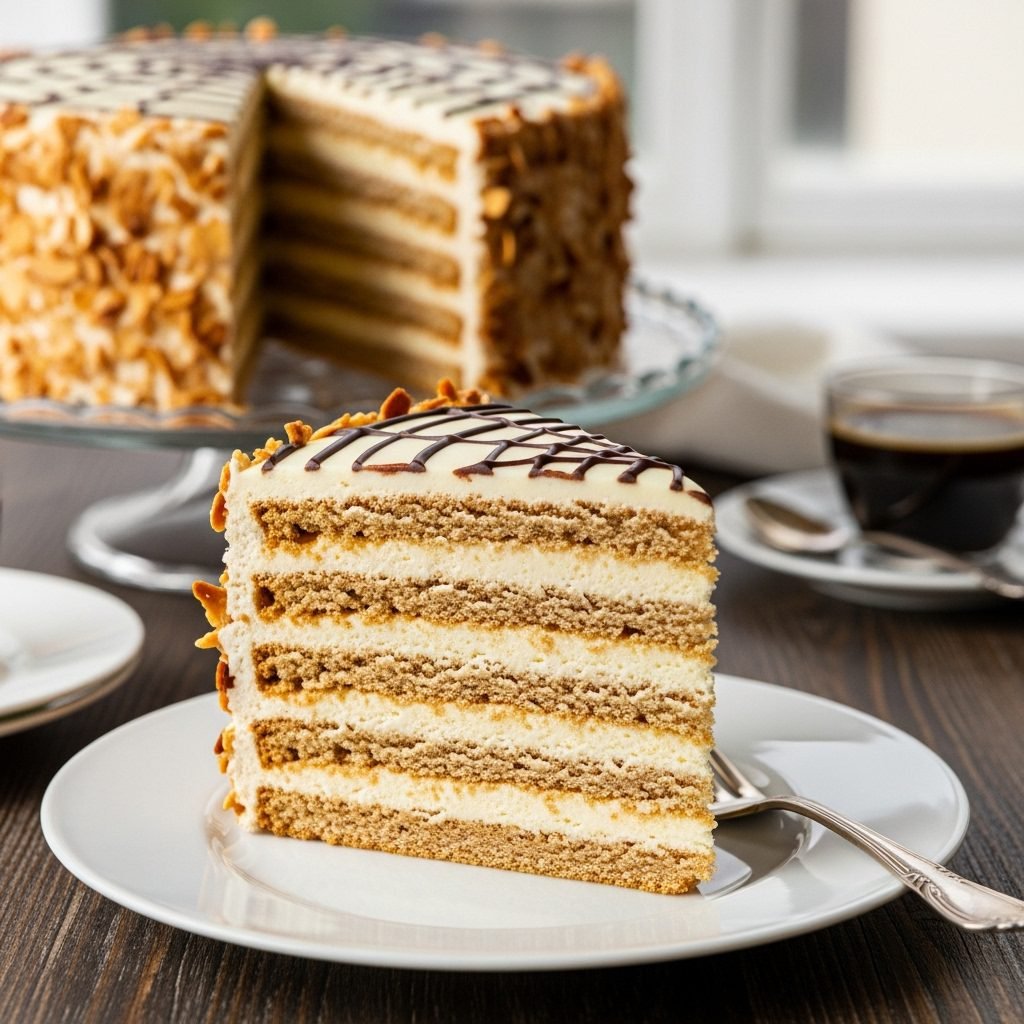
The Showstopping Spiderweb Cake: A Classic Esterhazy Torte Recipe
Have you ever seen a dessert so beautiful you were almost afraid to eat it? That’s the Esterhazy Torte. It’s that stunning, elegant European cake with the mesmerizing chocolate spiderweb design on top. It looks like something you’d only find in a high-end Viennese pastry shop, and it has a reputation for being complicated.
Well, I’m here to let you in on a secret: you can make this. Yes, you.
This isn’t just a pretty cake. It’s an adventure in texture. We’re talking multiple layers of crisp, chewy, nutty meringue sandwiched together with the most luscious, silky buttercream you can imagine. It’s rich, but it’s not heavy. It’s nutty, sweet, and has a sophisticated hint of rum and apricot.
This is a “project bake.” It’s not a quick weeknight dessert. It’s the kind of recipe you save for a special weekend, a holiday, or when you just want to get lost in the kitchen and create something truly spectacular. The process is a joy, and the result is a total showstopper.
I’m going to walk you through every single part, from the nutty meringue layers to that iconic web pattern. It’s all about following the steps. Are you ready to make something amazing?
What Makes This Torte So Special?
This is a classic for a reason. Here’s a little peek at what makes this recipe a standout:
- The Flavor: A beautiful harmony of toasted hazelnuts (or almonds), rich vanilla-rum buttercream, and a bright, sharp note of apricot jam that cuts through the richness. It’s sophisticated and deeply satisfying.
- The Texture: This is the best part! It’s a symphony of contrasts. You get the slight crunch of the nutty meringue layers, which are also delightfully chewy, all enveloped in a light, silky-smooth buttercream. It’s unlike any other cake.
- The Time: Be prepared to set aside an afternoon. This is a multi-step, multi-component dessert. You’ll need about 1.5 – 2 hours of active time, plus several hours for baking, cooling the layers, and chilling the final torte. This is the perfect make-ahead dessert.
- The “Wow” Factor: This torte is 10/10 on the “wow” scale. The sheer number of layers is impressive, and the spiderweb glaze is a professional touch that’s surprisingly fun to do. This is an “intermediate” level bake, not because any single step is hard, but because it requires patience and organization.
Everything You’ll Need
Let’s get our ingredients in order. This torte has three main parts: the nutty meringue layers, the buttercream filling, and the signature glaze.
For the Nutty Meringue Layers (Dacquoise):
- 8 large egg whites, at room temperature (This is crucial!)
- 1 1/2 cups granulated sugar
- 2 1/2 cups finely ground toasted hazelnuts or almonds (Hazelnut meal or almond flour works great!)
- 1/4 cup cornstarch
- 1 1/2 tsp vanilla extract
- 1/4 tsp salt
For the Vanilla-Rum Buttercream:
- 1 1/2 cups whole milk
- 1/2 cup granulated sugar, divided
- 4 large egg yolks
- 3 tbsp cornstarch
- 1 1/2 tsp vanilla extract
- 1 1/2 cups (3 sticks) unsalted butter, softened to room temperature
- 2 tbsp dark rum (or 1 tsp more vanilla extract)
- Pinch of salt
For the Assembly & Glaze:
- 1/2 cup smooth apricot jam
- 1/2 cup toasted sliced almonds (for decorating the sides)
- 2 cups powdered sugar, sifted
- 3-4 tbsp whole milk (or water or lemon juice)
- 1/2 tsp vanilla extract (or almond extract)
- 2 oz (about 1/4 cup) bittersweet chocolate chips or a chopped chocolate bar
- 1 tsp coconut oil (or any neutral oil)
How to Make Your Esterhazy Torte, Step by Step
Take a deep breath! We’re just going to tackle this one component at a time. It’s just a series of simple tasks.
Part 1: Make the Nutty Meringue Layers
- Prep Your Station: Preheat your oven to 325°F. Take two large baking sheets and line them with parchment paper. Using an 8-inch round cake pan as a guide, trace two circles on each piece of parchment (you’ll have 4 circles). Flip the parchment over so the pencil/ink side is down. Note: We’re making 5-6 layers. You’ll work in batches.
- Combine Dry Ingredients: In a medium bowl, whisk together your ground nuts (almond flour or hazelnut meal) and the 1/4 cup of cornstarch. This prevents the nuts from clumping.
- Whip the Meringue: In the spotlessly clean bowl of a stand mixer (or a large bowl with a hand mixer), beat the 8 egg whites and the 1/4 tsp of salt on medium speed until they’re foamy. Gradually, one tablespoon at a time, add the 1 1/2 cups of granulated sugar. Once all the sugar is in, turn the mixer up to medium-high and beat for 5-7 minutes, or until the meringue is stiff, glossy, and holds a firm peak. Beat in the 1 1/2 tsp of vanilla.
- Fold in the Nuts: Gently, in three additions, fold the nut-cornstarch mixture into the stiff meringue using a large spatula. Be gentle! You want to keep all that air you just whipped in. Fold just until no dry streaks remain.
- Pipe or Spread: Transfer the meringue to a large piping bag fitted with a 1/2-inch round tip. Pipe a spiral to fill in each of your traced circles. No piping bag? No problem! Just spoon about 1 cup of the meringue into the center of each circle and use a small offset spatula to spread it evenly to the edges. Try to keep the layers thin and even. You should have enough for 5, maybe 6 layers.
- Bake the Layers: Bake two layers at a time (one per sheet) for 20-25 minutes, or until the layers are a pale, light-golden-brown and feel dry to the touch. Let them cool on the baking sheets for 10 minutes, then very carefully peel the parchment paper off and transfer the delicate layers to a wire rack to cool completely. They will be crisp on the outside and a little chewy in the center. Repeat with the remaining meringue.
Part 2: Make the Silky Buttercream
This is a German-style buttercream, which starts with a pastry cream. It’s incredibly stable and silky!
- Start the Pastry Cream: In a medium saucepan, heat the 1 1/2 cups of milk until it’s just simmering (little bubbles around the edge).
- Whisk the Yolks: While the milk is heating, in a separate medium bowl, vigorously whisk the 4 egg yolks, the 1/2 cup of sugar, the 3 tbsp of cornstarch, and the pinch of salt until the mixture is pale yellow and fluffy.
- Temper the Eggs: Once the milk is simmering, remove it from the heat. Very slowly, while whisking the yolk mixture constantly, pour about half of the hot milk into the yolks. This gently warms them up so they don’t scramble.
- Cook the Custard: Pour the tempered yolk mixture back into the saucepan with the rest of the milk. Return to medium heat and cook, whisking constantly (don’t walk away!), for 3-5 minutes. The custard will thicken to a pudding-like consistency.
- Chill the Custard: Remove from the heat and whisk in the 1 1/2 tsp of vanilla. Scrape the pastry cream into a shallow bowl and press a piece of plastic wrap directly onto the surface (this prevents a “skin” from forming). Chill in the refrigerator until completely cold, at least 2 hours or overnight.
- Finish the Buttercream: In the bowl of your stand mixer, beat the 1 1/2 cups of softened, room-temperature butter on medium-high speed for 5 minutes, until it’s very light, pale, and fluffy. Turn the mixer to low and add the chilled pastry cream, one large spoonful at a time, waiting for each to incorporate before adding the next. Once it’s all in, add the 2 tbsp of rum and beat on medium-high for 2-3 minutes until it’s a cohesive, silky, luxurious buttercream.
Part 3: Assemble and Decorate Your Torte!
- Start Stacking: Place your first (and flattest) meringue layer on a cake stand or serving plate. Spread about 3/4 cup of the buttercream evenly over the top, going right to the edges. Note: If you have 6 layers, use 5 for the cake and save one (or the “ugliest” one) for snacking or crushing as a decoration.
- Keep Layering: Place a second meringue layer on top and gently press down. Top with another 3/4 cup of buttercream. Repeat this process with all your layers, ending with a meringue layer on top. You should have 4 (or 5) layers of filling. Save the last “top” layer bare for the glaze.
- The “Crumb Coat”: Use the remaining buttercream to apply a very thin coat all over the top and sides of the torte. This is just to seal everything in.
- The BIG Chill (Round 1): Place the assembled torte in the refrigerator for at least 1 hour (or the freezer for 30 minutes) to get very firm. This is essential for the next steps.
- The Apricot Seal: While the torte is chilling, heat the 1/2 cup of apricot jam in a small saucepan (or the microwave) until it’s warm and runny. Strain it through a fine-mesh sieve to remove any lumps. Brush the warm, strained jam in a thin layer all over the cold, firm torte—top and sides. This seals the cake and gives the glaze a perfect surface.
- Add the Nuts: Gently press the 1/2 cup of toasted sliced almonds onto the jam-coated sides of the torte. This is easiest to do over a baking sheet to catch the extras.
- The BIG Chill (Round 2): Pop the torte back in the fridge for another 30 minutes while you prepare the glaze.
- The Glaze & The Web: This is the fun part, and you have to work quickly!
- White Glaze: In a medium bowl, whisk the 2 cups of sifted powdered sugar, the vanilla, and 3 tbsp of milk. It should be very thick but pourable (like honey). If it’s too thick, add more milk 1/2 teaspoon at a time.
- Chocolate: In a small microwave-safe bowl, melt the 2 oz of chocolate and 1 tsp of coconut oil in 15-second bursts, stirring in between, until smooth. Pour it into a small piping bag or a ziplock bag (you’ll snip a tiny corner off).
- Go Time! Take the cold torte from the fridge. Pour the white glaze into the center of the torte. Use an offset spatula to quickly spread it to the edges, letting it drip a little down the sides if you like.
- Immediately (before the glaze sets), pipe the melted chocolate in 5-6 concentric circles on top of the white glaze, starting from the center and working your way out.
- Create the Web: Take a wooden skewer or a toothpick. Drag it from the center of the torte to the edge. Wipe the skewer clean. Give the torte a quarter turn and repeat. Do this 6-8 times around the cake.
- Now, go in the opposite direction. Drag the skewer from the edge to the center, in between your first set of lines. This is what creates that classic web!
- The FINAL Chill: Let the torte sit in the refrigerator for at least 1-2 hours to allow the glaze to set completely before slicing.
My Top Tips for Success
- Meringue’s Enemies: Any fat or moisture. Make sure your mixer bowl is bone-dry and squeaky clean. Don’t let any egg yolk get into your whites. Avoid making meringue on a very humid or rainy day if you can; it can make the layers sticky.
- Fixing “Broken” Buttercream: If your buttercream looks curdled or “split,” it means your butter and pastry cream were at different temperatures.
- If it looks soupy: The butter was too warm. Chill the whole bowl for 15 minutes and beat it again.
- If it looks curdled: The pastry cream was too cold. Take a small amount (1/4 cup) of the buttercream, microwave it just until melted (2-3 seconds), and pour it back in while beating. This brings the temperature up and will bring it all together.
- Be Gentle: Those meringue layers are delicate! Handle them with care. If one breaks, don’t panic! The buttercream will act like glue, and no one will ever know.
- Don’t Rush the Chill: Every chilling step is in this recipe for a reason. It makes the torte stable, the layers defined, and the final glaze look sharp and clean.
Swaps and Variations
- The Nuts: Classic Esterhazy uses hazelnuts or almonds. Walnuts or pecans would also be delicious, though less traditional. You can buy pre-ground nuts (meal or flour) to save a ton of time.
- The Rum: If you don’t want to use alcohol, just skip it and add 1-2 teaspoons of high-quality vanilla extract or even 1/2 teaspoon of almond extract to the buttercream.
- Gluten-Free Esterhazy Torte: This recipe is naturally almost gluten-free! The meringue layers contain no flour, only cornstarch. Just double-check that your cornstarch and powdered sugar are certified gluten-free, and you have a stunning GF dessert.
- The Sides: Not a fan of sliced almonds? You can coat the sides with more ground hazelnuts or even the crumbs from one of your “snack” layers.
Common Mistakes to Watch Out For
- Deflated Meringue: This is usually caused by an oily bowl, a speck of yolk, or over-folding.
- Thin, Runny Glaze: Your glaze was too thin to begin with. It needs to be very thick to sit on top of the cake. It’s easier to thin a thick glaze than to thicken a runny one.
- A Messy Web: This happens if you wait too long. You must pipe the chocolate and drag the skewer while the white glaze is still wet.
- A Wobbly Torte: You didn’t chill it long enough between assembly and glazing. A cold, firm torte is the key to a sharp, clean finish.
How to Serve and Store Your Torte
This torte is rich, so a thin slice is all you need.
- Serving: This cake must be served chilled, straight from the fridge. The contrast between the cold, silky cream and the chewy-crisp meringue is what makes it so good. It’s perfect with a strong cup of coffee or espresso.
- Storage: Because of the dairy-based buttercream, this torte must be stored in the refrigerator. Keep it in a cake carrier or lightly covered with plastic wrap (use toothpicks to tent the wrap so it doesn’t touch the glaze).
- Make-Ahead: This is the ultimate make-ahead cake! It’s honestly better on day 2 or 3, after the layers have had time to soften slightly and the flavors have melded. It will keep beautifully in the fridge for up to 5 days.
Your Esterhazy Torte Questions
Can I freeze this torte? Yes! You can freeze the entire, fully assembled torte. Freeze it uncovered for an hour until it’s solid, then wrap it tightly in plastic wrap and foil. It will keep for up to 2 months. Thaw it overnight in the refrigerator.
My meringue layers came out soft and sticky, not crisp. This is almost always a humidity issue. Meringue is like a sponge for moisture in the air. On a humid day, they just won’t dry out properly. They will still taste delicious, but the texture will be more chewy than crisp.
Do I really need 8 egg whites? What do I do with the yolks? Yes, you need all 8! But the recipe is designed to use 4 of the leftover yolks in the pastry cream for the buttercream. You’ll have 4 extra yolks left over, which are perfect for making homemade mayonnaise, hollandaise sauce, or a rich crème brûlée.
You’ve Got This—It’s a Bake to Be Proud Of
I know this recipe looks long, but I promise it’s so, so worth it. Making an Esterhazy Torte is a true labor of love, and it’s one of the most rewarding cakes you’ll ever bake.
When you bring this to the table, and your friends and family see those beautiful layers and that perfect spiderweb, you will feel like a total baking rockstar. Because you will be!
A Quick Summary
This classic Esterhazy Torte recipe guides you through creating a stunning, multi-layered European dessert. It features thin, crisp-chewy hazelnut meringue layers stacked with a silky, rum-kissed pastry buttercream. The torte is sealed with apricot jam, coated in toasted almonds, and finished with its iconic chocolate-on-white spiderweb glaze.
If you make this Esterhazy Torte, I would be so thrilled to see it! That web pattern is your moment to shine! Tag me on [Your Social Media Handle] or drop a comment below. And if this recipe made you feel like a pastry chef, please share it on Pinterest! It helps more bakers find the courage to tackle this beautiful torte.