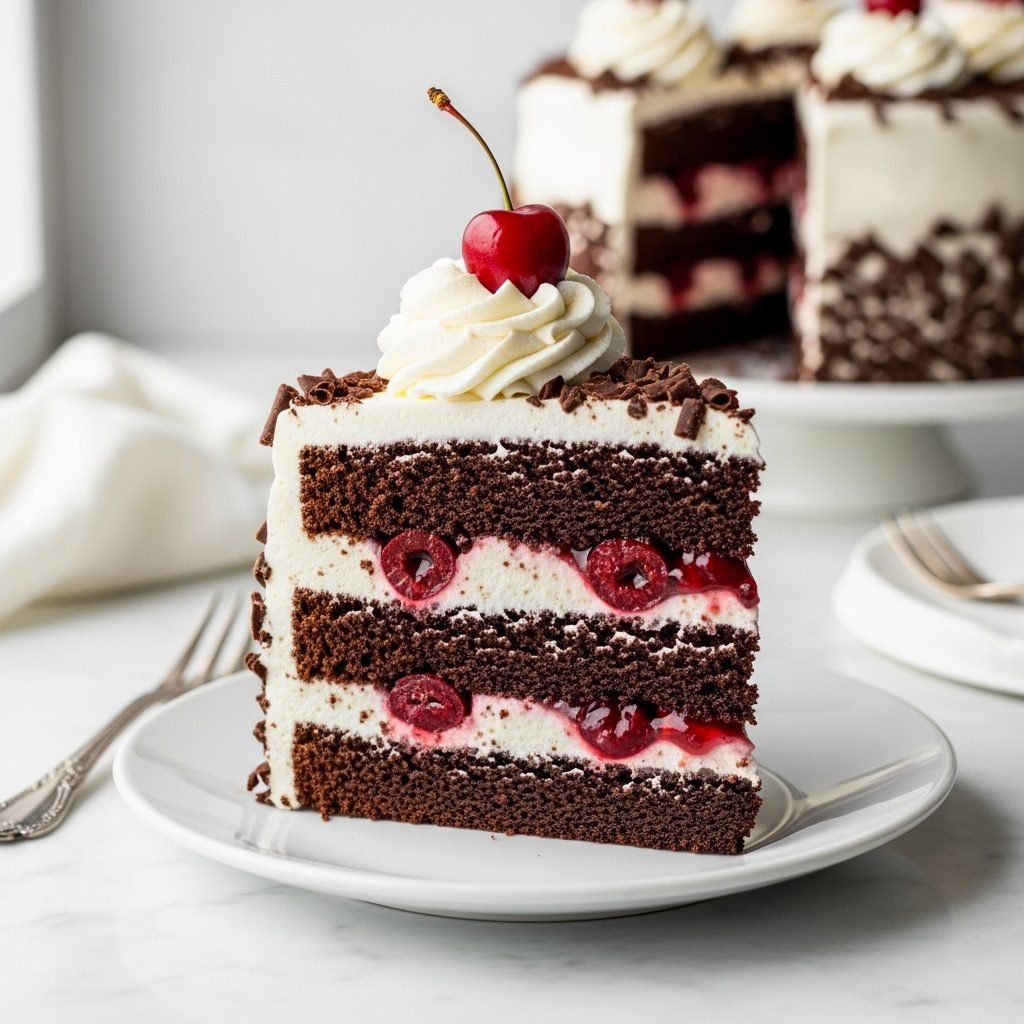
Classic Black Forest Gateau Recipe with Layers of Cherry & Chocolate
If there is one cake that is the very definition of “showstopper,” it’s this one. The Black Forest Gateau.
It’s that iconic, dramatic-looking dessert you see in fancy bakery windows, with its deep, dark chocolate layers, clouds of white whipped cream, and glimmers of ruby-red cherries. It’s a classic for a reason. It’s not just a cake; it’s an event.
I think a lot of people are intimidated by this cake, and I get it. It has multiple layers and several components. But I’m going to let you in on a secret: it’s just a series of simple, easy steps. There’s no single “hard” part. It’s just about stacking those simple steps on top of each other.
And the reward? Oh, it’s so worth it. This isn’t your average, overly-sweet American cake. This is a German classic, and it’s all about balance. You get the deep, dark, slightly-bitter chocolate cake, the bright, tart, juicy cherries, and a fluffy, barely-sweetened whipped cream. It’s light, airy, and stunningly delicious.
This is the cake you make when you want to impress. It’s for holiday dinners, milestone birthdays, or just a weekend when you want to lose yourself in a wonderful baking project. I’m going to walk you through every single step. You can do this.
Why This Recipe is a Keeper
This cake is a true classic, and here’s a little peek at what makes it so special:
- The Flavor: This is all about contrast. Deep, rich cocoa from the cake, a sharp, tart burst from the cherry filling, and a light, clean, dairy-rich flavor from the real whipped cream. The traditional splash of Kirsch (cherry brandy) adds a warm, fruity punch that ties it all together.
- The Texture: Get ready for a symphony of textures. The cake is a moist, tender, open-crumbed sponge. The filling is full of soft, juicy cherry pieces in a light syrup. The frosting is as light as air. It’s an incredible combination in every single bite.
- The Time: This is a project bake. It’s not a 30-minute dessert. Set aside a solid afternoon. You’ll need about 1.5 – 2 hours of active time, but the cake layers and the cherry filling must cool completely, so you need to factor in several hours of cooling time.
- The “Wow” Factor: This is an intermediate-level cake, not because any step is difficult, but because it requires patience and assembly. The final look, with the chocolate-shaving-coated sides and the neat rosettes, is pure pastry-shop elegance.
What You’ll Need
This recipe is broken down into its three main parts. Don’t let the list scare you—it’s mostly pantry staples!
For the Chocolate Cake Layers:
- 1 1/2 cups all-purpose flour
- 1 1/2 cups granulated sugar
- 3/4 cup Dutch-processed cocoa powder (This is key for the dark color!)
- 1 1/2 tsp baking soda
- 3/4 tsp baking powder
- 3/4 tsp salt
- 2 large eggs, at room temperature
- 3/4 cup buttermilk, at room temperature
- 3/4 cup hot, strong brewed coffee (or just hot water)
- 6 tbsp vegetable oil (or any neutral oil)
- 1 1/2 tsp vanilla extract
For the Tart Cherry Filling:
- 2 (15-oz) cans tart (sour) cherries in water, NOT pie filling
- 1/2 cup granulated sugar (or more, to taste)
- 1/4 cup cornstarch
- 1/4 cup Kirsch (cherry brandy), divided (This is traditional, see notes for subs)
- A pinch of salt
For the Whipped Cream Frosting & Assembly:
- 4 cups (32 oz) cold heavy whipping cream
- 1/2 cup powdered sugar, sifted
- 1 1/2 tsp vanilla extract
- 4-6 oz bar of good-quality bittersweet chocolate, for shavings
- 12-15 fresh cherries with stems, for garnish
How to Build Your Black Forest Gateau, Step by Step
Let’s take this one part at a time. The most important rule: everything must be cold before you assemble.
Part 1: The Chocolate Cake Layers
- Prep Your Station: Preheat your oven to 350°F. Grease and line three 8-inch round cake pans with parchment paper. Grease the parchment paper, too.
- Mix Dry Ingredients: In a large bowl, whisk together the all-purpose flour, sugar, Dutch-processed cocoa powder, baking soda, baking powder, and salt. Make sure to break up any cocoa clumps.
- Mix Wet Ingredients: In a separate, medium bowl, whisk together the eggs, buttermilk, vegetable oil, and vanilla extract.
- Combine: Pour the wet ingredients into the dry ingredients and mix with a spatula or whisk until just combined. Don’t overmix!
- Add Coffee: Slowly pour the hot coffee into the batter, whisking gently. The batter will be very thin. This is normal! It’s what makes the cake so moist.
- Divide and Bake: Pour the thin batter evenly between your three prepared pans. Bake for 30-35 minutes, or until a toothpick inserted in the center comes out clean.
- Cool Completely: Let the cakes cool in their pans on a wire rack for 15 minutes. Then, carefully invert them onto the wire rack, peel off the parchment, and let them cool 100% completely. This can take 2-3 hours. Do not rush this!
Part 2: The Tart Cherry Filling
- Drain Cherries: Drain the canned cherries over a bowl. Reserve 1 cup of the cherry juice.
- Make Slurry: In a small bowl, whisk the 1/4 cup cornstarch with 1/4 cup of the reserved cherry juice until smooth.
- Simmer Juice: In a medium saucepan, combine the remaining 3/4 cup of cherry juice and the 1/2 cup of sugar. Bring to a simmer over medium heat.
- Thicken: Once simmering, whisk in the cornstarch slurry. Continue to whisk constantly for 1-2 minutes as the mixture thickens and becomes clear.
- Finish Filling: Remove the pan from the heat. Stir in the drained cherries, 2 tablespoons of the Kirsch, and the pinch of salt.
- Cool Completely: Transfer the cherry filling to a bowl and let it cool to room temperature, then chill it in the refrigerator until completely cold. This can be made a day ahead.
Part 3: The Assembly & Frosting
- Make Chocolate Shavings: The easiest way? Gently run a vegetable peeler along the edges of your room-temperature bittersweet chocolate bar. This creates beautiful, rustic curls and shavings. Set them aside in a cool place.
- Whip the Cream: Make sure your cream is very cold. Place the 4 cups of heavy whipping cream, the 1/2 cup of sifted powdered sugar, and the vanilla in a large, chilled bowl (or the bowl of a stand mixer). Beat on medium-high speed until stiff peaks form. Stiff peaks mean that when you lift the beater, the peak holds its shape completely. This is key for a stable frosting.
- Prep the Syrup: In a small bowl, combine the remaining 2 tablespoons of Kirsch with 2 tablespoons of your reserved cherry juice (if you have any left) or water.
- Level and Soak (Layer 1): Place one of your cooled cake layers on your serving platter or cake stand. If the tops are domed, use a serrated knife to level them. Generously brush the layer with the Kirsch syrup.
- Build the “Dam”: Transfer about 1 1/2 cups of your whipped cream to a piping bag (or just use a spatula). Pipe a thick ring, or “dam,” of whipped cream around the very edge of the cake layer. This is a crucial step! It holds the cherry filling in.
- Fill (Layer 1): Spoon half of the cold cherry filling inside the whipped cream dam and spread it evenly.
- Layer 2: Place the second cake layer on top. Gently press it down. Brush this layer with the Kirsch syrup. Pipe another dam of whipped cream and fill it with the remaining cherry filling.
- Layer 3 & Crumb Coat: Place the final cake layer on top. Brush it with the last of the syrup. Now, cover the entire cake—top and sides—with a very thin layer of whipped cream. This is your “crumb coat,” and it locks in all the crumbs.
- Chill the Cake: Place the crumb-coated cake in the refrigerator for at least 30 minutes (or 15 in the freezer). This makes the final frosting so much cleaner.
- Final Frosting: Cover the chilled cake with the remaining whipped cream, smoothing the top and sides with an offset spatula. It doesn’t have to be perfectly smooth, as you’re about to cover it!
- Decorate: Gently press the chocolate shavings onto the sides of the cake. This is a messy but fun part! Just scoop up handfuls and press them against the cream.
- Garnish: Transfer any remaining whipped cream to a piping bag fitted with a star tip. Pipe 12-15 rosettes around the top edge of the cake. Top each rosette with a fresh cherry.
My Top Tips for Success
- Cold is King: I can’t say this enough. Your cakes must be cold, your filling must be cold, and your heavy cream must be very cold. A warm component will melt your whipped cream into a soupy mess.
- Dutch-Processed Cocoa: This cocoa is less acidic and has a darker color and smoother, deeper chocolate flavor. It’s what gives a Black Forest cake its signature dark, almost-black appearance.
- The Cream Dam: I mentioned it in the instructions, but it’s the most important trick. That little wall of whipped cream is the only thing stopping the cherry filling from oozing out the sides and turning your frosting pink.
- Stiff Peaks. Really! When you’re whipping the cream, you want it to be firm and stable, not soft and pillowy. It needs to hold up the weight of the cake layers and the chocolate. Beat it until it looks thick and is almost, but not quite, on its way to turning into butter.
- Don’t Use Cherry Pie Filling: This is a big one. Canned pie filling is overly sweet, goopy, and has a very artificial flavor. Using canned tart cherries in water allows you to control the sweetness and texture.
Swaps and Variations
- Non-Alcoholic Version: The Kirsch is traditional, but you can absolutely make a delicious cake without it. For the filling, just omit it. For the syrup soak, you can use the reserved cherry juice, or even a bit of apple cider. Some people add 1/2 tsp of almond extract to the filling to get that “cherry-pit” flavor, but I prefer it without.
- Gluten-Free: This cake works well with a high-quality 1-to-1 gluten-free baking flour blend.
- Frozen Cherries: If you can’t find canned tart cherries, 1 lb of frozen, pitted, tart cherries will work. Just thaw them, reserve any juice they release, and add water to get to the 1 cup of juice needed for the filling.
- Boxed Cake Mix: If you’re really in a pinch, you can use a high-quality dark chocolate or devil’s food cake mix. I recommend replacing the water in the box instructions with hot coffee to get that deep flavor.
Common Pitfalls (and How to Avoid Them)
- My Whipped Cream Collapsed! This usually means one of three things: 1) Your cream wasn’t cold enough, 2) You didn’t beat it to stiff peaks, or 3) You tried to frost a warm cake.
- My Filling is Leaking! You forgot the whipped cream dam. That’s it. That’s the whole reason.
- My Cake is Dry! You either slightly over-baked it (use the toothpick test!) or you skipped the syrup soak. That soak is essential for moisture and flavor.
- My Cake is Gummy: You over-mixed the batter. When you combine the wet and dry, mix just until the flour disappears.
How to Serve This Beauty
This cake must be served chilled, straight from the refrigerator. The contrast of the cold cream and juicy cherries is part of the experience.
To get clean, beautiful slices:
- Use a tall, sharp knife (like a chef’s knife).
- Fill a tall pitcher with hot water.
- Dip the knife in the hot water, wipe it clean with a towel, and make one slice.
- Repeat for every single slice. Dip, wipe, slice. This melts any frosting on the blade and gives you perfect, pastry-shop-clean slices every time.
This cake needs nothing else, but it’s lovely with a strong cup of coffee or espresso to cut the richness.
Storing Your Cake
This cake must be stored in the refrigerator because of the whipped cream. It will keep, covered in a cake carrier or box, for up to 3-4 days. It actually gets better on Day 2, as the syrup soaks in and all the flavors meld together.
You can also freeze slices. Place them on a baking sheet to freeze solid, then wrap each slice tightly in plastic wrap and store in a freezer bag. Let them thaw in the fridge.
Your Cake Questions, Answered
Is Kirsch really necessary? For it to be a traditional Black Forest Gateau, yes. The name in German (Schwarzwälder Kirschtorte) means “Black Forest Cherry-Torte,” and that “Kirsch” (cherry brandy) flavor is essential. But if you’re making it for kids or prefer not to use alcohol, the non-alcoholic version is still incredibly delicious.
Why is my batter so thin? It’s supposed to be! The hot coffee and oil (instead of butter) create a very liquid batter. This is what results in the light, springy, and super-moist sponge. Trust the process!
Can I make this in two 9-inch pans? You can. The layers will be thinner, and you’ll need to reduce the baking time by 5-10 minutes. Honestly, the three 8-inch layers give you that classic, tall, impressive look and a much better ratio of cake-to-filling.
A Labor of Love (and So Worth It)
This isn’t just a recipe; it’s a project. It’s a wonderful, rewarding way to spend an afternoon. When you pull this out of the fridge, you’re not just serving dessert—you’re serving a masterpiece that you made.
It’s a true celebration cake, and I hope you have so much fun making it. The moment you take that first bite—the dark chocolate, the tart cherries, the light-as-air cream—you’ll know that every single step was worth it.
A Quick Summary
This classic Black Forest Gateau recipe guides you step-by-step to create a showstopping dessert. It features three layers of moist, dark chocolate cake soaked in a cherry syrup, filled with a homemade tart cherry filling, and frosted with a mountain of light, stable whipped cream. The cake is decorated with dark chocolate shavings and fresh cherries for that iconic, elegant, bakery-quality finish.
If you make this Black Forest Gateau, I would be so happy to see it! It’s a true labor of love. Tag me on [Your Social Media Handle] or share a photo. And if you loved it, please share this post on Pinterest! It helps other bakers find the courage to tackle this amazing cake. Happy baking!