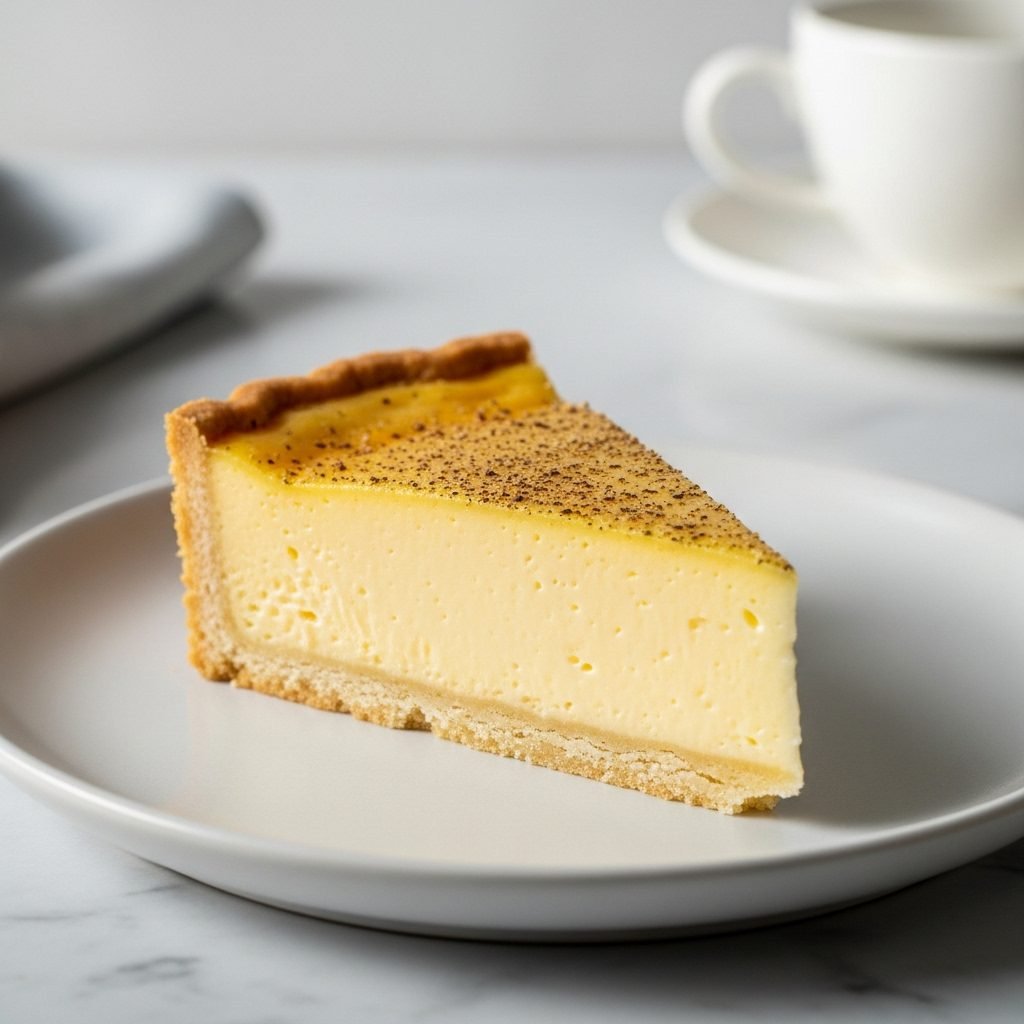
That Wobbly, Glass-Smooth Center: A Foolproof Guide to the Classic Custard Tart
In a world full of over-the-top, multi-layered, sprinkle-covered desserts, there is a quiet, confident elegance to a classic custard tart. It’s the kind of dessert you’d see sitting in the window of a high-end French pâtisserie—simple, unassuming, and absolutely flawless.
And I’m here to tell you that you can 100% make this at home.
The magic of a custard tart is all about two things:
- The Crust: A crisp, buttery, cookie-like shortcrust that snaps when you bite into it.
- The Filling: An unbelievably smooth, rich, and creamy baked custard, scented with real vanilla and finished with a dusting of warm nutmeg.
When you get it right, the contrast is just incredible. The filling is so delicate it wobbles when you move the plate, and the top is a perfect, glass-smooth, pale-yellow surface. It’s a bake that feels both humble and luxurious, and it’s one of my all-time favorites. It’s a project, yes, but every step is simple and so, so worth it.
Why You’ll Adore This Recipe
- The Flavor: Pure, clean, and classic. It’s all about rich cream, egg yolks, and real vanilla, with a buttery base and a hint of spice. It’s sweet, but not at all cloying.
- The Texture: This is the star of the show. The melt-in-your-mouth, crisp-yet-tender crust against the silky, just-set, wobbly center is a true delight.
- Difficulty: I’ll call this easy-medium. Not because any step is hard, but because it requires patience. You can’t rush the chilling or the baking. If you follow the steps, you’ll nail it.
- The “Wow” Factor: This tart isn’t flashy, but its perfection is the “wow.” Serving a slice with that clean, wobbly center makes you look like a pastry pro.
What You’ll Need for Your Tart
This recipe uses simple, high-quality ingredients. This is the time to break out your good vanilla!
For the Sweet Shortcrust Pastry:
- 1 ½ cups (190g) all-purpose flour
- ⅓ cup (40g) powdered sugar
- ½ tsp salt
- ½ cup (1 stick or 113g) very cold unsalted butter, cut into small cubes
- 1 large egg yolk
- 2-3 tbsp ice cold water
For the Silky Custard Filling:
- 1 ½ cups heavy cream
- ½ cup whole milk
- 1 whole vanilla bean (or 2 tsp pure vanilla bean paste or 1 tbsp vanilla extract)
- 5 large egg yolks
- 1 large whole egg
- ½ cup (100g) granulated sugar
- ¼ tsp salt
- Freshly grated nutmeg, for the top
Special Equipment:
- A 9-inch round tart pan with a removable bottom. This is really the key to getting that professional look.
- Pie weights (or about 2 lbs of dried beans or uncooked rice)
- A fine-mesh sieve (non-negotiable for a smooth custard!)
Let’s Bake This, Step-by-Step
I’ve broken this down into three main parts: making the crust, blind baking the crust (the most important part!), and making the filling.
Part 1: The Sweet Shortcrust
You can do this in a food processor (easier) or by hand.
- Mix Dry: In the bowl of a food processor, add the all-purpose flour, powdered sugar, and salt. Pulse 2-3 times to combine.
- Add Butter: Scatter the cold butter cubes over the flour. Pulse about 10-12 times, until the butter is the size of small peas.
- Add Wet: In a tiny bowl, whisk the egg yolk and 2 tablespoons of ice water. Pour this over the flour-butter mixture. Pulse just until the dough starts to clump together. It should still look crumbly, but if you squeeze a piece, it should hold its shape. If it’s too dry, add the last tablespoon of ice water and pulse 1-2 more times.
- Form & Chill (First Chill): Dump the dough onto a piece of plastic wrap. Use the wrap to press the dough together into a flat 1-inch thick disc. Don’t knead it! Just press. Wrap it tightly and chill in the refrigerator for at least 1 hour, or up to 2 days.
Part 2: Blind Bake the Tart Shell (The Secret to a Crisp Crust!)
- Prep: Preheat your oven to 375°F (190°C). Have your tart pan ready.
- Roll Out: Let the chilled dough sit at room temp for 5-10 minutes. On a lightly floured counter, roll the dough out into a 12-inch circle.
- Fit the Pan: Gently transfer the dough to your 9-inch tart pan. (I like to roll it over my rolling pin and unroll it over the pan). Ease the dough into the bottom and up the fluted sides. Don’t stretch it! Press it gently into the corners.
- Trim: Roll your rolling pin over the sharp top edge of the tart pan. This will give you a perfect, clean cut. (Save the scraps for a little cookie!).
- Prick & Chill (Second Chill): Prick the bottom of the tart shell all over with a fork. Place the entire pan in the freezer for 30 minutes. This is the secret to preventing the crust from shrinking down the sides.
- Bake #1 (With Weights): Take the frozen tart shell, line it with a crumpled piece of parchment paper (crumpling helps it fit in the corners), and fill it all the way to the top with pie weights or dried beans. Bake for 20 minutes.
- Bake #2 (Without Weights): Carefully remove the pan. Lift out the parchment and the weights. The crust will look pale. Place the empty tart shell back in the oven and bake for another 10-15 minutes, until the bottom is dry and a very pale golden color.
- The Egg Wash Seal (Pro Tip!): In a small bowl, whisk 1 egg yolk with 1 tsp of water. Brush this thin layer all over the bottom and sides of the hot tart shell. Put it back in the oven for 2-3 more minutes. This creates a waterproof “seal” that keeps your custard from seeping in!
- Cool: Set the baked shell on a wire rack to cool slightly. Lower your oven temperature to 325°F (165°C).
Part 3: The Silky Custard & Final Bake
- Infuse Milk: In a medium saucepan, combine the heavy cream and whole milk. If using a vanilla bean, split it lengthwise, scrape the seeds into the cream, and drop the pod in, too.
- Warm: Heat the cream mixture over medium-low heat just until it’s scalding (steaming, with tiny bubbles forming around the edge). Don’t let it boil! Turn off the heat and let it steep for 15 minutes. (If using extract or paste, add it in the next step).
- Whisk Eggs: In a large bowl, whisk the 5 egg yolks, 1 whole egg, granulated sugar, and salt. Whisk just until combined—you don’t want to add a lot of air or bubbles. (If using vanilla extract/paste, whisk it in here).
- Temper the Eggs: This is the key. Remove the vanilla pod from the warm cream. Now, very slowly, pour the warm cream into the egg-sugar mixture while whisking the eggs constantly. Start with just a tiny drizzle, then add more. This gently raises the temperature of the eggs without scrambling them.
- STRAIN! This is the most important tip for a smooth custard. Pour the entire custard mixture through a fine-mesh sieve into a large liquid measuring cup or another bowl. This catches any tiny bits of cooked egg or bubbles.
- Fill & Bake: Place your warm, blind-baked tart shell (still in its pan) on a baking sheet. Carefully pour the strained custard into the shell, right to the top.
- Nutmeg: Carefully grate a light, even layer of fresh nutmeg over the entire surface.
- Bake: Very carefully slide the baking sheet into the 325°F oven. Bake for 30-40 minutes.
- The Wobble Test: The tart is done when the edges are set, but the center 2-3 inches still has a distinct wobble (like Jell-O or set yogurt). It will not look solid. It will set up completely as it cools. Do not over-bake!
- Cool: Let the tart cool completely in its pan on a wire rack (at least 2 hours). Then, refrigerate it for at least 4 hours or overnight. It must be fully chilled to set.
My Top Tips for a Flawless Tart
- Patience with the Crust: I can’t say it enough: The two chills are non-negotiable. The 1-hour fridge chill relaxes the gluten (for a tender crust) and the 30-minute freezer chill prevents it from slumping (for pretty, straight sides).
- Don’t Whisk Air into the Custard: When you mix your eggs and sugar, and when you temper in the cream, whisk gently. You’re combining, not whipping. Excess air creates bubbles and a foamy texture.
- Strain, Strain, Strain: Seriously, don’t skip straining the custard. It’s the 10-second step that guarantees a silky, glass-like finish.
- Trust the Wobble: The #1 mistake is over-baking. A custard tart baked until “firm” in the oven will be rubbery and cracked when it cools. You must pull it from the oven when it still has that signature wobble.
Substitutions & Variations
- Gluten-Free: Swap the all-purpose flour in the crust for a good 1-to-1 gluten-free baking blend (the kind with xanthan gum).
- Dairy-Free: This is trickier. You can try a high-quality, full-fat canned coconut milk for the filling and a plant-based butter stick for the crust, but the flavor will be distinctly “coconut,” not classic custard.
- Flavor Twists: Infuse the cream with other things! A few strips of lemon or orange zest, 2-3 crushed cardamom pods, or a cinnamon stick would all be lovely. Just strain them out with the vanilla pod.
Common Custard Tart Problems (And How to Fix Them)
- “My crust is soggy!”
- Problem: You didn’t blind-bake long enough, or your oven wasn’t hot enough.
- Fix: You need that “Bake #2” step where the empty shell gets dry and pale golden. And the egg-yolk “seal” is your best friend!
- “My custard is lumpy or bubbly!”
- Problem: You either scrambled the eggs during tempering or you didn’t strain the custard.
- Fix: Temper slowly (slower than you think!) and always strain the final mixture.
- “My custard cracked!”
- Problem: You over-baked it. Period.
- Fix: Next time, pull it earlier. Remember: Wobble is your friend. A cracked tart will still taste great, it just won’t be as pretty.
- “My crust shriveled down the sides!”
- Problem: You stretched the dough when fitting it, or you skipped the 30-minute freezer chill.
- Fix: Ease, don’t stretch, the dough into the pan. And that freezer time is magic.
How to Serve Your Custard Tart
This tart needs very little. It is designed to be served chilled, straight from the refrigerator.
- Carefully push up the removable bottom of the tart pan and slide the tart onto a serving plate.
- Slice with a very sharp, clean knife. (I like to dip the knife in hot water and wipe it dry between each slice for an extra-clean cut).
- A few fresh raspberries or blueberries on the side are the perfect acidic contrast to the rich cream.
- It’s also… not surprisingly… wonderful with a cup of tea or coffee.
Storage
- Your custard tart must be stored in the refrigerator. Cover it lightly with plastic wrap (I try to “tent” it so it doesn’t touch the top) or in a cake carrier.
- It will last for 3-4 days in the fridge.
- Heads up: The crust will slowly soften as it sits in the fridge, as it absorbs moisture from the custard. It’s unavoidable. That’s why it’s at its crispest on day 1.
- Do not freeze this tart. The custard’s texture will be completely ruined when it thaws.
Your Custard Tart Questions
- What’s the difference between this and a Portuguese Custard Tart? Portuguese tarts (pastéis de nata) are very different! They’re made in individual muffin tins, use a flaky puff-pastry-style dough, and the custard is caramelized (or even scorched) on top. This is a large-format tart with a shortcrust and a delicately-set, non-caramelized filling.
- Can I use a store-bought crust? You can, but it won’t be the same. You’d need a shortbread crust, not a flaky pie crust. You would still need to fully blind-bake it.
- My custard looks… green? Don’t panic! This sometimes happens. It’s a harmless chemical reaction between the sulfur in the egg yolks and iron in the cream. It doesn’t affect the taste, but you can avoid it by making sure you’re not using an aluminum bowl or whisk.
The Sweet Reward of Patience
This tart isn’t a 30-minute dessert, but it’s a deeply rewarding one. It’s an exercise in trusting the process. When you chill the dough, you’re rewarded with a crust that doesn’t shrink. When you blind-bake, you get a crisp bottom. When you strain the custard, you get a silky top. And when you pull it from the oven with the wobble, you’re rewarded with the most delicate, creamy slice of heaven.
I hope you’ll set aside an afternoon and give this a try. It’s a bake that will make you feel incredibly accomplished.
Recipe Summary
This classic custard tart recipe guides you through creating a crisp, buttery, cookie-like shortcrust shell, sealing it, and filling it with a rich, unbelievably smooth baked custard. Scented with vanilla and nutmeg, the key to this tart is patience: proper chilling, thorough blind-baking, and pulling it from the oven while the center still has a distinct wobble.
Did You Make This?
I would be so excited to see your beautiful, wobbly tart! If you make this, please tag me on social media [Your Social Handle Here] or leave a comment below. And if you loved it, I’d be so grateful if you’d Pin this recipe to share it!
Happy baking!