That Rustic, Crustless ‘Cheesecake’ Tart You’ve Never Heard Of (Queijadas Recipe)
Let’s talk about the other Portuguese tarts.
I know, I know. When I say “Portuguese tart,” your mind instantly goes to the glorious, flaky, blistered-top Pastéis de Nata. And for good reason! They are a world-class dessert.
But today, I want to introduce you to their rustic, humble, and incredibly charming cousin: the Queijada.
Pronounced “kay-zhah-dah,” these little treats are a whole different experience. They’re often called “Portuguese cheese tarts,” but I need you to forget everything you know about American cheesecake. This is not a creamy, smooth, dense slice of rich cream cheese.
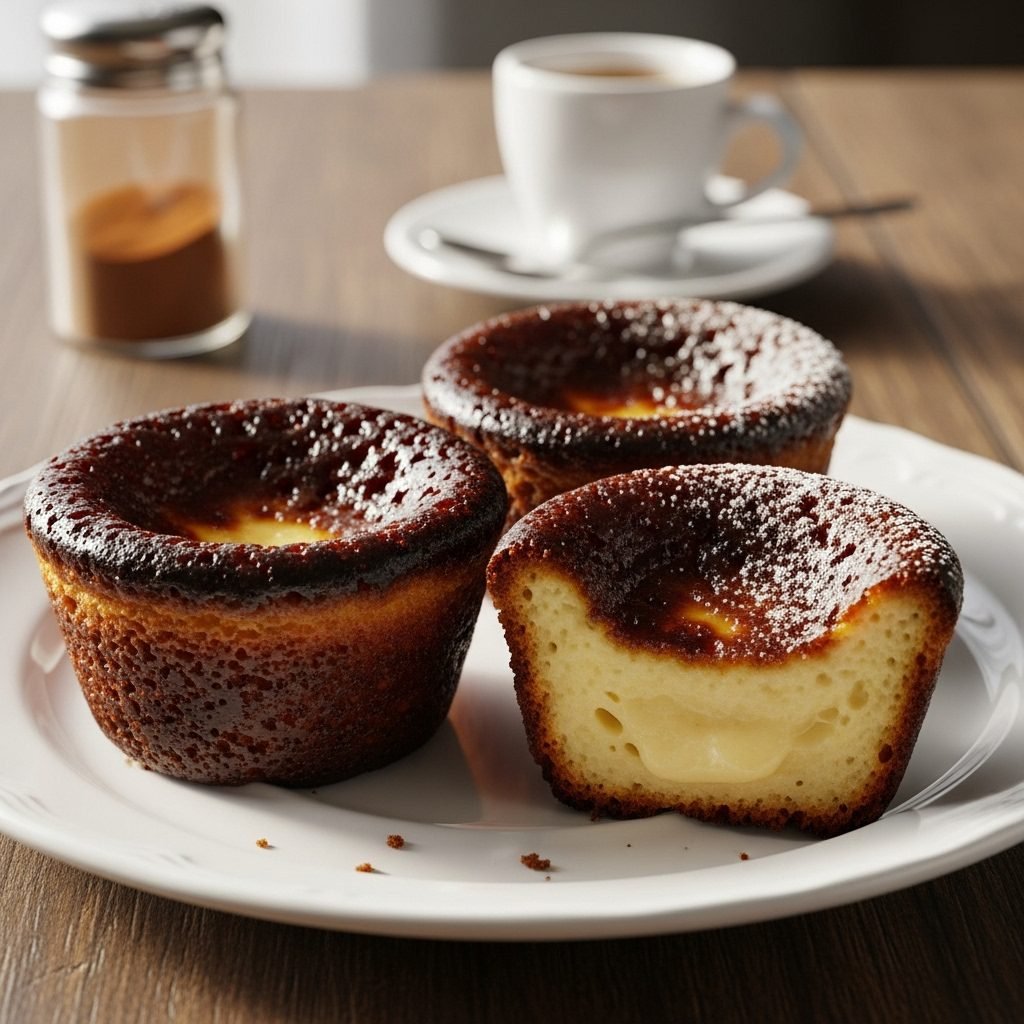
A queijada is a small, crustless tart baked in a muffin tin. It’s made with cheese (queijo means cheese), eggs, sugar, a tiny bit of flour, and a whisper of cinnamon. The magic is in the texture. It’s light yet rich, slightly spongy, a little bit chewy, and “curdy” in the most wonderful way.
The real secret? A hot oven and a well-prepared pan. They bake up with dark, deeply caramelized edges and a sunken, rustic top. They’re sweet, a little tangy from the cheese, and they make your whole house smell like a seaside Portuguese bakery.
Why You’ll Be Obsessed With These
This is one of those wonderfully unique, “secret” recipes that will stun your friends. Here’s a peek at what makes them so special:
- The Flavor: It’s a beautiful, rustic harmony. You get the sweet, caramelized sugar, a warm kiss of cinnamon, and a subtle, savory-sweet tang from the cheese (we’re using ricotta!). It’s not a “cheesy” flavor, but a rich, cultured one.
- The Texture: This is the whole reason to make them. The outside edges are chewy and caramelized from the sugar-coated pan. The inside is moist, tender, and has a unique, slightly open, curdy-spongy texture. It’s unlike any other dessert I know.
- The Time: This is a “hurry up and wait” recipe. The active prep time is literally 10-15 minutes. It’s all just mixing in one bowl. The bake is about 25-30 minutes, and then you have to wait for them to cool (which is the hardest part!).
- The Difficulty: This is a true “easy” level bake. If you can whisk things in a bowl and generously butter a muffin tin, you can make these. The “hardest” part is just being brave enough to let them get dark in the oven.
What You’ll Need
This recipe uses incredibly simple, humble ingredients to create something magical.
- 1 1/2 cups (15 oz) full-fat ricotta cheese (This is our stand-in for traditional Portuguese queijo fresco)
- 1 cup granulated sugar
- 2 large eggs, at room temperature
- 2 large egg yolks, at room temperature (This adds richness!)
- 1/4 cup (1/2 stick) unsalted butter, melted and cooled slightly
- 1/4 cup all-purpose flour
- 1 tsp ground cinnamon (Don’t skip this, it’s key!)
- 1/4 tsp salt
For the Pan (The “Crust”):
- 2 tbsp very soft, spreadable unsalted butter
- 1/4 cup granulated sugar
How to Make Queijadas, Step by Step
Ready? The whole secret is in the pan and in the cooling.
Step 1: The All-Important Pan Prep
This step is the crust. This is what creates that crackly, caramelized, non-stick shell. Do not skip this, and don’t be stingy.
- Preheat your oven to 400°F.
- Get a standard 12-cup muffin tin.
- Take your 2 tbsp of very soft butter and, using your fingers or a pastry brush, generously grease every single cup. Get into all the corners, all the way up the sides.
- Spoon about 1 tsp of the 1/4 cup of sugar into each muffin cup.
- Now, tilt and tap the pan, rolling the sugar around to coat the bottom and sides of each cup, just like you’d flour a cake pan. Tap out any excess (but you want a good, thick coating).
Step 2: Make the 10-Minute Batter
This is genuinely a one-bowl, “dump and mix” affair.
- In a large bowl, add the ricotta, 1 cup of granulated sugar, the 2 whole eggs, and the 2 egg yolks. Whisk by hand until it’s well-combined. It’s okay if the ricotta is still a bit lumpy.
- Pour in the cooled, melted butter and whisk to combine.
- Add the all-purpose flour, cinnamon, and salt. Whisk just until no dry streaks of flour remain. Don’t over-mix! The batter will be relatively thin, like a pancake batter.
Step 3: Fill and Bake
- Pour or spoon the batter evenly into your 12 prepared muffin cups. They should be filled about 3/4 of the way to the top.
- Bake at 400°F for 20-25 minutes.
Step 4: The Bake (Don’t Be Scared of the Dark!)
This is where the magic happens. At around 15 minutes, they will puff up dramatically, like little soufflés. Don’t take them out. You want to bake them until they are puffed, deeply browned on top, and the edges are a dark, caramelized brown. You’re looking for color that’s way past “golden”—you want “mahogany.” This dark color is all that caramelized sugar. This is the flavor.
Step 5: The Cooling (The Most Important Step!)
- Remove the pan from the oven. They will be impressively puffed.
- Place the pan on a wire rack and walk away.
- As they cool, they will dramatically sink and deflate in the center. This is normal! This is what they are supposed to do. This sinking is what creates that signature dense, rustic, chewy-custardy texture.
- Let them cool in the pan for at least 30-40 minutes. I know. It’s torture. But if you try to remove them while they’re hot, the caramelized sugar will be sticky, and they will tear and be a complete mess.
- As they cool, the sugar “crust” will release from the pan. After 30-40 minutes, you should be able to use a small offset spatula or a butter knife to gently pop one out.
My Top Tips for Perfect Queijadas
- That Pan Prep, Again: I’m saying it a third time because it’s the only place this recipe can go wrong. Be so generous with that butter and sugar. It’s the difference between a beautiful, pop-out tart and a stuck, sad mess.
- Drain Your Ricotta (If You Need To): If you open your container and there’s a lot of watery whey, drain it off. Or, dump the ricotta into a cheesecloth-lined sieve over a bowl for 30 minutes. You want thick, full-fat ricotta.
- Embrace the Sink: If your tarts come out of the oven and stay puffed up, something is wrong. The dramatic deflate is the sign of success! It means the inside is setting into that perfect, rustic texture.
- Patience is Your Virtue: Seriously, do not try to get them out of the pan hot. The molten sugar will stick to the pan and rip the bottoms off your tarts. Let them cool, let the sugar re-harden, and they will release beautifully.
Swaps and Variations
- The Cheese: We’re using ricotta as an easy, high-quality substitute for Portuguese fresh cheese (queijo fresco). You could also use a food processor to blend full-fat cottage cheese until it’s perfectly smooth.
- The Flavor: These are a blank canvas. Add 1 tsp of finely grated lemon or orange zest to the batter for a bright, citrusy note. It’s a very common and delicious addition. You could also add 1/2 tsp of vanilla extract.
- Gluten-Free Queijadas: This is a perfect candidate! There’s so little flour. Just swap the 1/4 cup of all-purpose flour for your favorite 1-to-1 gluten-free baking blend.
Common Pitfalls (and How to Avoid Them)
- “They stuck to the pan!” You didn’t use enough butter and sugar in the pan prep. There is no such thing as “too much” here.
- “They tore apart when I took them out!” You tried to remove them while they were hot. You must let them cool.
- “Mine are pale, not dark and caramelized.” You were scared and you underbaked them! That deep, dark, almost-burnt edge is the flavor. Trust the process and let them get dark.
- “Mine aren’t creamy like cheesecake.” They aren’t supposed to be! They are Queijadas. They have a unique, wonderful, slightly-spongy, “curdy” texture. You have to meet them where they are.
How to Serve and Store These Little Gems
These are the perfect little “anytime” treat.
- Serving: They are best served at room temperature or even slightly chilled from the fridge. They are the perfect partner for a strong cup of coffee or an espresso.
- Garnishing: A simple dusting of powdered sugar or a little more ground cinnamon is a beautiful, traditional way to serve them.
- Storage: This is the best part. They get even better as they sit. Store them in an airtight container in the refrigerator for up to 5 days. The texture gets more dense and chewy, and the flavors really meld. They are a fantastic make-ahead dessert.
Your Queijada Questions, Answered
Are these the same as Pastéis de Nata (Portuguese Custard Tarts)? Nope! Not at all. Pastéis de Nata have a flaky puff pastry crust and are filled with a creamy egg-and-milk custard. Queijadas have no crust (just the sugar-pan “crust”) and are made with a rustic, cheesy, egg-based batter. Both are amazing, but they are totally different.
Are they… cheesy? Yes and no. You don’t bite into it and think “cheese.” You bite into it and think “rich, tangy, sweet, rustic.” The cheese provides a rich, savory-sweet background note, not an in-your-face cheese-pull.
Why did my tarts sink so much? They’re supposed to! It’s a chemical reaction. They’re leavened almost entirely by the eggs. The hot air in the oven makes them puff up, and as they cool, the air escapes, and the structure collapses in on itself to create that wonderful, dense, chewy texture. A sunken top is a sign of a perfect Queijada.
A Humble Little Taste of Portugal
I am so excited for you to try these. They are one of my favorite “secret weapon” bakes. They feel special and old-world, but they are one of the easiest, fastest things you can mix up.
They are the perfect example of how simple, humble ingredients—cheese, eggs, sugar, cinnamon—can be transformed into something truly magical. That first bite of the caramelized, crunchy-chewy edge and the tender, tangy center… it’s just so, so good.
A Quick Summary
This recipe for Portuguese Queijadas (rustic “cheese” tarts) guides you through making a unique, crustless dessert. A simple, one-bowl batter of ricotta, sugar, eggs, and cinnamon is baked in a muffin tin that’s been generously coated in butter and sugar. This creates a caramelized “crust.” The tarts puff in the oven, then dramatically sink as they cool, creating a signature dense, chewy, and tender-curdy texture.
If you make these Queijadas, I would be so thrilled to see them! I especially want to see those dark, caramelized tops. Tag me on [Your Social Media Handle] or share a photo. And if this recipe brought a little bit of rustic Portugal to your kitchen, please share this post on Pinterest!