The No-Fear Guide to Real Pistachio Macarons (That Actually Taste Like Pistachio)
Let’s talk about pistachio macarons.
If you’ve ever bought one from a bakery, you were probably enchanted by that pale-green shell. But when you took a bite, did it really taste like pistachio? Or did it just taste… sweet?
This is my biggest pet peeve. So many “pistachio” desserts are just almond-flavored and dyed green. We’re not doing that today.
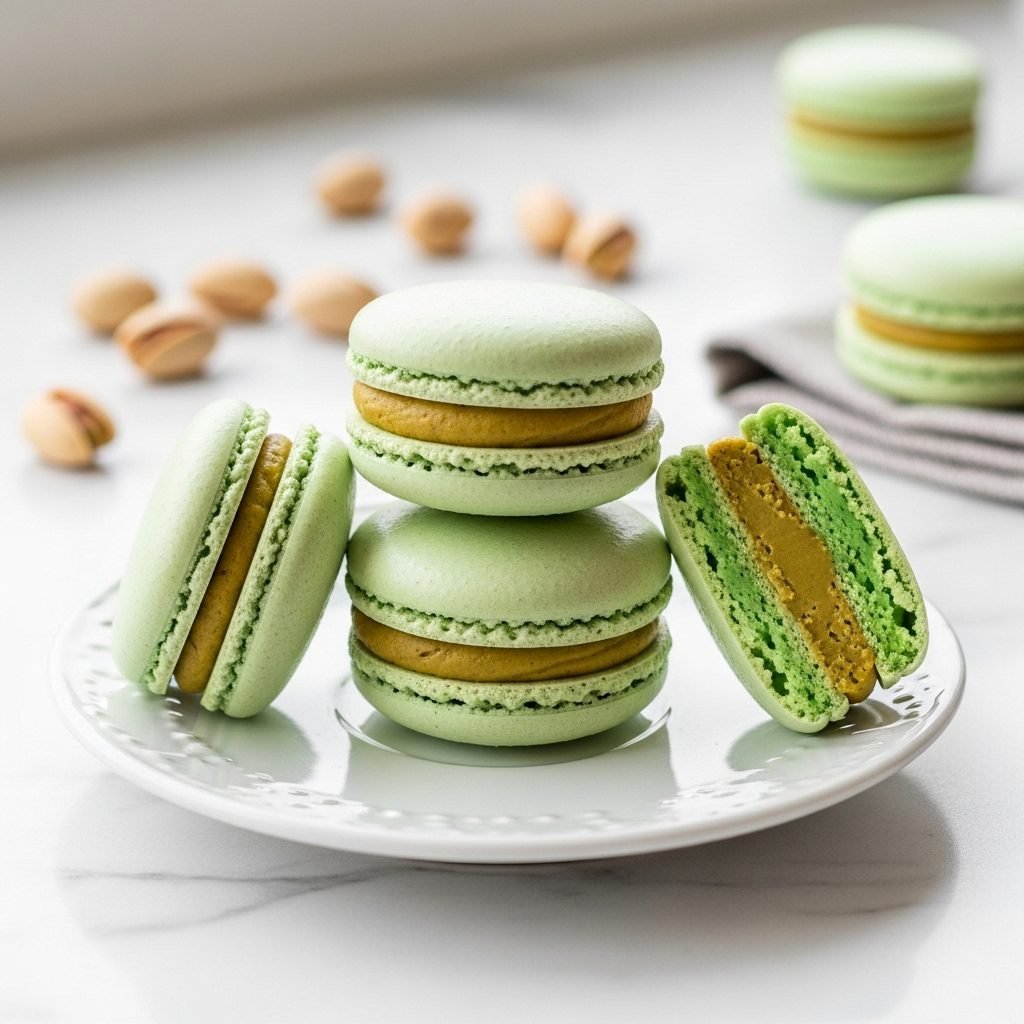
Today, we are making real pistachio macarons. This is a macaron where the shell is the perfect, crisp-chewy vehicle, but the filling is the absolute star—an unashamedly rich, nutty, and completely authentic pistachio buttercream.
And the shells? We’re going to make them together, and we’re going to conquer them. We’re using the Italian Meringue method.
If you’ve been scared off by macarons before (hollows, cracks, no “feet” – we’ve all been there), this method is your new best friend. It involves a hot sugar syrup that creates a meringue so stable, so strong, it’s practically bulletproof. It’s the secret to getting those full, gorgeous shells with the ruffly feet.
This is a “project bake,” so put on your favorite playlist, take a deep breath, and let’s make something amazing.
Why You Will Love This Recipe
- The Flavor: This is the #1 reason. The filling is packed with real pistachio paste, so the nuttiness is deep, complex, and undeniable. It’s balanced by the sweet, delicate, almond-flavored shell.
- The Texture: This is the macaron holy grail: a paper-thin, crisp “skin,” a light, airy shell, a slightly-chewy, full (not hollow!) center, and a rich, creamy filling.
- The Time: This is a weekend project. Be prepared to spend 2-3 hours in the kitchen, not including the crucial 24-hour “maturing” time.
- The Difficulty: I’ll be honest: this is an intermediate bake. But it’s not about “talent.” It’s about precision. We will use a kitchen scale, we will follow the steps, and we will win.
Your Ingredient Shopping List
This is the most important part! Macarons are 100% chemistry. We must use a kitchen scale. I’ve included cup measurements for reference, but I cannot guarantee success without a scale. Grams are the key.
For the Pistachio-Green Shells (Italian Meringue):
- 1 1/2 cups + 1 tbsp (150g) Almond Flour, finely ground
- 1 1/4 cups + 1 tbsp (150g) Powdered Sugar
- 2/3 cup (55g) Egg Whites, at room temperature (from 1-2 eggs)
- 2/3 cup (55g) Egg Whites, at room temperature (yes, a second 55g!)
- 3/4 cup + 2 tbsp (150g) Granulated Sugar
- 1/4 cup + 1 tbsp (60g) Water
- 1-2 drops Sage Green or Leaf Green Gel Food Coloring (NEVER liquid!)
For the Real Pistachio Buttercream Filling:
- 1 cup (2 sticks / 226g) Unsalted Butter, softened to room temperature
- 2 cups (240g) Powdered Sugar, sifted
- 1/2 cup (120g) Pistachio Paste (100% pure, unsweetened. This is the secret!)
- 1/4 tsp Almond Extract (This boosts the nutty flavor)
- 1/4 tsp Salt (A must for balancing sweetness)
- 1-2 tbsp Heavy Cream or Milk (to get the right consistency)
How to Make Real Pistachio Macarons, Step by Step
Read all the steps before you start. We’ll make this in three parts: Shells, Filling, and Assembly.
Part 1: The Pistachio-Green Shells
- Prep Your Station: Line two large baking sheets with parchment paper or silicone macaron mats. Get your stand mixer, a small heavy saucepan, and a digital thermometer ready.
- Sift Your Drys: Sift the 150g of almond flour and 150g of powdered sugar together into a large bowl. Whisk them to combine. This is your “tant pour tant.”
- Make the Slurry: In a separate, medium bowl, add your first portion of egg whites (55g). Add your sifted drys to these whites. Add 1-2 drops of green gel coloring. Mix with a stiff spatula until it forms a thick, stiff, green-colored paste. Set it aside.
- Start the Syrup: In your small saucepan, combine the 150g of granulated sugar and 60g of water. Swirl gently. Clip your thermometer to the side, making sure it’s in the liquid but not touching the bottom. Heat on medium.
- Prep the Meringue: Place your second portion of egg whites (55g) in the spotlessly clean, dry bowl of your stand mixer (fitted with the whisk).
- The “Transfer”: When the sugar syrup hits 230°F (110°C), turn your stand mixer on to medium-high speed to whip the whites.
- The “Drizzle”: Your goal is to have the whites at “soft peaks” (foamy, peaks just droop) right as your syrup hits 240-244°F (115-118°C).
- Once the syrup is at 240°F, turn the mixer to medium-low. Very carefully, pour the hot syrup in a thin, steady stream down the side of the bowl (don’t hit the whisk!).
- Whip to Cool: Once all the syrup is in, turn the mixer up to medium-high. Let it whip for 8-10 minutes. You are waiting for the meringue to become stiff, glossy, and—most importantly—for the outside of the bowl to be cool to the touch.
- The Macaronage: This is the folding step. Add about 1/3 of your stiff, glossy meringue to the green almond paste. Fold it in with a spatula to lighten it. Now, add the rest of the meringue.
- Fold, Fold, Fold: Fold by scraping around the bowl and pressing down through the middle. Turn the bowl a quarter turn, and repeat. You’re looking for the “lava” stage. The batter should fall from your spatula in a thick, continuous ribbon and “melt” back into the batter within 20 seconds. Stop as soon as you get here! It’s better to be slightly under-mixed.
- Pipe & Slam: Transfer the batter to a piping bag with a 1/2-inch round tip. Pipe 1.5-inch circles, holding the bag straight up and down. After piping a tray, pick it up and slam it hard on the counter 4-5 times to pop any air bubbles.
- Rest (The Skin): This is critical. Let the trays of piped shells rest at room temperature for 30-60 minutes. They’re ready to bake when you can gently touch the top and it’s dry and “tacky,” not sticky.
- Bake: Preheat your oven to 300°F (150°C). Bake one tray at a time on the center rack for 14-17 minutes. The shells are done when they don’t “wiggle” on their “feet.”
- Cool: Let the shells cool completely on the baking sheet before trying to remove them.
Part 2: The Real Pistachio Buttercream
- While your shells are cooling, make the filling. In the bowl of your stand mixer (or with a hand mixer), beat the 2 sticks of very soft butter on medium-high for 5 minutes, until it’s very pale and fluffy.
- Turn the mixer to low and sift in the 2 cups of powdered sugar, one cup at a time.
- Once the sugar is incorporated, turn the mixer to high and beat for 3-4 minutes.
- Add the 1/2 cup of pistachio paste, 1/4 tsp almond extract, and 1/4 tsp salt. Beat on medium until fully combined.
- Add 1 tbsp of heavy cream and beat. If it still feels too stiff, add the second tablespoon. You want a thick, creamy, pipe-able consistency.
Part 3: Assembly & Maturation (The Most Important Part!)
- Match up your cooled macaron shells by size.
- Transfer your pistachio buttercream to a piping bag. Pipe a generous “kiss” of filling onto the flat side of one shell.
- Gently press another shell on top, just until the filling comes to the edge.
- DO NOT EAT THEM. I’m serious! This is the secret.
- Place your filled, assembled macarons in an airtight container. Put them in the refrigerator for 24-48 hours. This is called “maturing.” The moisture from the filling will soften the inside of the shell, creating that perfect, chewy-crisp, melded texture.
My Top Tips for Pistachio Macarons
- WHAT IS PISTACHIO PASTE? This is the key. It is not pistachio pudding or pistachio-flavored syrup. It is 100% pure, ground-up pistachios, blended until it’s a smooth, oily paste (like natural peanut butter). You can buy it online (it’s often a muted, olive-green color, not bright green!)
- DIY PISTACHIO PASTE: If you can’t find it, make it! You’ll need about 1 cup of raw, unsalted, shelled pistachios. Blanch them, peel off the skins (this is tedious but gives a better color), toast them lightly, and then blend them in a high-powered food processor for… a long time. 10-15 minutes. It will go from crumbs, to a “clump,” to a smooth, natural butter.
- THE SCALE: I’m saying it again. If you use cups, you are gambling. If you use grams, you are baking.
- KNOW YOUR OVEN: An oven thermometer is your best friend. Most ovens are off by 10-25 degrees. 300°F is the sweet spot, but your 300°F might be 315°F.
Troubleshooting Your Macarons
- My Shells are CRACKED: You didn’t slam the pan hard enough to get the air bubbles out, OR you didn’t let them rest long enough to form a skin.
- My Shells are HOLLOW: This is the most common problem. It’s usually a meringue issue (not stiff enough) or your oven is too low. The Italian method is your best defense against this.
- My Shells have NO “FEET”: Your batter was over-mixed (the macaronage went too long), OR you didn’t let them rest.
- My Filling is too green/brown: Your pistachio paste is fine! The color of real pistachios is often a yellow-olive-green. The bright green in bakery items is almost always food coloring.
How to Serve and Store
- Serving: After your macarons have “matured” in the fridge for 24 hours, take them out. Let them sit at room temperature for 20-30 minutes before serving. This is the perfect texture. Serve with coffee or tea.
- Storage: Store your finished macarons in an airtight container in the refrigerator for up to 5 days.
- Freezing: Macarons freeze beautifully! You can freeze the unfilled shells, or the entire filled macaron. Place them in a single layer in an airtight container. They’ll keep for 3 months. Let them thaw in the fridge.
Pistachio Macaron FAQ
Can I use pistachio flour in the shells? I strongly advise against it. Pistachio flour (or just ground pistachios) adds a lot of oil and fat, which is the mortal enemy of meringue. It can cause your shells to fail. Stick with almond flour for the shell structure and let the filling provide the real pistachio flavor.
Do I have to use a stand mixer? For the Italian method, it’s almost a requirement. You need to be able to whip the eggs while simultaneously pouring 240°F syrup. A hand mixer is very difficult and dangerous to use for this.
My pistachio paste is really expensive! It is! It’s a high-quality, specialty ingredient. That’s why those macarons in the bakery are $4 each. This recipe is your chance to make two dozen of them for a fraction of the cost.
You’ve Got This!
This is a recipe to be proud of. It takes patience, it takes precision, but the reward is a truly high-end, professional-quality dessert that tastes real. You are not just making a “green” macaron; you are making a pistachio macaron.
A Quick Summary
This recipe guides you through making authentic, “no-fear” pistachio macarons using the stable Italian Meringue method for the shells. The pale-green, almond-flour shells are filled with a rich, nutty, homemade pistachio buttercream, which is the secret to their real pistachio flavor. The recipe emphasizes precision (using a kitchen scale) and the crucial 24-hour “maturing” step for the perfect crisp-chewy texture.
If you make these, you must show them off! You’ve earned it. Tag me on [Your Social Media Handle] or share a photo. And if this guide helped you conquer the macaron, please share it on Pinterest!