Like a Parisian Bakery: A No-Fear Guide to Delicate Rose Macarons
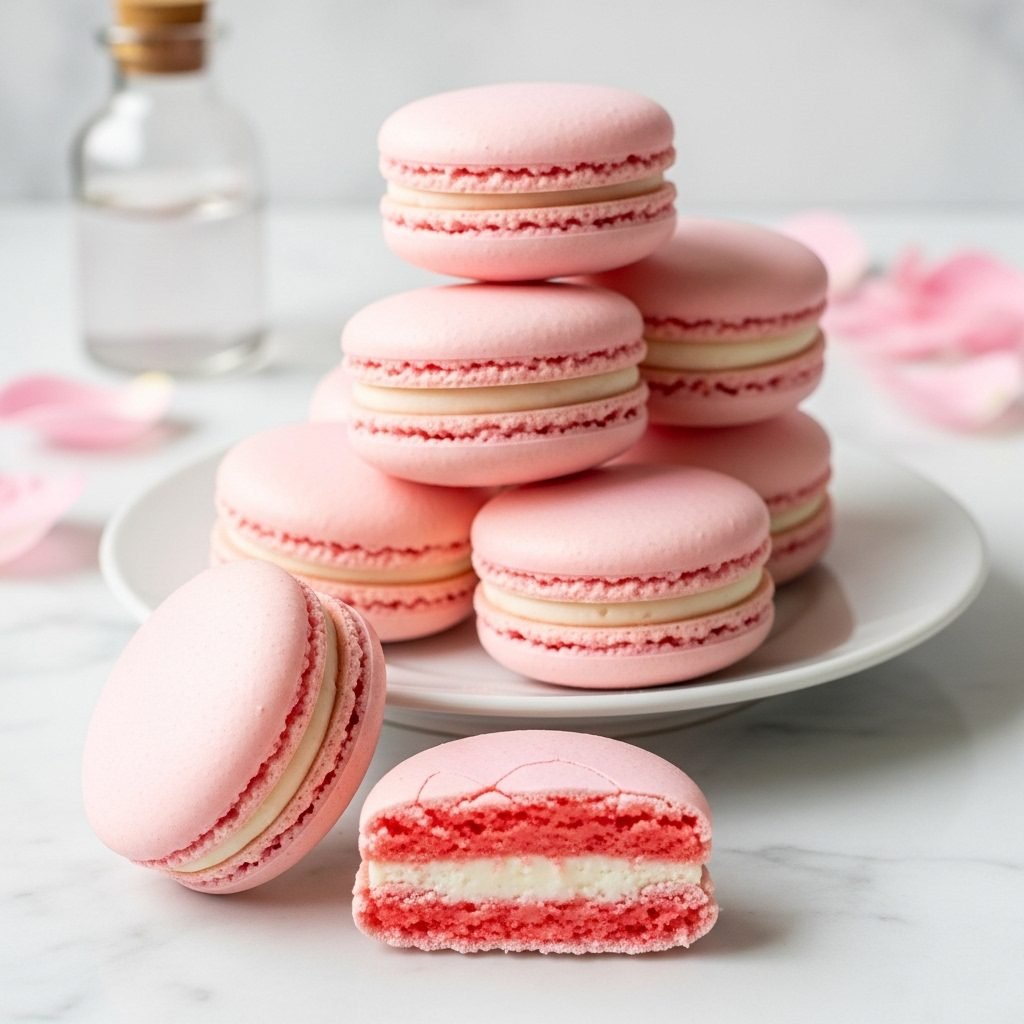
There is no cookie more elegant, more romantic, or more intimidating than a French macaron. And when you tint them a delicate shell-pink and fill them with a fragrant, floral rose ganache, they become something truly special. They are the epitome of high-end pâtisserie, the kind of treat you’d see stacked in a perfect, pastel pyramid in a Parisian shop window.
Let’s be honest: these cookies are famous for being finicky. They are a baking challenge. They demand precision, patience, and a willingness to follow instructions to the letter. But they are not magic, and they are not impossible.
This is your in-depth guide. We’re going to use the classic French meringue method (no fussy hot sugar syrups) and walk through every single critical step, from the sifting to the “macaronage” to the all-important maturation.
The goal? To help you bake a batch of stunning rose macarons with those signature shiny tops, a full set of “feet,” and a crisp-yet-chewy texture that sandwiches a creamy, floral, white chocolate ganache. You can do this. It’s a project, but the reward is so, so worth it.
What Makes These Macarons So Special
- The Flavor: A delicate, floral whisper of rose (not soapy or perfumey!) balanced by creamy white chocolate and the sweet, nutty almond shell.
- The Texture: A true masterpiece of contrasts. A paper-thin, crisp shell gives way to a satisfyingly chewy, moist interior, all held together by a rich, smooth ganache.
- Difficulty: This is an advanced recipe. It is not for a quick, casual bake. It’s a “read everything twice and use a kitchen scale” kind of recipe. But it is so rewarding!
- What’s Special: The flavor and color are pure elegance. They are a showstopper for a bridal shower, baby shower, Valentine’s Day, or any time you just want to feel fancy.
Ingredients You’ll Need (A Scale is Required!)
This is the most critical part of the recipe. Macarons are a science of ratios. Measuring by “cups” is notoriously inaccurate and the #1 reason for macaron failure. I’ve included cup measurements for reference, but I am strongly urging you to use the grams for success.
For the Rose White Chocolate Ganache (Make This First):
- 4 oz (113g) good-quality white chocolate (not chips!), finely chopped
- ⅓ cup (80ml) heavy cream
- 1 tsp food-grade rose water (start with less, you can add more)
For the Pink Macaron Shells:
- 1 ¼ cups (120g) super-fine almond flour
- ¾ cup (100g) powdered sugar
- 3 large egg whites (about 100g), at room temperature
- A pinch of cream of tartar
- ½ cup (100g) granulated sugar
- 1-2 drops of gel food coloring (pink)
The Step-by-Step Method to Macaron Success
Take this one section at a time. Read the entire section before you start it. This is a process, so don’t rush!
Part 1: Make the Rose Ganache (So It Can Chill)
- Place your finely chopped white chocolate in a medium, heat-proof bowl. White chocolate can be finicky, so chopping it small is key.
- Pour the heavy cream into a small saucepan. Heat it over medium-low heat just until it begins to simmer (tiny bubbles form around the edges). Do not let it boil.
- Pour the hot cream directly over the chopped white chocolate. Let it sit, untouched, for 5-7 minutes. This melts the chocolate gently.
- After it has rested, start stirring with a small whisk, beginning in the very center and working your way out. It will look separated at first, but keep stirring, and it will emulsify into a smooth, glossy ganache.
- Stir in 1 teaspoon of rose water. Taste it. If you want a stronger floral note, add one or two more drops. Remember, it will get stronger as it sits.
- Press a piece of plastic wrap directly onto the surface of the ganache (to prevent a “skin”) and place it in the refrigerator to chill and thicken for at least an- hour, or until it’s a “pipeable” consistency, similar to peanut butter.
Part 2: Prepare the Macaron Shells
- Prep Your Station: Line two large baking sheets with parchment paper. If you’re new to this, it helps to trace 1.5-inch circles on the underside of the parchment as a guide, leaving 2 inches between them. Set aside a large piping bag fitted with a ½-inch round tip.
- SIFT. SIFT. SIFT. This is the secret to smooth tops. Get a large bowl and a fine-mesh sieve. Add your almond flour and powdered sugar to the sieve. Sift them all together into the bowl.
- SIFT AGAIN. Yes, really. Discard any large almond lumps left in the sieve. Pour the sifted mixture back into the sieve and sift it a second time. This fine-flour-like texture is what gives you that glossy, professional finish. Set this dry mixture aside.
- Make the Meringue: Place your 100g of room-temperature egg whites in the spotlessly clean, 100% grease-free bowl of a stand mixer (or a large glass/metal bowl). Add the pinch of cream of tartar.
- Whip on medium-low speed until the whites are foamy (like a bubble bath).
- Turn the speed to medium. Start adding your 100g of granulated sugar, one tablespoon at a time, very slowly, waiting 20-30 seconds between additions. This slow addition is key to a stable, strong meringue.
- Once all the sugar is added, turn the mixer speed up to medium-high. Whip for 5-8 minutes, until the meringue is incredibly thick, glossy, and forms stiff peaks. This means when you pull the whisk out, a peak forms and stands straight up. It should not flop over. If you turn the bowl upside down, the meringue should not move at all.
- Add 1-2 drops of gel food coloring. (Liquid coloring adds too much moisture and can ruin your shells). Mix on high for 30 more seconds to fully incorporate the color. Remember it will lighten as it bakes.
Part 3: The “Macaronage” (The Most Important Step)
This is the process of folding the dry ingredients into the meringue. It’s where you get the “lava” consistency.
- Add about ⅓ of your sifted dry ingredients to the meringue. Using a spatula, gently fold them in. Use a “scrape and fold” motion—scrape around the edge of the bowl, then fold the batter over the top. Turn the bowl a quarter turn and repeat.
- Add the second ⅓ of the dry ingredients and continue to fold gently until it’s just combined.
- Add the final ⅓ of the dry ingredients. Now, your technique changes. Continue folding, but start to be a bit more “firm.” You are intentionally deflating some of the air. Start to press the batter against the side of the bowl with your spatula as you fold.
- The “Lava Test”: This is how you know it’s ready. Lift your spatula and let the batter fall back into the bowl. It should fall in a thick, continuous, “molten lava” ribbon, and you should be able to “draw” a figure-8 with the ribbon without it breaking.
- The “10-Second Test”: The ribbon of batter that fell into the bowl should slowly dissolve back into the surface in about 10-15 seconds.
- If it’s lumpy and doesn’t flow: It’s under-mixed. Fold a few more times.
- If it’s thin and watery: It’s over-mixed. Unfortunately, there is no saving it.
- As soon as you hit the “lava” stage, STOP.
Part 4: Piping, Whacking, and Resting
- Transfer your macaron batter to the prepared piping bag.
- Hold the bag straight up and down (perpendicular to the pan) and pipe your 1.5-inch circles. Stop squeezing just before the circle is full, and flick the tip of the bag in a “C” motion to finish.
- WHACK THE TRAYS. This is not a suggestion. Pick up one baking sheet and rap it hard on your counter 5-6 times. Rotate it and do it again. This forces any large, hidden air bubbles to the surface. (If you see any bubbles, pop them with a toothpick).
- THE REST. This is the second non-negotiable step. Let the trays of piped macarons sit at room temperature for 30-60 minutes (this can vary wildly based on humidity).
- The “Touch Test”: They are ready to bake when you can gently touch the top of a macaron, and it’s dry, matte, and not sticky. Your finger should come away clean. This dry “skin” is what forces the macaron to bake up and create “feet” (the ruffled bottom).
Part 5: Baking and Maturing
- While the shells rest, preheat your oven to 300°F (150°C). An oven thermometer is highly recommended, as most ovens are not accurate.
- Bake one tray at a time on the middle rack for 15-18 minutes.
- The “Wiggle Test”: They are done when the tops are firm and set. Gently nudge the top of one shell. If the “foot” wiggles or slides around, they need 1-2 more minutes. The top should be firm on its foot.
- Let the shells cool completely on the baking sheet before you even think about peeling them off the parchment.
Part 6: Assembly and Maturation (The Final Secret)
- Gently peel your cooled shells off the parchment. Match them up into pairs by size.
- Transfer your chilled, thickened ganache to a piping bag. Pipe a dollop of ganache onto the flat side of one shell. Gently press a second shell on top, twisting slightly to spread the ganache to the edge.
- THE MOST IMPORTANT STEP FOR TEXTURE: Place your filled macarons in an airtight container and put them in the refrigerator for 24 hours. This is called “maturing.” The ganache’s moisture softens the inner shell, transforming it from “crispy” to “chewy.” Do not skip this.
My Top Tips for Macaron Success
- USE A SCALE. I’m saying it again. This is a 1:1 ratio of egg whites to granulated sugar, and roughly a 1.2:1 ratio of almond flour to egg whites. Cups will not work.
- SIFT. SIFT. SIFT. This is the secret to those smooth, glossy tops.
- A SPOTLESS BOWL. Any fat (yolk, grease) will kill your meringue. Wipe your bowl and whisk with white vinegar to be 100% sure.
- RESPECT THE MACARONAGE. Watch a video of it if you need to. It’s a “feel” you will learn. Under-mixed is better than over-mixed.
- THE WHACK & REST. Mandatory. These two steps release air and form the skin that creates the feet.
- KNOW THY OVEN. An oven thermometer is your best friend. Most home ovens are lying about their temperature.
- PATIENCE. Do not take them off the pan hot. Do not eat them right away. Let them cool. Let them mature.
Substitutions & Dietary Options
- Almond Flour: You must use super-fine, blanched almond flour. Do not use “almond meal.”
- Cream of Tartar: You can substitute 1 tsp of white vinegar or lemon juice for the pinch of cream of tartar. It’s just a stabilizer.
- Gluten-Free: This recipe is naturally 100% gluten-free!
- Dairy-Free: The shells are dairy-free. For the ganache, use a high-quality dairy-free white chocolate and substitute the heavy cream with an equal amount of full-fat canned coconut cream (the thick white part only).
- Rose Water: Make sure you use food-grade rose water. Rose extract is much stronger; if you use it, start with just 1/8 of a teaspoon.
Common Mistakes to Avoid (A Troubleshooting Guide)
- Why do my macarons have NO “FEET”?
- Your batter was over-mixed (too thin), or you didn’t let them rest long enough to form a dry skin.
- Why did my macarons CRACK on top?
- Your batter was under-mixed (too thick), you didn’t “whack” the air bubbles out, or your oven was too hot.
- Why are my macarons HOLLOW?
- Your meringue was under-whipped (not stiff enough), your oven was too low, or you over-mixed the batter.
- Why did my shells turn splotchy or brown?
- Your oven was too hot. The pink color is delicate. Or, you used liquid food coloring, which adds too much moisture. Always use gel.
- Why did they spread out and get FLAT?
- Your batter was way over-mixed.
- Why are they STICKY and CHEWY (not crisp)?
- You under-baked them, or it’s a very humid day. Try to make macarons on a dry day!
Serving and Storing Your Masterpieces
- Serving: Always let your macarons come to room temperature for 20-30 minutes before serving. This is crucial! The ganache will soften, and the shell will have the perfect crisp-chewy texture.
- Storage: Store the filled, mature macarons in an airtight container in the refrigerator for 3-5 days.
- Freezing: Macarons freeze beautifully. Place the mature macarons in a single layer in an airtight container and freeze for up to 3 months. Let them thaw in the fridge, then bring to room temp before eating.
Your Macaron Questions, Answered
- What are “aged” egg whites?
- Some bakers swear by letting egg whites sit in the fridge for 24-48 hours. I find that as long as your whites are 100% room temperature and you whip them to a very stiff, stable meringue, you will be successful.
- Where do I find food-grade rose water?
- Check the international aisle of your grocery store (it’s common in Middle Eastern and South Asian cuisine), a specialty baking store, or online.
- Can I reduce the sugar?
- No. In macarons, sugar is a structural ingredient, not just a sweetener. It’s what creates the shell, the chew, and the stability. The recipe will fail if you reduce the sugar.
- Can I use a different filling?
- Yes! A raspberry buttercream or a simple vanilla bean buttercream would also be lovely with the rose shells.
A Rewarding, Elegant Challenge
Macarons are a true labor of love. Your first batch might not be perfect, but they will still be delicious (it’s hard to mess up almond, sugar, and rose!). Don’t be discouraged. Every batch teaches you something new. When you pull that first tray of shiny, full-footed, pale pink shells from the oven, you will feel like a true pâtissier.
Recipe Summary
This is a detailed, step-by-step guide to making classic French rose macarons. The recipe focuses on the French meringue method and breaks down the most critical techniques, including sifting, creating a stable meringue, and mastering the “macaronage.” The delicate pink shells are filled with a creamy rose-infused white chocolate ganache and “matured” in the refrigerator for 24 hours to develop their signature chewy texture.
You Did It! Share Your Bake!
If you take on this elegant challenge, I have to see your results! Did you get feet? What did you learn? Tag me on social media [Your Social Handle Here] or leave a comment below. And if this guide helped you, please Pin this recipe to help other aspiring macaron bakers!
Happy baking!