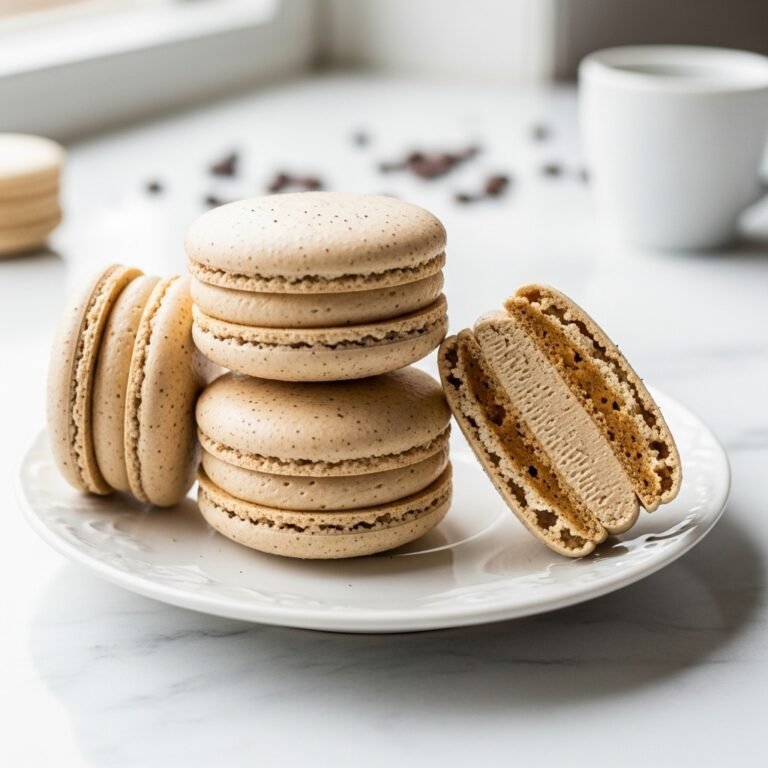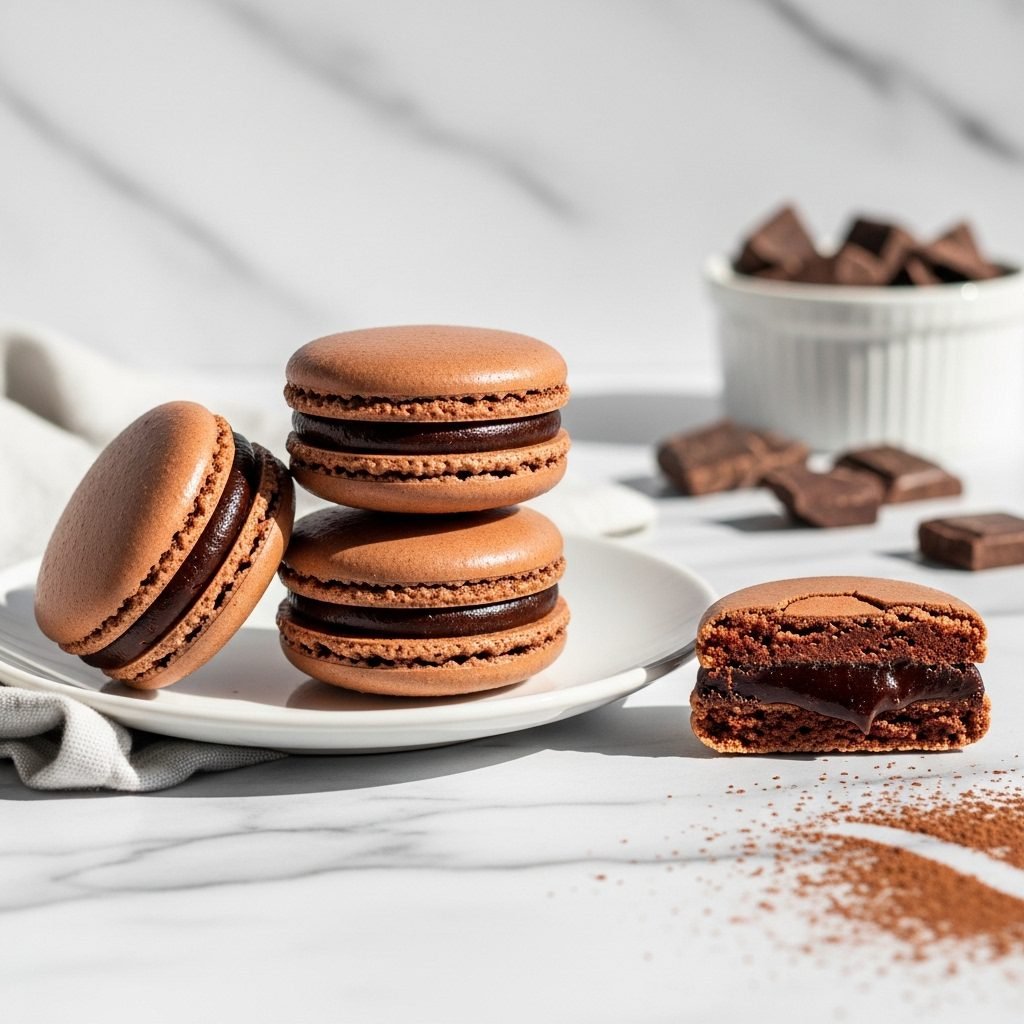
Rich & Chewy Chocolate Ganache Macarons (A No-Fail Guide)
Hello, friends! Let’s talk about a baking project that has a bit of a reputation: the macaron.
We’ve all seen them—those beautiful, delicate cookies in bakery windows. And let’s be honest, they’re intimidating. So many bakers I know (myself included!) have a story about a batch that spread, cracked, or just… sighed… and deflated.
But what if I told you that you can make them at home? And that you can make them well?
Today, we’re tackling my absolute favorite, the one I turn to when I need a truly decadent treat: Rich, Fudgy Chocolate Ganache Macarons. These aren’t just sugary-sweet. They have a deep, real-chocolate flavor from cocoa in the shells and a silky, melt-in-your-mouth ganache filling.
The secret? We’re using the Italian meringue method.
I know, I know—that sounds even more intimidating. But here’s the truth: it’s my secret weapon for macaron success. Instead of just whipping raw egg whites, we’re making a stable, glossy meringue with a hot sugar syrup. This technique is so much more forgiving and reliable, especially if you live in a humid area. It gives you a stronger batter that’s less likely to fail.
This recipe is a process, but it’s not “difficult” in the way you might think. It’s just precise. If you follow the steps, measure your ingredients (a scale is your best friend here!), and trust the process, you will be rewarded with the most wonderful, chewy, chocolatey cookies.
Why This is My Go-To Chocolate Macaron Recipe
- The Flavor: This is a macaron for real chocolate lovers. The cocoa in the shells and the dark ganache create a deep, sophisticated flavor that isn’t one-note-sweet.
- The Texture: You get it all! The delicate, crisp outer shell gives way to a soft, satisfyingly chewy center, all held together by that rich, velvety ganache.
- The “Wow” Factor: These look (and taste) like they came from a high-end French patisserie. They are such a joy to make and share.
- The Method: The Italian meringue method is a game-changer. It creates a stable, sturdy batter that gives you a much better chance of achieving those coveted “feet” (the ruffled bottoms) and smooth, domed tops.
What You’ll Need
Precision is key, so I highly recommend using a kitchen scale for the most accurate results. I’ve included cup measurements, but they are an approximation.
For the Rich Chocolate Ganache (Make this first!)
- 4 oz (about 1/2 cup + 2 tbsp) good-quality semisweet chocolate, finely chopped (use a bar, not chips!)
- 1/2 cup heavy cream
- 1 tbsp unsalted butter, softened
- 1/4 tsp vanilla extract
- Pinch of kosher salt
For the Chocolate Macaron Shells (Italian Meringue)
- 1 1/4 cups (125g) almond flour, finely ground
- 1 1/4 cups (125g) powdered sugar
- 3 tbsp (20g) unsweetened cocoa powder (Dutch-processed is great for a darker color)
- 1/2 cup (110g) egg whites (from 4-5 large eggs), divided into two 55g portions
- 3/4 cup (150g) granulated sugar
- 1/4 cup (60g) water
- A pinch of cream of tartar
How to Make Chocolate Macarons (Step-by-Step)
Don’t rush the process! Put on some music, read through the steps first, and let’s get baking.
Part 1: The Chocolate Ganache (Make This First)
The ganache needs a few hours to set, so we always start here.
- Chop the Chocolate: Finely chop your chocolate bar and place it in a medium, heat-proof bowl. The smaller the pieces, the more evenly they will melt.
- Heat the Cream: Pour the heavy cream into a small saucepan. Heat it over medium-low heat until it just begins to simmer (little bubbles will form around the edge). Don’t let it come to a full boil.
- Pour and Wait: Pour the hot cream directly over the chopped chocolate. Don’t stir! Let it sit for 5 full minutes. This allows the heat from the cream to gently melt the chocolate.
- Whisk: After 5 minutes, add the softened butter, vanilla, and the pinch of salt. Begin whisking from the center of the bowl, moving in small, slow circles. As the mixture emulsifies, your circles can get larger. Whisk until the ganache is completely smooth, glossy, and thick.
- Chill: Press a piece of plastic wrap directly onto the surface of the ganache (this prevents a skin from forming). Place it in the refrigerator for at least 2 hours, or until it’s firm enough to pipe (it should have a consistency similar to thick frosting).
Part 2: The Chocolate Macaron Shells
Okay, this is the main event. You’ve got this.
- Prep Your Station: Line two large baking sheets with parchment paper or silicone mats. (I find parchment works great). If you want a guide, you can trace 1.5-inch circles on the underside of the parchment. Prepare a large piping bag with a medium round tip (like a Wilton 12).
- Sift, Sift, Sift: In a large bowl, add your almond flour, powdered sugar, and cocoa powder. Whisk them together, then sift them all together through a fine-mesh sieve. This is not optional. Cocoa powder is notoriously lumpy, and this step is the secret to a smooth, shiny shell. If you have a few tablespoons of lumpy bits left, just discard them.
- Make the Almond Slurry: Add half of your egg whites (one 55g portion) to the sifted dry ingredients. Use a spatula to mix this together. It will be a very thick, stiff, and sticky paste, almost like marzipan. Set this bowl aside.
- Start the Meringue: Place the other half of your egg whites (the second 55g portion) and the pinch of cream of tartar into the clean, dry bowl of a stand mixer fitted with the whisk attachment.
- Make the Sugar Syrup: In a small, heavy-bottomed saucepan, combine the granulated sugar and water. Give it a quick stir to moisten the sugar. Clip a candy thermometer to the side of the pan, making sure the tip doesn’t touch the bottom.
- Heat the Syrup: Turn the heat to medium-high and let the syrup cook. Do not stir it. As it cooks, any sugar crystals on the side can be brushed down with a wet pastry brush.
- Whip the Whites: When the sugar syrup reaches about 230°F, turn your stand mixer on to medium speed. Whip the egg whites until they are foamy and just starting to form soft peaks (when you lift the whisk, the peak flops over).
- Combine Syrup & Whites: As soon as your syrup hits 244°F (the “soft-ball stage”), remove the pan from the heat. Turn the mixer speed down to medium-low. Very slowly and very carefully, pour the hot syrup in a thin, steady stream down the side of the mixing bowl. Try to avoid hitting the whisk itself, as the hot syrup can spatter.
- Whip Until Stiff & Cool: Once all the syrup is added, turn the mixer speed up to medium-high. Let it whip for 8-12 minutes. The meringue will become incredibly thick, glossy, and stiff. You’ll know it’s ready when the outside of the mixing bowl is no longer hot, but just barely lukewarm, and the meringue holds a very stiff, bird’s-beak peak when you lift the whisk.
Part 3: The Macaronage (The Most Important Step)
Macaronage is the process of folding the meringue into the almond paste. This is where you get the final texture.
- Lighten the Paste: Add about 1/3 of your glossy meringue to the bowl with the stiff almond-cocoa paste. Go ahead and fold this in aggressively with your spatula. You’re just trying to loosen up that thick paste, so don’t be gentle.
- Fold the Rest: Add the remaining meringue to the bowl. Now, you fold gently. Use your spatula to scrape around the edge of the bowl, then cut through the middle. Turn the bowl a quarter-turn and repeat.
- The “Lava” Test: You are looking for a very specific consistency. The batter should be smooth, glossy, and flow off the spatula in a continuous, thick “ribbon.” You should be able to draw a “figure 8” with this ribbon without it breaking. Note: Cocoa powder absorbs moisture, so this batter may feel a little thicker than a plain macaron batter. Be careful not to over-mix! If the batter is runny, your macarons will spread and won’t develop feet. It’s always better to be slightly under-mixed (where the ribbon breaks a little) than over-mixed.
- Pipe Your Shells: Transfer the batter to your prepared piping bag. Hold the bag straight up (90-degree angle) about a half-inch above the baking sheet. Squeeze the bag, keeping the tip in one place, until the batter spreads to fill your 1.5-inch circle. Stop squeezing and lift the bag with a quick “swirl” motion.
- Rap the Pans: This is crucial! Once all your shells are piped, pick up the baking sheet and rap it hard on your counter 4-5 times. This forces any large air bubbles to the surface and prevents your shells from cracking. You’ll see little bubbles pop. You can use a toothpick to pop any remaining ones.
- Rest the Shells: This is the second non-negotiable step. Leave the baking sheets on your counter at room temperature for 30-60 minutes (the time will vary based on your kitchen’s humidity). You are waiting for the shells to form a “skin.” You should be able to gently touch the top of a macaron, and it should feel dry and matte, not sticky. Your finger should come away clean.
- Bake: Preheat your oven to 300°F. Once the shells are dry, place one baking sheet at a time on the center rack. Bake for 15-18 minutes. To check for doneness, gently nudge the top of a shell. If it wobbles on its “feet,” it needs another minute or two. If it feels firm and doesn’t wiggle, it’s done.
- Cool Completely: Let the macarons cool completely on the baking sheet (at least 30 minutes) before you even think about peeling them off. If you try to remove them while warm, they will stick and the bottoms will rip off.
Part 4: Assemble Your Chocolate Macarons
- Match the Shells: Once cool, gently peel your shells off the parchment. Find “partner” shells that are a similar size and shape.
- Fill: Transfer your chilled, firm ganache to a piping bag (you can use the same round tip). Pipe a generous dollop on the flat side of one macaron shell.
- Sandwich: Gently press the other macaron shell on top, twisting just a bit, until the ganache spreads to the edge.
- MATURE THEM (The Final Secret): This is the step that creates the signature chewy texture! Place all your assembled macarons in an airtight container and put them in the refrigerator for 24 hours. This “maturing” process allows the ganache to soften the inside of the shell, melding the flavors and creating that perfect crisp-then-chewy bite. Don’t skip this!
My Favorite Tips for Macaron Success
- A Scale is Your Best Friend: I can’t say this enough. Macarons are a science. A kitchen scale is the #1 tool that will improve your macaron game.
- Wipe Your Bowl: Your stand mixer bowl and whisk must be 100% free of any fat or grease. I like to wipe mine with a paper towel dampened with a little white vinegar or lemon juice before I start.
- Know Your Oven: Most ovens have hot spots and run hot or-cool. An oven thermometer is cheap and will tell you the real temperature. If your shells are browning, your oven is likely too hot.
- Don’t Bake on a Rainy Day: Seriously. Humidity is the mortal enemy of macarons. It will prevent them from drying and forming that crucial “skin,” leading to cracked tops and no feet.
- Sift, Sift, Sift: Did I mention you need to sift? Sift. Especially with cocoa powder, which is extra lumpy.
Substitutions & Variations
- Dairy-Free: This works well! For the ganache, use a high-quality dairy-free dark chocolate and replace the heavy cream with the solid cream from a can of full-fat coconut milk (chill the can overnight and scoop out the top). Use a vegan butter stick or omit the butter.
- Add Espresso: To make “mocha” macarons, add 1 teaspoon of instant espresso powder to your dry ingredients when you sift them. It will make the chocolate flavor even deeper.
- Gluten-Free: Good news! This recipe is naturally gluten-free. Just check your ingredient labels (like for your cocoa powder) to be sure.
Common Macaron Troubles (and How to Fix Them)
- Cracked Shells: This usually means your oven was too hot, or you didn’t let them rest long enough to form a skin. It can also mean you didn’t rap the pans hard enough to get all the air bubbles out.
- No “Feet” (The Ruffles): This is the classic bummer. It’s almost always a sign that your batter was over-mixed (macaronage went too long) and was too runny. It can also happen if your meringue wasn’t whipped stiff enough.
- Hollow Shells: When you bite in, and there’s a gap between the top and the “foot.” This can be from an over-whipped meringue or, more commonly, from under-baking.
- Lumpy Tops: You didn’t sift your almond flour/sugar/cocoa.
- My Ganache is Runny: You either didn’t use enough chocolate (check your ratio) or you didn’t chill it long enough. Just pop it back in the fridge!
Don’t be sad if your first batch is a little wonky. We call those “baker’s treats”! Just try to diagnose the problem and remember what to adjust for next time.
How to Serve These Beauties
After your macarons have matured in the fridge for 24 hours, take them out and let them sit at room temperature for about 20 minutes before serving. This is when their flavor and texture are at their absolute best. They are perfect with a cup of coffee, an afternoon tea, or as the star of a dessert platter.
Storing Your Macarons
- In the Fridge: Assembled macarons must be stored in an airtight container in the refrigerator. They will keep getting better for the first couple of days and are good for up to 5 days.
- In the Freezer: Macarons freeze wonderfully! Place them in a single layer in an airtight container and freeze for up to 3 months. Let them thaw in the fridge or on the counter for 30 minutes.
Your Chocolate Macaron Questions
Why the Italian meringue method? It seems harder. It has one extra step (the hot syrup), but that step cooks the egg whites, making the meringue so much stronger and more stable. It’s far less likely to deflate during the macaronage step, which is where most French-method macarons fail. I truly believe it’s more reliable!
Can I use regular cocoa powder? Yes! I like Dutch-processed cocoa (like Droste or Guittard) because it has a deeper, darker color and a smoother, less bitter flavor. But any unsweetened cocoa powder will work.
Can I use chocolate chips for the ganache? I really recommend using a high-quality chocolate bar (like Ghirardelli or Guittard baking bars). Chocolate chips have stabilizers in them to help them keep their shape, which means they don’t melt as smoothly and can make your ganache waxy or grainy.
A Final, Chocolate-y Thought
Whew, that was a lot! But I wanted to give you every tip and trick I have. Making macarons is a journey, but it’s one of the most rewarding bakes you can do. When you pull that first tray of shiny, footed, perfect-looking shells from the oven, you’ll feel like a baking superhero.
I hope you love these rich, chewy chocolate macarons as much as I do. Happy baking!
Quick Recipe Summary
This recipe guides you through making rich, chewy chocolate macarons using the stable Italian meringue method. The deep-chocolate almond shells are filled with a silky, semisweet chocolate ganache. The key steps include sifting the dry ingredients with cocoa, making a sugar syrup for the meringue, and “maturing” the finished cookies in the refrigerator for 24 hours to develop their signature texture.