Showstopper Tiramisu Tart (With a Crisp Chocolate Crust)
Hello, fellow dessert lovers!
Let’s talk about Tiramisu. It’s a classic for a reason—that dreamy combination of coffee, creamy mascarpone, and cocoa is just one of those flavors that feels like a cozy, sophisticated hug.
But let’s be honest: traditional tiramisu, served in a big casserole dish, isn’t always the prettiest dessert. It can be a little… slouchy. Delicious, yes, but not always the elegant centerpiece you want for a dinner party.
That’s where this Tiramisu Tart comes in.
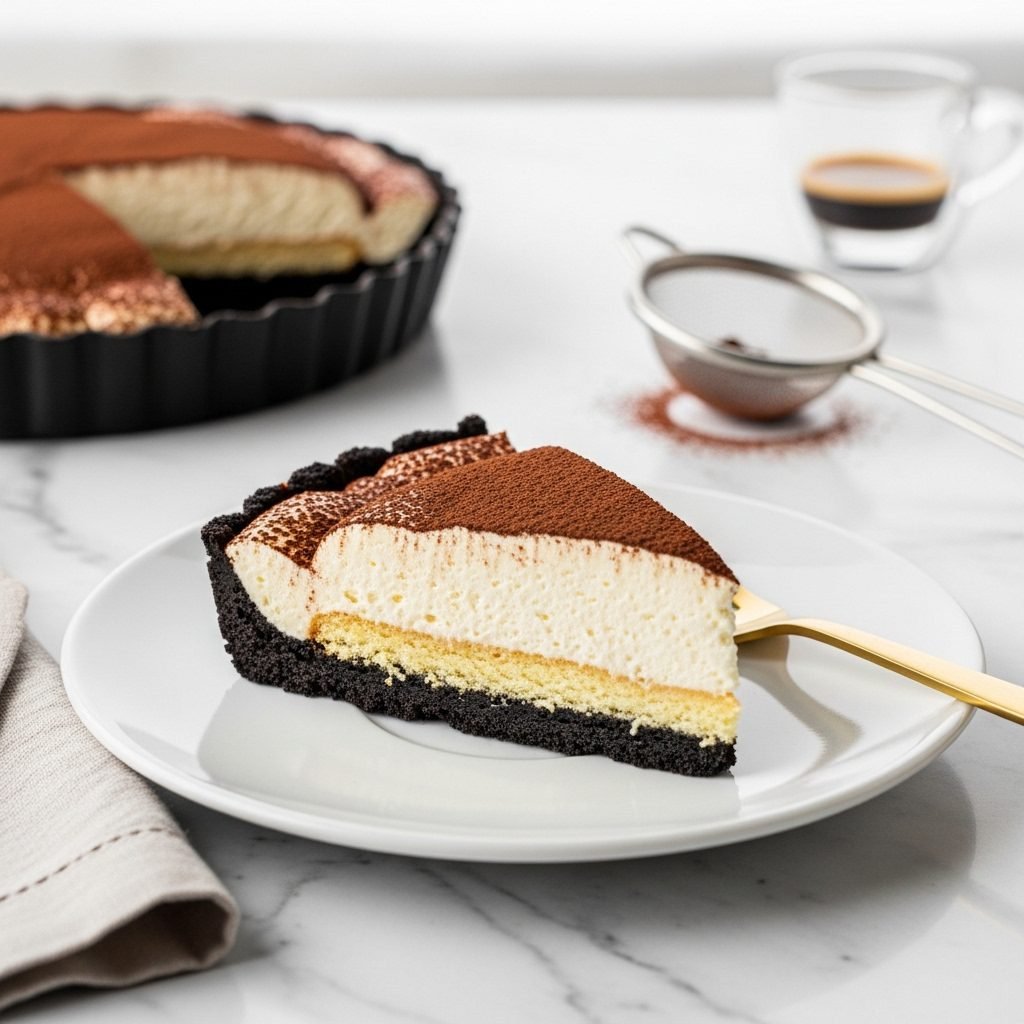
We’re taking all the flavors you love from the classic and transforming them into an elegant, sliceable, and absolutely stunning tart. It starts with a crisp, buttery chocolate cookie crust. Then, we add a single, perfect layer of coffee-and-rum-dipped ladyfingers. And the star of the show is the filling: a cloud-like, impossibly creamy mascarpone mousse that’s rich but not heavy.
This is the dessert you make when you want to hear “Wow.” It has all the rustic, comforting flavor of traditional tiramisu, but with the sharp, clean edges of a high-end patisserie dessert. It’s a true showstopper, and it’s easier to make than you might think. Let’s get started.
Why You’ll Be Making This Tart Again and Again
- The Flavor: It’s pure Tiramisu, but balanced. You get the deep, dark chocolate from the crust, a bright hit of coffee and rum, and the milky, sweet, tangy flavor of the mascarpone cream.
- The Texture: This is a tart of contrasts! The crust is snappy and crisp. The ladyfingers are soft and cake-like. The filling is airy, velvety, and melts in your mouth.
- The “Wow” Factor: It slices like a dream. No more messy scoops. Each piece is a perfect, clean-edged triangle with beautiful, distinct layers.
- The Method: We’re using a gently cooked-yolk method for the filling, which makes it stable, rich, and completely food-safe (no raw eggs!).
What You’ll Need for Your Tart
For this recipe, a 9-inch round tart pan with a removable bottom is your best friend. It’s the secret to getting that perfect, clean-edge removal.
For the Chocolate Cookie Crust
- 1 1/2 cups (about 160g) chocolate cookie crumbs (from about 24-25 Oreo-style cookies, filling removed)
- 6 tbsp unsalted butter, melted
For the Coffee Soak
- 1/2 cup very strong coffee or espresso, hot
- 2 tbsp granulated sugar
- 2 tbsp dark rum, coffee liqueur (like Kahlua), or Marsala wine (optional, see notes)
- About 12-14 “hard” ladyfingers (the crisp, savoiardi kind)
For the Creamy Mascarpone Filling
- 3 large egg yolks
- 1/3 cup granulated sugar
- 16 oz (2 cups) mascarpone cheese, cold
- 1 cup heavy whipping cream, cold
- 1 tsp vanilla extract
- Pinch of salt
For the Topping
- 2 tbsp unsweetened cocoa powder, for dusting
Step-by-Step: How to Build Your Tiramisu Tart
This recipe is all about a few key steps. We’ll take them one by one.
Part 1: Make and Bake the Crust
- Preheat Oven: Preheat your oven to 350°F (175°C).
- Make Crumbs: If you don’t have pre-made crumbs, place your chocolate cookies (filling scraped out) in a food processor and pulse until they are fine crumbs. You should have 1 1/2 cups.
- Mix: In a medium bowl, stir the cookie crumbs and the melted butter together with a fork until the mixture looks like damp sand.
- Press: Dump the moist crumbs into your 9-inch tart pan (with the removable bottom!). Use the flat bottom of a measuring cup or your fingers to press the crumbs firmly and evenly across the bottom and up the sides of the pan. Make sure to pack it tightly!
- Bake: Bake the crust for 10-12 minutes, just until it’s set and smells toasty.
- Cool Completely: Set the crust aside to cool completely while you make the filling. This is important—a hot crust will melt your filling.
Part 2: The Creamy Mascarpone Filling
This filling is made in three parts that get folded together. Don’t let that scare you! This method is the secret to a filling that is both airy and stable.
- Create the “Zabaglione” Base: Fill a small saucepan with about 1-2 inches of water and bring it to a gentle simmer. In a medium, heat-proof bowl (like glass or metal), whisk together the 3 egg yolks and 1/3 cup sugar.
- Cook the Base: Place the bowl over the simmering water, making sure the bottom of the bowl doesn’t touch the water. Whisk constantly as the mixture heats up. It will get foamy, then pale, and will start to thicken. Keep whisking for 5-8 minutes, until the mixture is thick, pale yellow, and has doubled in volume. If you have a thermometer, it should read 160°F (this pasteurizes the eggs).
- Cool the Base: Remove the bowl from the heat and set it aside to cool to room temperature.
- Whip the Cream: In a separate, large, cold bowl, pour in your 1 cup of cold heavy cream. Using an electric mixer, whip the cream, starting on low and increasing the speed. Whip until it holds stiff peaks (when you lift the beaters, the peak holds its shape).
- Prep the Mascarpone: In another medium bowl (I know, but it’s worth it!), add your 16 oz of cold mascarpone, the vanilla extract, and the pinch of salt. Use a spatula to gently stir and soften the mascarpone. DO NOT BEAT IT with a mixer. Over-whipping mascarpone is the #1 way to make it grainy or “break.” Just a few gentle stirs to loosen it up is all you need.
- Combine & Fold:
- First, add the cooled egg yolk mixture to the softened mascarpone. Gently fold them together with your spatula until just combined.
- Next, add about one-third of the whipped cream to the mascarpone mixture. Fold it in to lighten the base.
- Finally, add the rest of the whipped cream and fold gently, scraping the bottom of the bowl, until the mixture is smooth and no streaks remain. You’ll have a thick, airy, luxurious mousse.
Part 3: Assemble Your Tart
- Prep the Coffee Soak: In a shallow bowl or pie dish, combine the hot coffee and 2 tbsp of sugar. Stir to dissolve. If you’s using it, stir in the rum or liqueur.
- The Ladyfinger Layer: Your crust should be completely cool. Take one ladyfinger at a time and dip it into the coffee mixture—very quickly. A 1-second dip on each side is all you need. If you soak them, they will turn to mush and make your crust soggy.
- Arrange the Layer: Arrange the dipped ladyfingers in a single, snug layer on the bottom of your chocolate crust. You may need to break a few to fit them into the curves.
- **Add the Filling:**Spoon the mascarpone filling over the ladyfinger layer. Use an offset spatula or the back of a spoon to spread it into one even, smooth layer, all the way to the edges of the crust.
- CHILL. (This is the most important step.) Cover the tart gently with plastic wrap (try not to let it touch the top). Place the tart in the refrigerator to chill for at least 6 hours. Overnight is even better. This isn’t just a suggestion! This chilling time is essential for the filling to set and the flavors to meld. A 4-hour tart will be runny; a 6-hour tart will be sliceable.
Part 4: Serve
- Release the Tart: When you’re ready to serve, carefully push the removable bottom of the tart pan up. You can place a can or a glass underneath to help.
- Dust with Cocoa: Place the tart on its serving platter. Just before serving, use a small, fine-mesh sieve to dust the entire top of the tart with a generous, even layer of unsweetened cocoa powder.
- Slice & Serve: Use a sharp knife, wiping it clean between slices, to get those perfect, clean-edged pieces.
My Favorite Tips for Tiramisu Tart Success
- Your Tart Pan is Key: I can’t stress this enough. A 9-inch tart pan with a removable bottom is what makes this dessert a showstopper. It allows you to present the tart with its beautiful, fluted chocolate edges.
- Be Gentle with the Mascarpone: This is the #1 rule of Tiramisu. Mascarpone cheese is not like cream cheese. If you over-beat it, its fat structure will break, and it will become watery and grainy. Always use it cold and stir it with a spatula, never beat it with a mixer.
- The “Flash-Dip”: When I say “dip the ladyfingers quickly,” I mean it. In and out. They are like little sponges. You just want to flavor them, not saturate them.
- Patience is an Ingredient: The 6+ hour chill time is non-negotiable. It’s what transforms the filling from a soft mousse into a stable, sliceable, creamy delight.
Ingredient Swaps & Variations
- No-Alcohol Version: Simply leave out the rum or liqueur! The tart will still be delicious. You can add 1/4 tsp of rum extract to the coffee soak if you still want that flavor.
- Alternative Crust: You can use a Biscoff cookie crust or a graham cracker crust (add 2 tbsp of cocoa powder to it) if you prefer.
- Easier, No-Cook Filling: If cooking the egg yolks makes you nervous, you can use an egg-free method. It won’t be as airy, but it’s still tasty. Gently stir to soften 16 oz of mascarpone. Add 1/2 cup powdered sugar and 1 tsp vanilla. In a separate bowl, whip 1 1/2 cups of heavy cream to stiff peaks. Fold the whipped cream into the mascarpone mixture.
Common Tiramisu Tart Problems (and How to Fix Them)
- My Mascarpone Filling is Grainy/Watery: You over-mixed the mascarpone. Unfortunately, once it’s broken, you can’t really fix it. Next time, remember to only stir it to soften, and fold your ingredients in gently.
- My Tart is Runny and Won’t Slice: You didn’t chill it long enough. Patience! If it’s still runny after 6 hours, it’s possible your filling was under-mixed, but 99% of the time, it just needs more time in the fridge.
- My Crust is Soggy: You over-soaked the ladyfingers. The moisture seeped through and softened the crust. Remember: a flash-dip!
How to Serve This Beauty
This tart is a complete dessert all on its own.
- Serve it chilled, straight from the fridge.
- The cocoa powder dusting is all it really needs.
- If you’re feeling extra, you can add some chocolate shavings on top or serve it with a few fresh raspberries on the side.
- A small cup of espresso or a glass of dessert wine pairs with it wonderfully.
How to Store Your Tiramisu Tart
- In the Fridge: The tart must be stored in the refrigerator. Cover it loosely with plastic wrap (or store it in a tart container) to protect it from other fridge smells. It’s best in the first 2-3 days, as the crust will start to soften after that.
- In the Freezer: Yes, this tart freezes beautifully! You can freeze the whole tart or individual slices. To freeze, place the tart (or slices) uncovered on a baking sheet in the freezer until firm. Then, wrap tightly in plastic wrap and then in foil. It will keep for up to 1 month. Thaw in the refrigerator overnight.
Your Tiramisu Tart Questions
Do I have to cook the egg yolks? For this recipe, yes. Cooking them with the sugar over a water bath not only makes them food-safe (pasteurizing them) but also creates a “zabaglione” base, which gives the filling an incredibly rich, stable, and airy texture.
Can I make this in a regular pie dish? You can, but it won’t be a “tart.” You will have to serve it by scooping it out, more like a traditional Tiramisu, as you won’t be able to remove it from the dish. The removable-bottom tart pan is what gives it the “wow” factor.
My ladyfingers are soft, not hard. Will they work? They will, but be extremely fast with your dip—like, half a second. The soft, cake-like ladyfingers will absorb the liquid almost instantly and can get mushy very easily. I prefer the hard, “savoiardi” kind for this recipe as they hold their shape better.
A Final, Sweet Thought
I know this recipe has a few components, but I promise you, each step is simple and straightforward. The final result—that first bite of crisp chocolate, soft coffee-soaked cake, and airy mascarpone cream—is so worth it.
This is a dessert that makes people feel special, and I hope you feel special making it (and eating it!).
Quick Recipe Summary
This Showstopper Tiramisu Tart features a crisp, baked chocolate cookie crust, a single layer of ladyfingers quickly dipped in coffee and rum, and a rich, airy, and stable mascarpone mousse. The mousse is made by folding a cooked egg-yolk-and-sugar base (a zabaglione) and fresh whipped cream into softened mascarpone. The tart requires at least 6 hours of chilling to set before being dusted with cocoa powder and served.