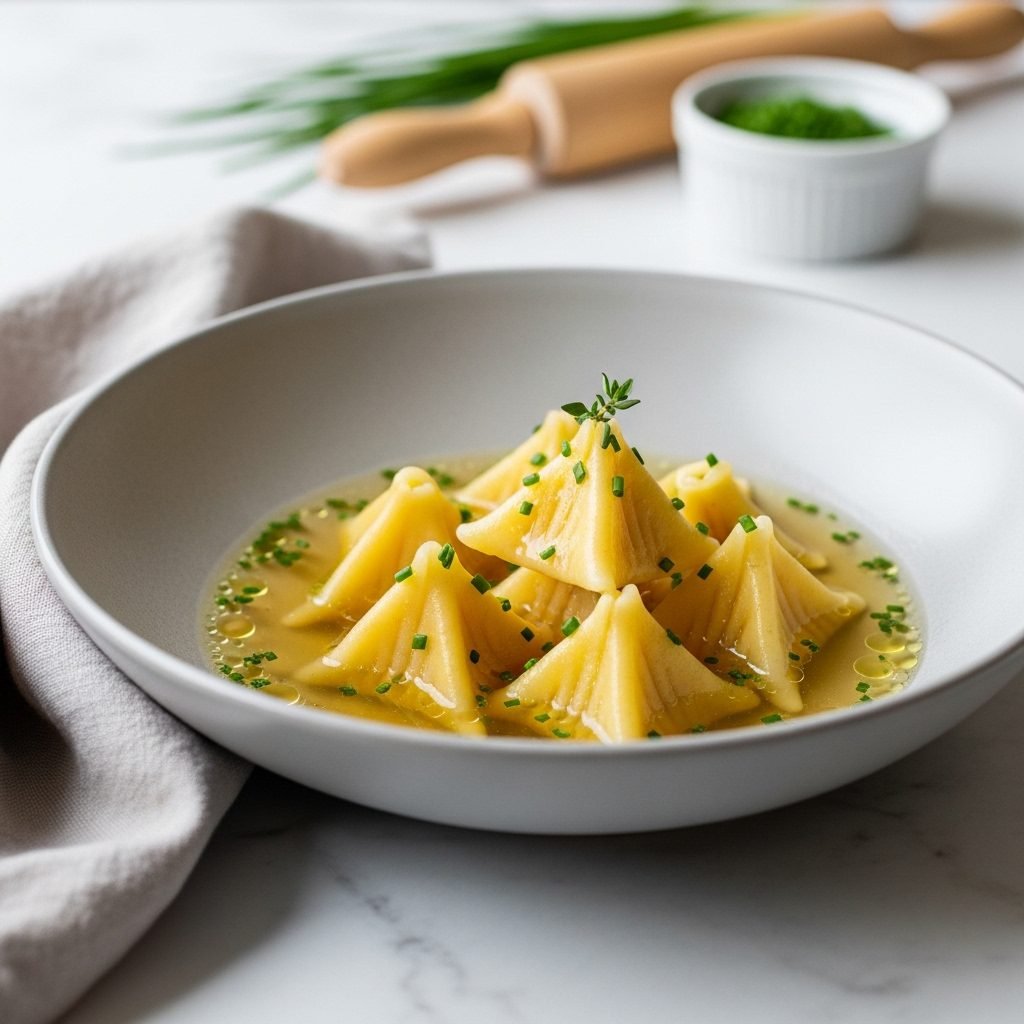
Why These Little French Pasta Pyramids (Berlingots) Are My New Favorite Thing
Have you ever seen a dish that just stops you in your tracks? That’s what happened to me with Berlingots. I first saw a picture of these elegant, pyramid-shaped little pastas and assumed they were from some three-Michelin-star restaurant in Paris. They looked so intricate, so fancy.
My first thought was, “I could never make that.” But then I got curious.
It turns to out, “Berlingot” is the name of a French hard candy, and this pasta is simply shaped to look like it. And the secret? The shape is surprisingly simple to create once you know the trick. It’s a “pinch and twist” motion that, once you get the rhythm, is actually kind of meditative and fun.
So, I set out to create a version that feels incredibly high-end but is totally achievable for a home cook. Forget the super-complicated components. At their heart, these are just beautiful little ravioli.
We’re making delicate, homemade pasta dough, filling it with a bright, tangy goat cheese and herb mixture, and serving it in a light, savory broth that lets the pasta truly shine. It’s the perfect “wow” dish for a date night in, a special occasion, or just a quiet weekend afternoon when you want to make something beautiful.
This is a project, for sure. But it’s a fun project. And when you sit down to that bowl of delicate, cheesy, savory little pillows, you’ll feel like a culinary rockstar. I promise.
Why You’ll Fall in Love With This Recipe
- The Taste: The filling is the star. It’s creamy, tangy from the goat cheese, and bright with fresh chives and lemon zest. It’s all wrapped in a silky, tender pasta shell. Served in a simple, clear broth, every bite is clean, savory, and so satisfying.
- The “Wow” Factor: Let’s be honest, they’re just stunning. They look like you spent all day fussing, but the shaping technique is our little secret.
- The Vibe: This is slow-food. It’s the perfect recipe to put on some music, pour a glass of wine, and just enjoy the process of making.
- The Difficulty: I’d call it “Adventurous Beginner.” If you’ve never made pasta, I’ll walk you through it. If you’ve made ravioli before, you’re already a pro. The only “tricky” part is the shaping, and I’ve broken it down step-by-step.
- The Time: This isn’t a 30-minute meal. Plan on about 2 hours from start to finish. Most of that is the fun, hands-on part of rolling and shaping.
What You’ll Need: Ingredients
This recipe looks fancy, but the ingredient list is beautifully simple. We’ll break it down into three parts: the pasta, the filling, and the broth.
For the Pasta Dough:
- 2 cups “00” flour (this is a super-fine Italian flour, but all-purpose works if it’s all you have!)
- 3 large eggs, at room temperature
- 1 tablespoon olive oil
- ½ teaspoon kosher salt
For the Creamy Goat Cheese Filling:
- 5 oz log of plain, creamy goat cheese (chèvre), softened
- 2 oz cream cheese, softened (this adds stability and mutes the “goatiness” just a bit)
- 2 tablespoons fresh chives, very finely chopped
- 1 teaspoon lemon zest
- ¼ teaspoon kosher salt
- A few cracks of fresh black pepper
For the Simple Serving Broth:
- 4 cups good-quality, low-sodium vegetable broth (or chicken broth)
- 1 wide strip of lemon peel (use a vegetable peeler)
- 1 fresh thyme sprig (optional, but lovely)
- 2 tablespoons unsalted butter
- Salt and pepper to taste
Equipment:
- A pasta machine (hand-crank or an electric attachment)
- A piping bag (or a sturdy Ziploc bag)
- A fluted pasta or pastry wheel (a pizza cutter or sharp knife also works)
Step-by-Step Instructions
Ready? Let’s make some magic.
Part 1: Make the Pasta Dough
- By Hand: Mound your flour on a clean counter and make a large “well” in the center (like a volcano). Crack the eggs into the well and add the olive oil and salt. Using a fork, gently whisk the eggs, slowly pulling in flour from the inside wall of the well. Continue until a shaggy dough forms. Use your hands or a bench scraper to bring it all together.
- By Food Processor: (My easy way!) Add the flour and salt to the food processor and pulse once. Add the eggs and olive oil. Pulse in 1-second bursts until the dough looks like wet crumbs, about 10-15 pulses. Don’t let it form a ball!
- Knead the Dough: Dump the shaggy dough or crumbs onto a lightly floured counter. Knead the dough by pushing it away from you with the heel of your hand, folding it over, giving it a quarter turn, and repeating. Knead for 8-10 minutes. It will seem dry at first, but trust the process! It will transform into a smooth, silky, elastic ball.
- Rest the Dough: This is the most important step! Wrap the dough ball tightly in plastic wrap. Let it rest on the counter for at least 30 minutes, or up to 2 hours. This relaxes the gluten and makes it 100x easier to roll out. Do not skip this!
Part 2: Make the Filling
- While the dough rests, make the filling. In a medium bowl, add the softened goat cheese, softened cream cheese, chopped chives, lemon zest, salt, and pepper.
- Mash everything together with a spatula or fork until it’s completely smooth and creamy.
- Taste it. Want more salt? A little more pepper? Now’s the time.
- Transfer the filling to a piping bag (or a Ziploc bag). This makes assembly so much cleaner and faster than using a spoon. Snip a small (about ¼-inch) opening at the tip. Set aside.
Part 3: Roll and Shape the Berlingots
This is the fun part!
- Prep Your Station: Set up your pasta machine, clamping it to the counter. Dust a large baking sheet with semolina flour or regular flour (semolina is better as it doesn’t get “gummy”). This is where your finished berlingots will live so they don’t stick.
- Divide and Roll: Unwrap your rested dough. Isn’t it silky? Cut it into four equal pieces. Take one piece and immediately re-wrap the other three so they don’t dry out.
- Laminate the Dough: Lightly flatten the first piece of dough into a small rectangle with your hands. Set your pasta machine to its widest setting (usually “0” or “1”). Feed the dough through. Fold the dough into thirds, like a letter. Feed it through the widest setting again. Do this 2-3 times. This “laminating” step gives the pasta a beautiful, chewy texture.
- Roll It Thin: Now, start working your way down the settings. Pass the dough through, one setting at a time, without folding. (e.g., 1, 2, 3, 4, 5, 6). Don’t skip settings! I usually stop at setting “6” or “7” for filled pasta. You want it thin enough to be delicate, but not so thin you can see through it. You should have one very long, beautiful sheet of pasta.
- Shape the Berlingots:
- Lay your long pasta sheet on a lightly floured counter.
- Pipe a continuous, even log of filling (about ½ inch thick) lengthwise down the center of the pasta sheet.
- Carefully fold one long side of the dough over the filling. Brush the opposite long edge with a tiny bit of water (use your finger), then fold it over to completely seal the tube. Press down gently to make sure it’s sealed. You now have one very long pasta “tube” filled with cheese.
- Now, for the “pinch and twist.” Start at one end of the tube.
- First Pinch: Use your thumb and forefinger to pinch the tube flat, right where the filling starts. Pinch it “North-to-South” (or vertically).
- Second Pinch: Move down the tube about 1.5 inches. This time, pinch the tube flat in the opposite direction—”East-to-West” (or horizontally).
- First Cut: Use your fluted pasta wheel to cut through your first “North-to-South” pinch. This will separate your first Berlingot. It should be a little pyramid shape!
- Keep Going: Move down another 1.5 inches. Pinch again in the first direction (“North-to-South”). Cut through your “East-to-West” pinch.
- Repeat this “pinch, pinch, cut” pattern, alternating the direction of your pinch every time. This is what creates the signature tetrahedron shape.
- Store: As you cut each Berlingot, place it on your semolina-dusted baking sheet. Make sure they don’t touch, or they will stick together.
- Repeat: Repeat the rolling and shaping process with your remaining 3 balls of dough.
Part 4: Cook and Serve
- Boil: Bring a large pot of water to a boil. Add a very generous amount of salt (it should taste like the ocean).
- Warm Broth: While the water heats, pour your broth into a small saucepan. Add the lemon peel and thyme sprig. Bring to a gentle simmer, then lower the heat to keep it warm.
- Cook Pasta: Gently lower the fresh berlingots into your boiling water. Stir once and gently so they don’t stick to the bottom. Cook for 3-4 minutes. They’re done when they float to the top and the pasta is tender.
- Finish Broth: Just before straining the pasta, fish the lemon peel and thyme sprig out of your broth. Turn off the heat and swirl in the 2 tablespoons of butter until it melts. This gives the broth a little richness and a beautiful sheen.
- Serve: Use a slotted spoon to transfer the cooked berlingots directly from the pasta water into shallow bowls (about 5-7 per person is a good first-course size). Ladle the warm, buttery broth over the top.
- Garnish: Top with a sprinkle of your leftover fresh chives and another crack of black pepper. Serve immediately.
My Top Tips for Pasta Success
- Don’t Overfill! It’s tempting, I know. But if you pipe too much filling, your pasta will burst when you pinch it or when it cooks. A ½-inch log is plenty.
- Flour is Your Friend: Keep your work surface, your hands, and your pasta machine lightly floured to prevent sticking. But don’t go crazy—too much flour will dry out the dough. A light dusting is all you need.
- Keep It Covered: Pasta dough dries out fast. Always keep the dough you’re not actively working with (the other balls, the finished pasta sheets) covered with a clean, slightly damp kitchen towel or plastic wrap.
- Seal Tightly: When you pinch the tube, make sure you’re creating a good seal. Air is the enemy of filled pasta and can also make them burst.
- Gentle Boil: Don’t cook these in a raging, violent boil. A strong, rolling boil is good, but if it’s splashing out of the pot, it’s too aggressive and can tear the delicate pasta.
Ways to Mix It Up (Substitutions)
This recipe is a great template. Feel free to play!
- If you don’t like goat cheese: Use whole-milk ricotta! Just be sure to drain it first (line a sieve with cheesecloth and let it drain for an hour). Mix it with ½ cup of grated parmesan, the lemon zest, and some chopped parsley.
- For the filling: Add other herbs like fresh thyme, basil, or oregano. A little roasted garlic mashed into the cheese would be incredible.
- For the “broth”: If you don’t want a broth, these are amazing with a simple brown butter and sage sauce. Just melt a stick of butter with a few fresh sage leaves until it turns nutty and brown, then toss the pasta in it.
- Gluten-Free Option: You can make this with a high-quality, 1-to-1 gluten-free flour blend (I’ve had luck with Cup4Cup). The dough will be more delicate and less stretchy, so be extra gentle when rolling and shaping.
Common Pitfalls (And How to Fix Them)
- “My dough is too dry/sticky!” This is all about environment. If your house is dry, you may need a tiny bit more water (add it 1 teaspoon at a time). If it’s sticky, add more flour while kneading, not in the initial mix. The final dough should be firm and smooth, not tacky.
- “My Berlingots burst while cooking!” Ah, the classic. This is almost always one of two things: 1) You overfilled them, or 2) You didn’t get all the air out when you sealed the tube. Make sure to press firmly around the filling to create a good seal.
- “They all stuck together on the baking sheet!” This is heartbreaking! You must use a heavy dusting of semolina or flour on your tray, and they must not touch. Give them space. They’re needy like that.
Serving Suggestions
I truly believe the simple lemon-thyme broth is the best way to serve these. It’s light, elegant, and lets you taste the pasta and filling.
However, you could also serve them as a main course by tossing them in:
- A light, fresh tomato sauce.
- A simple pesto, thinned out with a little pasta water.
- That brown butter and sage sauce I mentioned earlier (seriously, it’s so good).
Garnish with fresh herbs (chives, parsley) and always, always offer fresh grated parmesan or pecorino on the side.
Storing, Freezing, and Reheating
This is the best part: these freeze perfectly.
- To Store (Uncooked): You can keep the freshly-made, uncooked berlingots on their flour-dusted tray, covered tightly with plastic wrap, in the fridge for up to 1 day.
- To Freeze (Recommended!): This is my preferred method. Place the baking sheet with the non-touching berlingots straight into the freezer. Let them freeze until rock solid (about 1-2 hours). Once solid, you can dump them all into a freezer-safe bag or container. They won’t stick! They’ll keep for up to 2 months.
- Cooking from Frozen: Do NOT thaw them! Cook them straight from the freezer. Just add an extra 1-2 minutes to the cooking time. It’s a lifesaver.
- Reheating (Cooked): I don’t really recommend it. Like most pasta, they’re best fresh. Reheating tends to make them overcooked and soggy.
Your Questions, Answered!
Can I make the pasta dough ahead of time? Yes! You can make the dough, wrap it very tightly in plastic wrap, and store it in the refrigerator for up to 2 days. Let it sit on the counter for 30-60 minutes to come to room temperature before you try to roll it.
Do I really need a pasta machine? Need? No. Want? Yes. You can roll this by hand with a rolling pin, but it is a serious workout. You need to get the dough incredibly thin (like, you-can-almost-see-your-hand-through-it thin). A pasta machine just makes the job faster and much more consistent.
What is “00” flour and is it essential? “00” (or doppio zero) is a very finely milled Italian flour. It gives pasta a super-silky, tender texture. It’s not essential—all-purpose flour will still make delicious pasta—but if you see it at the store, it’s worth picking up.
It’s a Project, But It’s Worth It
When you set that bowl down on the table, it feels like such an accomplishment. These little berlingots are so unique, and the process of making them is just as satisfying as eating them.
Don’t be intimidated by the shape. Once you get the “pinch north-south, pinch east-west” rhythm, you’ll be flying through them. This is a recipe that proves that “fancy” food is often just simple food made with care.
I hope you love making—and eating—these as much as I do!
Recipe Summary
These French Berlingots are delicate, pyramid-shaped pasta filled with a creamy goat cheese and herb mixture, served in a light, elegant lemon-thyme broth. While they look impressive, the shaping technique is a simple “pinch and twist” method. They are a beautiful weekend project or dinner party starter and freeze wonderfully for a quick, high-end meal later.