Homemade Pralines Roses Recipe for a Classic French Sweet
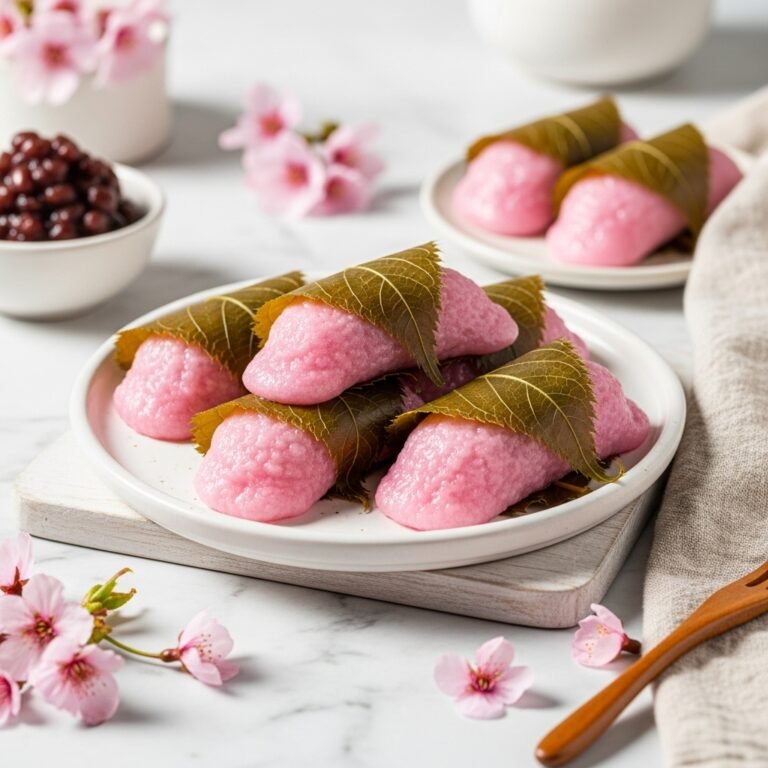
Have you ever seen those unbelievably vibrant, crunchy pink nuts in the window of a French bakery? They almost look like jewels. Those, my friends, are Pralines Roses, or French pink pralines, and they are one of my favorite confections to come out of France.
Now, let’s clear one thing up right away: these are not the soft, creamy, pecan-based pralines you find in New Orleans. These are their crunchy, nutty, and dazzlingly pink French cousins.
Pralines Roses are essentially whole almonds coated in a crunchy, opaque, rosy-pink sugar shell. They are famously from the city of Lyon, where they’re used to make two iconic desserts: the Tarte aux Pralines (a gooey, bright pink tart) and the Praluline (a sweet brioche bread absolutely loaded with them).
They look like something that would be incredibly complicated to make, right? I used to be so intimidated by them. But here’s the secret: they are actually one of the most straightforward candies you can make.
The process is fascinating. Unlike most candy-making where you’re trying to prevent crystallization, here you’re actually forcing it to happen. You cook a sugar syrup, add the nuts, and then stir like crazy until the sugar seizes up and forms that signature “sandy,” crunchy coating.
It’s a quick, fun recipe that yields a stunning result. You can eat them just as they are (so crunchy and addictive!), crush them to sprinkle over ice cream, or use them in your own baking adventures. If you’re ready to make something truly special, let’s do this!
A Quick Look: Why This Recipe Works
- The Taste: It’s a pure, simple flavor. You get the warm, toasty nuttiness of the almond, followed by a wave of clean, sugary sweetness, all brightened with a little hint of vanilla.
- The Texture: This is all about the crunch. The sugar shell is hard, crystalline, and “sandy,” which creates a super satisfying contrast with the firm almond inside.
- The Time: This is a surprisingly fast recipe. From start to finish, you’ll be done in about 30-40 minutes. The active cooking time is only about 15 minutes, and they cool very quickly.
- The Difficulty: I’d call this an “Ambitious Beginner” or “Intermediate” recipe. It’s not technically difficult, but you do need a candy thermometer, and you have to work quickly once the candy is ready.
- It’s a Showstopper: Let’s be real—they are beautiful. That electric pink color is just so fun. They are naturally gluten-free, dairy-free, and vegan, making them a fantastic homemade gift.
What You’ll Need
The ingredient list is short and sweet. The almonds are the star, so try to get good ones.
- 1 ½ cups (about 7 oz or 200g) whole, raw, blanched almonds
- 1 ⅓ cups (about 9 oz or 260g) granulated sugar
- ½ cup (4 oz) water
- 1 tsp pure vanilla extract
- ½ tsp (or more) pink or red gel food coloring
Special Equipment You’ll Need:
- A reliable digital candy thermometer. This is essential!
- A heavy-bottomed, medium-sized saucepan (stainless steel is great).
- A large baking sheet lined with parchment paper or a silicone mat.
- A heatproof spatula or wooden spoon.
- Two forks (for separating the pralines later).
Let’s Make Pink Pralines! Step-by-Step
First, read all the steps. Once the sugar starts, you won’t have time to stop and read. Get everything ready to go!
Step 1: Prep Your Station (Mise en Place)
- Line your large baking sheet with parchment paper or a silicone mat. Place it right next to your stove.
- Have your two forks ready.
- Measure out all your ingredients. Make sure your candy thermometer is clean and ready.
Step 2: Toast the Almonds
- Preheat your oven to 350°F (175°C).
- Spread the blanched almonds on a small, unlined baking sheet.
- Toast for 8-10 minutes, shaking the pan halfway through. You want them to be just faintly golden and smelling nutty. Be careful not to let them get dark.
- Set them aside. It’s perfectly fine (and even good!) if they are still warm when you add them to the sugar.
Step 3: Make the Sugar Syrup
- In your medium, heavy-bottomed saucepan, combine the granulated sugar and the water.
- Place it over medium heat and stir gently with your spatula or wooden spoon only until the sugar has completely dissolved. You shouldn’t see any more granules.
- Once it’s dissolved, stop stirring!
Step 4: Cook the Syrup
- Clip your candy thermometer to the side of the pot, making sure the tip is submerged in the syrup but not touching the bottom of the pan.
- Bring the syrup to a boil. Let it bubble away, without stirring, until the thermometer reaches 275°F (135°C). This is the “soft crack” stage.
- Pro Tip: If you see any sugar crystals forming on the side of the pan, dip a pastry brush in water and gently “wash” them down into the syrup. This helps prevent the wrong kind of crystallization.
Step 5: Add Color and Nuts
- As soon as the syrup hits 275°F, turn off the heat.
- Immediately (but carefully!), add the vanilla extract and the gel food coloring. It will bubble and steam, which is normal. Stir to combine the color. Be bold with the color—it will look very dark, but it will lighten up when it crystallizes.
- Dump all of the toasted almonds into the hot pink syrup.
Step 6: The “Sanding” Process (The Magic Part!)
- This is the most important step. Start stirring the almonds in the syrup constantly with your wooden spoon or spatula.
- At first, the syrup will be clear, glossy, and sticky.
- Keep stirring. After about 1-2 minutes, you’ll see the syrup start to look cloudy and opaque.
- Keep stirring! Suddenly, the sugar will “seize” or crystallize. It will rapidly turn from a syrup into a “sandy,” thick, and sugary coating that clings to the nuts. This is exactly what you want!
Step 7: The (Optional) Second Cook
- This step gives a slightly more robust, even coating. Once the sugar has crystallized, place the pot back on very low heat.
- Continue stirring for another 2-3 minutes. This will gently re-melt just a little of the crystallized sugar, helping it form a harder, slightly shinier (but still opaque) shell. Don’t let it all turn back into a liquid syrup.
Step 8: Cool and Separate
- Quickly dump the coated nuts from the pot onto your prepared parchment-lined baking sheet.
- This is where you have to move fast. Use your two forks to separate the nuts from each other. They will want to clump together, but try to get as many individual pralines as you can. They are hot, so don’t use your hands!
- If you end up with a few big clusters, don’t worry. You can break them apart once they’re cool.
Step 9: Let Them Cool
- Let the Pralines Roses cool completely on the baking sheet. This won’t take long, maybe 20-30 minutes.
- Once they are fully cool, they will be hard, crunchy, and ready to eat!
My Top Tips for Praline Success
- Mise en Place is Everything: I’m saying it again because it’s that important. This recipe goes from 0 to 100 very quickly. Have your lined tray, forks, and ingredients measured and waiting before you turn on the stove.
- Blanched Almonds are Key: Don’t use almonds with the skin on. The pink sugar won’t adhere as well, and you’ll lose that classic, clean look.
- Use Gel Food Coloring: Liquid food coloring can add too much extra moisture. You need the concentrated power of a gel to get that signature vibrant pink. And you’ll probably need more than you think—the white sugar dilutes the color a lot.
- Embrace the Crystallization: Remember, the goal here is to make the sugar seize. So when you get to Step 6, stir, stir, stir! This agitation is what encourages the sugar molecules to form crystals.
- Work Fast to Separate: The pralines will set quickly. Get them onto the tray and start separating them with your forks immediately. If you have a partner, this is a great job for them.
- Humidity is Not Your Friend: Like all candy projects, this is best done on a dry, clear day. If it’s very humid or raining, the sugar can absorb moisture from the air and become sticky.
Recipe Variations & Dietary Notes
- Pralines Noisettes: You can absolutely make this exact same recipe using whole, raw, blanched hazelnuts instead of almonds. It’s just as traditional and delicious.
- Different Colors: Who says they have to be pink? You could make them baby blue, mint green, or even white (by using no color at all).
- Flavor Twists: Instead of vanilla, try 1/2 teaspoon of almond extract for a more intense “marzipan” flavor, or 1/2 teaspoon of rose water for a lovely floral note (add it with the food coloring).
- Dietary Status: This recipe is a fantastic one for serving guests because it’s naturally gluten-free, dairy-free, and vegan!
Common Troubles & How to Fix Them
- “My sugar coating is clear and glassy, like a lollipop.”
- The Problem: You either cooked the sugar to a much higher temperature (like 300°F+, the hard-crack stage) OR you didn’t stir enough in Step 6. Stirring is what creates the opaque, sandy texture.
- The Fix: Honestly, they’ll still be delicious! Just not “classic” Pralines Roses. Next time, watch your thermometer closely and stir continuously once you add the nuts.
- “My sugar seized into one giant rock in the pan.”
- The Problem: You may have had the heat too high, or you hesitated too long.
- The Fix: If it’s a solid mass, you may have to start over. (See the FAQ for cleaning the pot!)
- “I have one giant pink blob on my baking sheet.”
- The Problem: You didn’t separate them fast enough while they were cooling.
- The Fix: No problem! Just let it cool completely, then break the big cluster into smaller, bite-sized “praline bark” or chunks. It all eats the same.
- “My sugar syrup crystallized before I added the nuts.”
- The Problem: This can happen if you stirred it after the sugar dissolved, or if a stray sugar crystal fell into the pot.
- The Fix: You’ll have to start this part over. Scrape it out (or clean the pot), and next time, remember: do not stir while it boils!
How to Use Your Beautiful Pink Pralines
While I am 100% guilty of eating these straight from the jar, here’s how they are traditionally used:
- As Candy: Pile them in a pretty glass bowl or jar and set them out. They are a crunchy, sweet snack.
- In Pastries (The Classic Use): This is their true calling.
- Tarte aux Pralines: The pralines are roughly crushed and cooked with heavy cream, then poured into a sweet tart shell to set. It’s decadent and stunning.
- Praluline de Roanne: This is a famous brioche from the French baker Auguste Pralus. The brioche dough is studded with a very generous amount of crushed pink pralines.
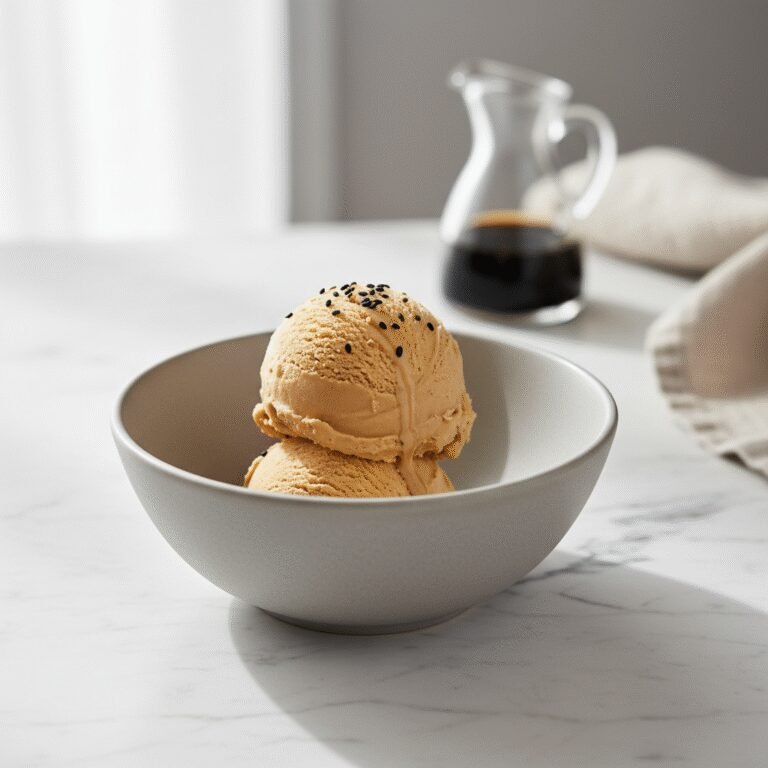
- As a Topping: Roughly crush them with a rolling pin (put them in a ziptop bag first!) and sprinkle them over:
- Vanilla or chocolate ice cream
- Yogurt bowls
- The frosting on a cupcake or cake
- Panna cotta
- As a Homemade Gift: These are made for gifting. Scoop them into clear cellophane bags and tie them with a beautiful ribbon. It’s such an elegant, impressive-looking gift.
How to Store Pralines Roses
The number one enemy of hard candy is moisture. Do not, under any circumstances, store these in the refrigerator. The fridge is a humid environment, and it will make your pralines weep and get sticky.
The best way to store them is in an airtight container (a glass jar with a good seal is great) at room temperature in a cool, dark place (like your pantry).
Stored this way, your Pralines Roses will stay perfectly hard, crunchy, and delicious for weeks, even up to a month.
Your Praline Questions, Answered
Q: Do I really, really need a candy thermometer? A: Yes. I’m sorry, but this is one of those times. The difference between 260°F and 275°F and 300°F is the difference between a soupy mess, a perfect crystallization, and a rock-hard clear candy. You need the precision.
Q: How do I clean my pot?! It’s covered in hard pink cement! A: This is the easiest part! Just fill the pot with water, put it back on the stove, and bring it to a boil. The hard sugar will melt and dissolve completely into the water. Pour it out, and your pot will be good as new. Do the same for your spoon and thermometer.
Q: Can I use less sugar? A: Not really. The sugar-to-almond ratio is what creates the thick, crunchy coating. If you use less sugar, you’ll just have very lightly-coated almonds.
Q: My pralines aren’t very pink. A: You need to be brave with the gel food coloring! It takes a surprisingly large amount to overcome the whiteness of the sugar. Add more than you think you need—it will lighten up as it crystallizes.
Q: Can I use peanuts or pecans? A: You can, and it would probably be tasty, but it wouldn’t be a classic French Praline Rose. The traditional nuts are almonds or hazelnuts.
A Little Piece of Lyon in Your Kitchen
You did it! You’ve made one of the most iconic and beautiful confections in all of France. That crunchy, nutty, sugary bite is just so special, and knowing you made it yourself makes it taste even better.
Whether you’re snacking on them, gifting them, or planning your own tarte aux pralines, I hope you feel proud of this little kitchen accomplishment. They are such a joy to make and share.
Recipe Summary
This recipe teaches you how to make authentic French Pralines Roses at home. Whole, blanched almonds are toasted for flavor. A sugar-and-water syrup is cooked to the “soft crack” stage (275°F), then colored with pink food coloring. The warm nuts are added, and the mixture is stirred constantly off the heat to force the sugar to “seize” and crystallize, forming the signature opaque, crunchy, “sandy” pink shell. The pralines are then separated and cooled. They are naturally gluten-free and vegan, perfect for eating as-is or using in classic French pastries.