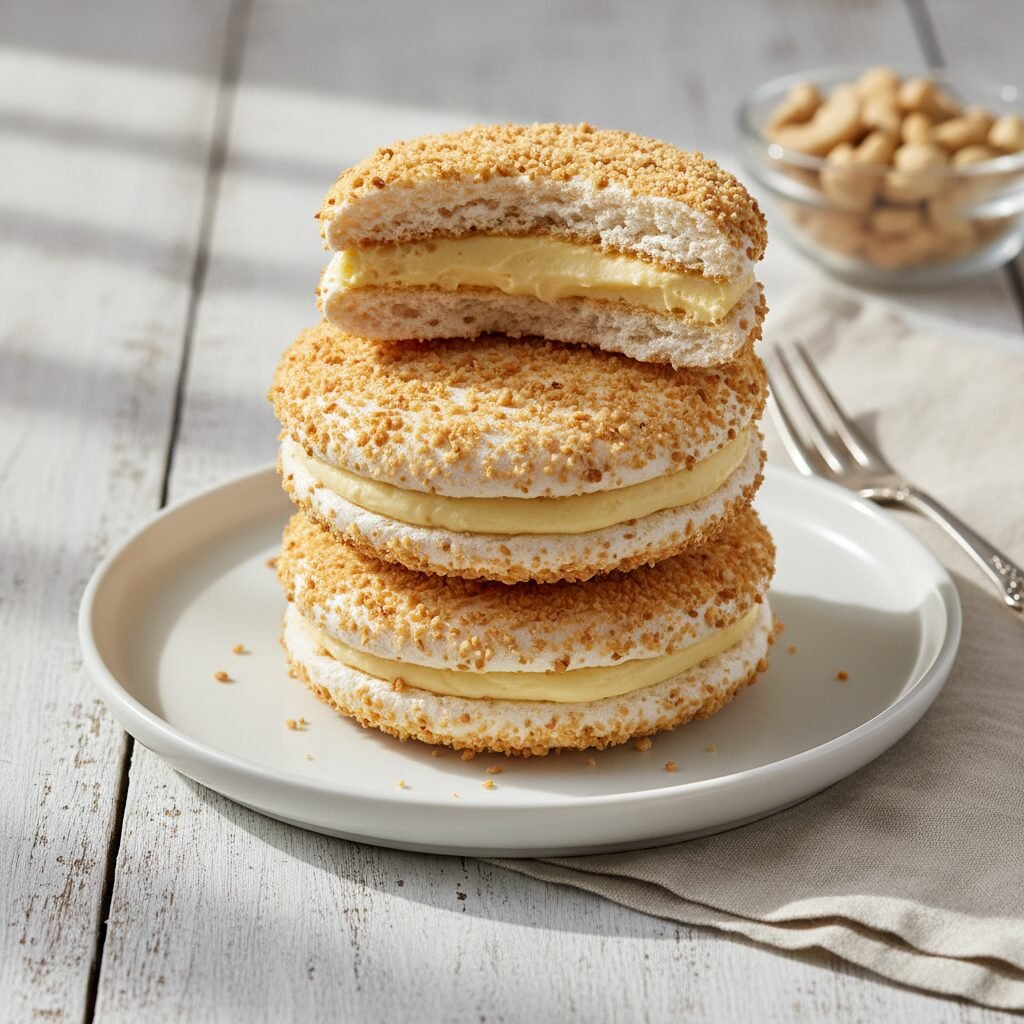
Heavenly Filipino Cashew Meringue Cookies (Silvanas)
Silvanas Recipe
Get ready to fall in love with your new favorite dessert! Silvanas are a heavenly Filipino treat made of two crisp cashew-meringue wafers sandwiched together with a rich, silky French buttercream and coated in cookie crumbs. Served frozen, they have the most incredible texture that’s simultaneously crisp, chewy, and melts in your mouth—a truly unforgettable cookie experience you can now make right at home.
45 minutes
30 minutes
3 hours 15 minutes (includes freezing time)
18-20 cookie sandwiches
Dessert
Baking
Filipino
Gluten-Free
Why You’ll Love This Recipe
- A unique frozen cookie with a crisp, chewy, and creamy texture.
- Loaded with rich, nutty flavor from toasted cashews.
- A show-stopping dessert that’s perfect for making ahead.
- Surprisingly achievable with step-by-step instructions.
Equipment You’ll Need
- Stand mixer with whisk and paddle attachments (or a hand mixer)
- 2-3 large baking sheets
- Parchment paper
- Piping bag with a 1/2-inch round tip
- Small saucepan
- Instant-read thermometer
- Offset spatula
- Sifter or fine-mesh sieve
Ingredients
- For the Cashew Meringue Wafers:
- 6 large egg whites, room temperature
- 1/2 teaspoon cream of tartar
- 1 cup granulated sugar
- 1 cup finely ground roasted cashews
- For the French Buttercream:
- 6 large egg yolks
- 1 cup granulated sugar
- 1/2 cup water
- 1 1/2 cups (3 sticks) unsalted butter, softened but still cool, cut into cubes
- 2 teaspoons pure vanilla extract
- 1/4 teaspoon salt
- For the Crumb Coating:
- 1 1/2 cups finely chopped or ground roasted cashews
- 1 cup finely crushed butter cookies or vanilla wafers (optional, for extra crunch)
Instructions
- Step 1: Prepare for Baking. Preheat your oven to 300°F (150°C). Line two or three large baking sheets with parchment paper. Using a 2-inch round cookie cutter or glass as a guide, draw circles on the parchment paper, leaving about 1.5 inches of space between them. Flip the parchment over so the ink/pencil side is down.
- Step 2: Make the Meringue. In the clean, dry bowl of a stand mixer fitted with the whisk attachment, beat the egg whites and cream of tartar on medium speed until foamy. Gradually add the granulated sugar, one tablespoon at a time, while increasing the speed to high. Continue to beat until the meringue is stiff, glossy, and holds a sharp peak when the whisk is lifted.
- Step 3: Fold in the Cashews. Gently fold the finely ground cashews into the meringue using a spatula. Be careful not to deflate the mixture; use gentle, sweeping motions until just combined.
- Step 4: Pipe and Bake the Wafers. Transfer the meringue to a piping bag fitted with a 1/2-inch round tip. Pipe 2-inch rounds onto your prepared baking sheets, using the traced circles as a guide. Bake for 25-30 minutes, or until the wafers are a pale tan color and feel dry to the touch. They should lift easily from the parchment. Let them cool completely on the baking sheets.
- Step 5: Start the Buttercream. While the wafers cool, begin the buttercream. In a stand mixer bowl, whisk the egg yolks on high speed until they are pale and have doubled in volume, about 5-7 minutes. Leave them in the mixer.
- Step 6: Make the Sugar Syrup. In a small saucepan, combine the sugar and water. Bring to a boil over medium-high heat, stirring until the sugar dissolves. Continue to boil, without stirring, until the syrup reaches 240°F (115°C) on an instant-read thermometer (soft-ball stage).
- Step 7: Temper the Yolks. With the mixer running on low speed, very slowly and carefully stream the hot sugar syrup down the side of the bowl into the whipped egg yolks. Be careful to avoid the whisk. Once all the syrup is added, increase the speed to high and beat for 8-10 minutes, until the bottom of the bowl feels cool to the touch.
- Step 8: Finish the Buttercream. With the mixer on medium speed, add the cubed butter, one piece at a time, waiting until each is incorporated before adding the next. Once all butter is added, mix in the vanilla extract and salt. The mixture might look curdled at some point—this is normal! Just keep beating on high speed, and it will come together into a smooth, silky buttercream.
- Step 9: Assemble the Silvanas. Pair up your cooled meringue wafers by size. Spread a generous layer of buttercream on the flat side of one wafer and top it with another wafer, pressing gently to create a sandwich. Place the assembled sandwiches on a parchment-lined tray.
- Step 10: First Freeze. Freeze the cookie sandwiches for at least 30-45 minutes. This step is crucial as it firms up the buttercream, making the next step much cleaner and easier.
- Step 11: Coat the Cookies. Prepare your crumb coating by mixing the ground cashews and crushed cookies (if using) in a shallow dish. Remove the chilled Silvanas from the freezer. Using an offset spatula, frost the entire outside (top, bottom, and sides) of each sandwich with a thin layer of buttercream.
- Step 12: Dredge and Final Freeze. Immediately roll each frosted sandwich in the crumb mixture, pressing gently to ensure the crumbs adhere all over. Place the finished Silvanas back on the parchment-lined tray. Freeze for at least 2 hours, or until completely firm, before serving.
Expert Cooking Tips
- For the best meringue, use egg whites that are at room temperature. They whip up with more volume than cold eggs.
- When making the sugar syrup for the buttercream, use a wet pastry brush to wipe down the sides of the saucepan to prevent sugar crystals from forming.
- Don’t rush the cooling of the meringue-and-syrup mixture for the buttercream. If it’s too warm when you add the butter, the buttercream will be soupy.
- Work in batches when coating the Silvanas. Only take a few out of the freezer at a time to keep them firm and easy to handle.
Substitutions and Variations
While cashews are traditional, you can easily substitute them with finely ground almonds, pecans, or even pistachios for a different flavor profile in both the meringue and the coating. For a nut-free coating, use finely crushed shortbread cookies, vanilla wafers, or even toasted cake crumbs. The French buttercream is classic, but a simpler American buttercream can be used in a pinch, though it will be sweeter and less silky.
Common Mistakes to Avoid
The most common issue is a flat or weeping meringue, usually caused by a greasy bowl, a speck of egg yolk in the whites, or humidity. Always ensure your equipment is spotless. Another frequent problem is a broken buttercream. If it looks curdled or separated, don’t panic! Just keep whipping on high speed. If it’s too soft, chill the bowl for 15-20 minutes and then whip again until it comes together.
Serving Suggestions
Silvanas are meant to be eaten frozen, straight from the freezer! Their unique, crisp-yet-chewy texture is at its peak when chilled. They are an elegant treat to serve with a strong cup of black coffee or a soothing hot tea, which beautifully contrasts their creamy sweetness. For parties, arrange them on a chilled platter to keep them from softening too quickly.
Storage and Reheating Tips
Proper storage is key! Place the fully frozen Silvanas in a single layer in an airtight container or freezer bag. Separate layers with sheets of parchment paper to prevent them from sticking together. They will keep beautifully in the freezer for up to one month. Do not store them in the refrigerator, as the humidity will cause the delicate meringue wafers to become soft and soggy.
Nutrition Facts (Estimated)
| Serving Size | 1 cookie sandwich |
| Calories | 285 kcal |
| Fat | 21 g |
| Saturated Fat | 12 g |
| Unsaturated Fat | 8 g |
| Trans Fat | 0.5 g |
| Cholesterol | 80 mg |
| Sodium | 95 mg |
| Carbohydrates | 20 g |
| Fiber | 1 g |
| Sugar | 18 g |
| Protein | 4 g |
Frequently Asked Questions
Why did my meringue wafers spread out and become thin?
This typically happens if the meringue was under-whipped and didn’t reach stiff peaks, or if the ground cashews were folded in too aggressively, deflating the air. Ensure your meringue is thick and glossy, and use a gentle hand when folding.
Can I make these dairy-free?
Yes, you can make a dairy-free version by substituting the unsalted butter in the buttercream with a high-quality, firm vegan butter stick (not a soft tub-style spread). The results will be very similar and just as delicious.
My buttercream is soupy. How can I fix it?
A soupy buttercream usually means the butter was too soft or the egg yolk base was still too warm when the butter was added. The fix is simple: place the entire mixing bowl in the refrigerator for 20-30 minutes to chill the mixture, then return it to the mixer and whip on high speed until it becomes thick and fluffy.
Do I have to use a piping bag?
While a piping bag provides the most uniform and perfectly round wafers, you can also use two spoons to drop mounds of the meringue onto the parchment paper. Use the back of a spoon to gently shape them into circles before baking.
Conclusion
There’s nothing quite like the moment you bite into a homemade Silvana—the crisp shell, the chewy interior, and the decadently creamy filling. It’s a baking project that is incredibly rewarding and guaranteed to wow anyone lucky enough to try one. I hope you have as much fun making these as you will eating them! If you create these little bites of heaven, please share a photo and tag me on social media. I absolutely love seeing your beautiful creations!