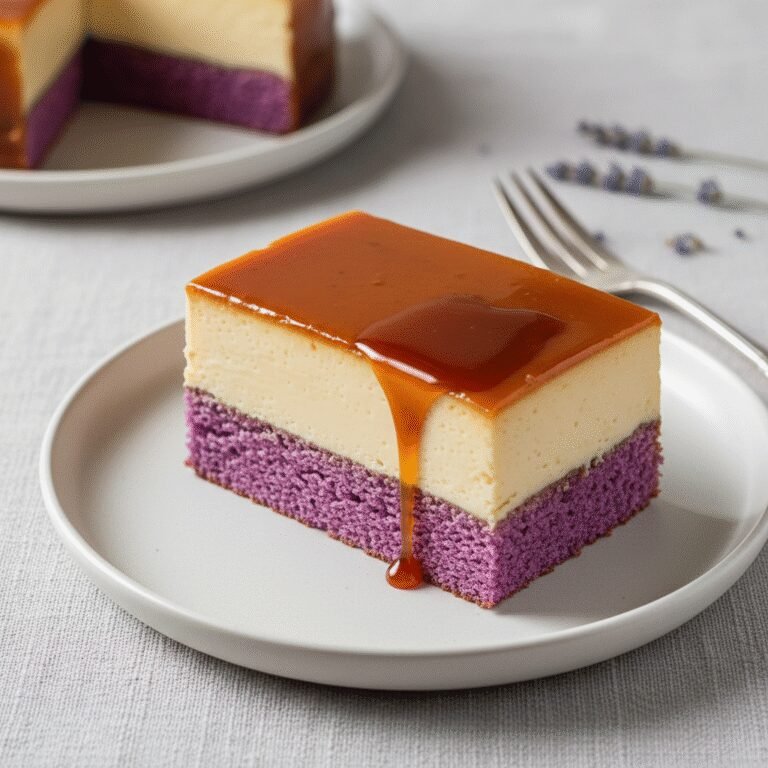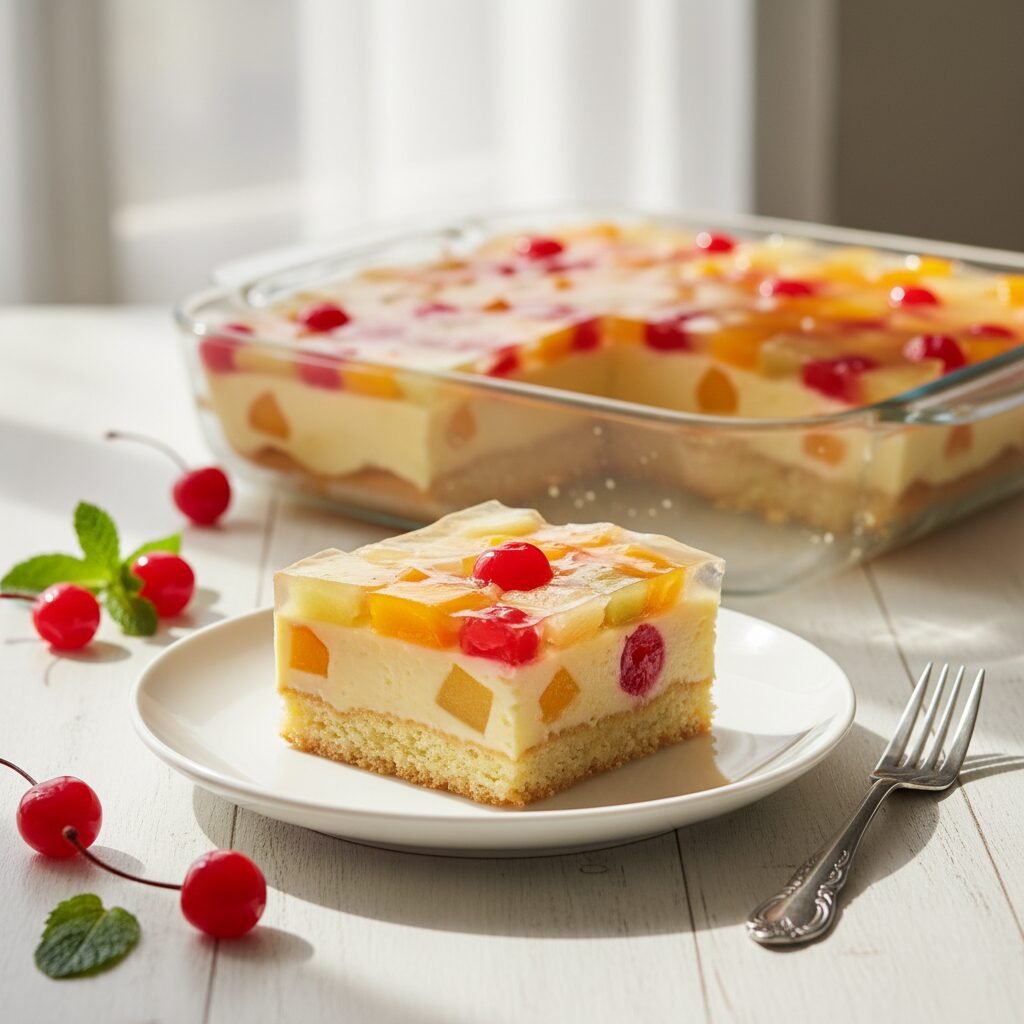
Heavenly Layered Filipino Fruit Cocktail Cake (Crema de Fruta)
Crema De Fruta Recipe
Get ready to fall in love with this stunning Crema de Fruta, a classic Filipino dessert that’s the star of any celebration! It’s a dreamy, no-bake icebox cake featuring layers of soft ladyfingers, rich vanilla custard, and vibrant fruit cocktail, all crowned with a glistening gelatin topping. This recipe is surprisingly simple to assemble and is a guaranteed crowd-pleaser that looks as incredible as it tastes.
25 minutes
15 minutes
4 hours 40 minutes (includes chilling)
12-16 servings
Dessert
No-Bake
Filipino
N/A
Why You’ll Love This Recipe
- Effortless no-bake dessert
- Creamy, fruity, and refreshingly light
- Perfect make-ahead party showstopper
- Vibrant, picture-perfect layers
Equipment You’ll Need
- 9×13 inch rectangular baking dish (glass or ceramic is best)
- Medium saucepan
- Whisk
- Spatula
- Mixing bowls
- Fine-mesh sieve or colander
Ingredients
- 2 packs (7 oz each) ladyfingers (or Broas)
- 2 cans (15 oz each) fruit cocktail in heavy syrup, drained, syrup reserved
- 1 can (14 oz) sweetened condensed milk
- 1 can (12 oz) evaporated milk
- 1/2 cup all-purpose cream or heavy cream
- 4 large egg yolks
- 1/4 cup cornstarch
- 1 teaspoon vanilla extract
- A pinch of salt
- 2 packs (0.3 oz each) unflavored gelatin powder (like Knox)
- 1/2 cup granulated sugar (for gelatin topping)
- 1 1/2 cups water (for gelatin topping)
Instructions
- First, prepare your fruit. Drain the two cans of fruit cocktail through a sieve set over a bowl. Reserve 1 cup of the syrup for soaking the ladyfingers. Set the drained fruit and the reserved syrup aside.
- Now, let’s make the creamy custard filling. In a medium saucepan, whisk together the egg yolks and cornstarch until you have a smooth paste. This prevents lumps!
- Gradually whisk in the evaporated milk and sweetened condensed milk until fully combined. Add the pinch of salt.
- Place the saucepan over medium-low heat. Cook, whisking constantly, until the mixture thickens to a pudding-like consistency. This should take about 8-10 minutes. Be patient and keep whisking to prevent it from scorching at the bottom.
- Once thickened, remove the custard from the heat. Stir in the vanilla extract and the all-purpose cream. Set it aside to cool slightly, placing a piece of plastic wrap directly on the surface to prevent a skin from forming.
- Time to assemble! Arrange a single, tight layer of ladyfingers at the bottom of your 9×13 inch baking dish. Brush them generously with the reserved fruit cocktail syrup until they are moistened but not completely soggy.
- Pour the slightly cooled custard evenly over the layer of ladyfingers. Use a spatula to spread it into a smooth, even layer that covers the entire base.
- Artfully arrange the drained fruit cocktail over the custard layer. Try to distribute the colors and types of fruit evenly for a beautiful presentation.
- Next, prepare the gelatin topping. In a small saucepan, combine the unflavored gelatin powder, granulated sugar, water, and if you like, a few tablespoons of the remaining fruit syrup for extra flavor.
- Let the gelatin ‘bloom’ for about 5 minutes. Then, place the saucepan over low heat and stir gently until the gelatin and sugar have completely dissolved. Do not let it boil. The liquid should be clear.
- Remove the gelatin mixture from the heat and let it cool for about 10-15 minutes. It should be close to room temperature but still liquid. If it’s too hot, it can melt the custard layer.
- Carefully and slowly pour the cooled gelatin mixture over the fruit layer. Pouring it over the back of a spoon can help disperse the liquid gently and prevent it from dislodging the fruit.
- Transfer the dish to the refrigerator. Chill for at least 4 hours, or preferably overnight, until the gelatin is firm and the cake is fully set.
- Once set, slice into squares and serve chilled. Enjoy your beautiful creation!
Expert Cooking Tips
- For a richer custard, use heavy cream instead of all-purpose cream. For a brighter yellow color, you can add a tiny drop of yellow food coloring.
- Don’t over-soak the ladyfingers! A quick brush of syrup is all you need. If they get too soggy, the base will be mushy.
- When making the custard, constant whisking over medium-low heat is key. This ensures a silky-smooth texture and prevents the eggs from scrambling.
- Pour the gelatin topping slowly and carefully. Start from the corners and work your way in. This helps create a flawless, crystal-clear top layer.
- For an extra layer of flavor, you can add a tablespoon of lemon or calamansi juice to the gelatin mixture to cut through the sweetness.
Substitutions and Variations
You can easily customize your Crema de Fruta! Instead of ladyfingers, you can use a base of graham crackers or a thin layer of vanilla sponge cake. Feel free to use fresh fruits like sliced peaches, kiwi, and strawberries, but be aware that fresh pineapple and kiwi contain enzymes that can prevent gelatin from setting unless they are cooked first. For a dairy-free version, substitute the milks and cream with full-fat coconut milk and coconut cream, and use a plant-based ‘egg yolk’ replacer for the custard.
Common Mistakes to Avoid
A common mistake is cooking the custard over too high heat, which can cause it to become lumpy or scorch. Go low and slow, and never stop whisking. Another pitfall is pouring hot gelatin over the custard, which will cause the layers to bleed into each other. Always let the gelatin cool to room temperature before pouring. Finally, don’t skimp on the chilling time! The cake needs several hours for the flavors to meld and for all the layers to set firmly for clean, beautiful slices.
Serving Suggestions
Crema de Fruta is best served chilled, straight from the refrigerator. Cut it into neat squares and serve on dessert plates. It’s a fantastic standalone dessert after a hearty meal, but it also pairs wonderfully with a cup of hot coffee or black tea to balance its sweet and creamy profile. It is the perfect centerpiece for holiday gatherings, potlucks, and family celebrations.
Storage and Reheating Tips
Store any leftover Crema de Fruta tightly covered with plastic wrap in the refrigerator. It will keep well for up to 3 days. The ladyfingers will continue to soften over time, so it’s best enjoyed within the first couple of days for the best texture. This dessert does not freeze well, as the custard and gelatin can become watery and separate upon thawing.
Nutrition Facts (Estimated)
| Serving Size | 1 slice (1/16th of cake) |
| Calories | 350 kcal |
| Fat | 18 g |
| Saturated Fat | 10 g |
| Unsaturated Fat | 8 g |
| Trans Fat | 0 g |
| Cholesterol | 80 mg |
| Sodium | 150 mg |
| Carbohydrates | 40 g |
| Fiber | 1 g |
| Sugar | 25 g |
| Protein | 5 g |
Frequently Asked Questions
Can I use fresh fruit instead of canned fruit cocktail?
Yes, you absolutely can! Sliced peaches, mangoes, strawberries, and mandarin oranges are wonderful choices. However, avoid using fresh pineapple, kiwi, papaya, or mango as they contain enzymes that will prevent the gelatin from setting. If you want to use them, you must cook them briefly first to deactivate the enzymes.
Why is my custard lumpy?
Lumpy custard is usually caused by two things: not mixing the cornstarch and egg yolks into a smooth paste before adding the milk, or cooking the mixture over heat that is too high, which scrambles the eggs. To fix it, you can try to pass the custard through a fine-mesh sieve before spreading it on the ladyfingers.
Can I make this dessert ahead of time?
Yes, Crema de Fruta is the perfect make-ahead dessert! In fact, it needs to be made at least 4-6 hours in advance for it to set properly. Making it the day before you plan to serve it is ideal, as this allows the flavors to meld together beautifully.
My gelatin layer is cloudy. What did I do wrong?
A cloudy gelatin layer can happen if the mixture was boiled or stirred too vigorously, incorporating air bubbles. To ensure a crystal-clear topping, heat the gelatin mixture gently only until the granules are dissolved, and stir minimally. Letting it rest for a few minutes before pouring can also help bubbles dissipate.
Conclusion
There you have it – a showstopping Crema de Fruta that’s as fun to make as it is to eat! This layered dessert is a true celebration of textures and flavors, from the soft, cake-like base to the rich custard and sweet fruit. It’s a recipe that’s destined to become a family favorite. If you try this recipe and love it, I’d be thrilled to see your creations! Snap a photo and share it on Pinterest or Instagram, and don’t forget to tag me!