The Jeweled Crown of Christmas: A Bolo Rei (Portuguese King Cake) Recipe
If you’ve never seen a Bolo Rei on a holiday table, you’re in for such a treat. It’s the centerpiece of a Portuguese Christmas. This isn’t just a cake; it’s a spectacle.
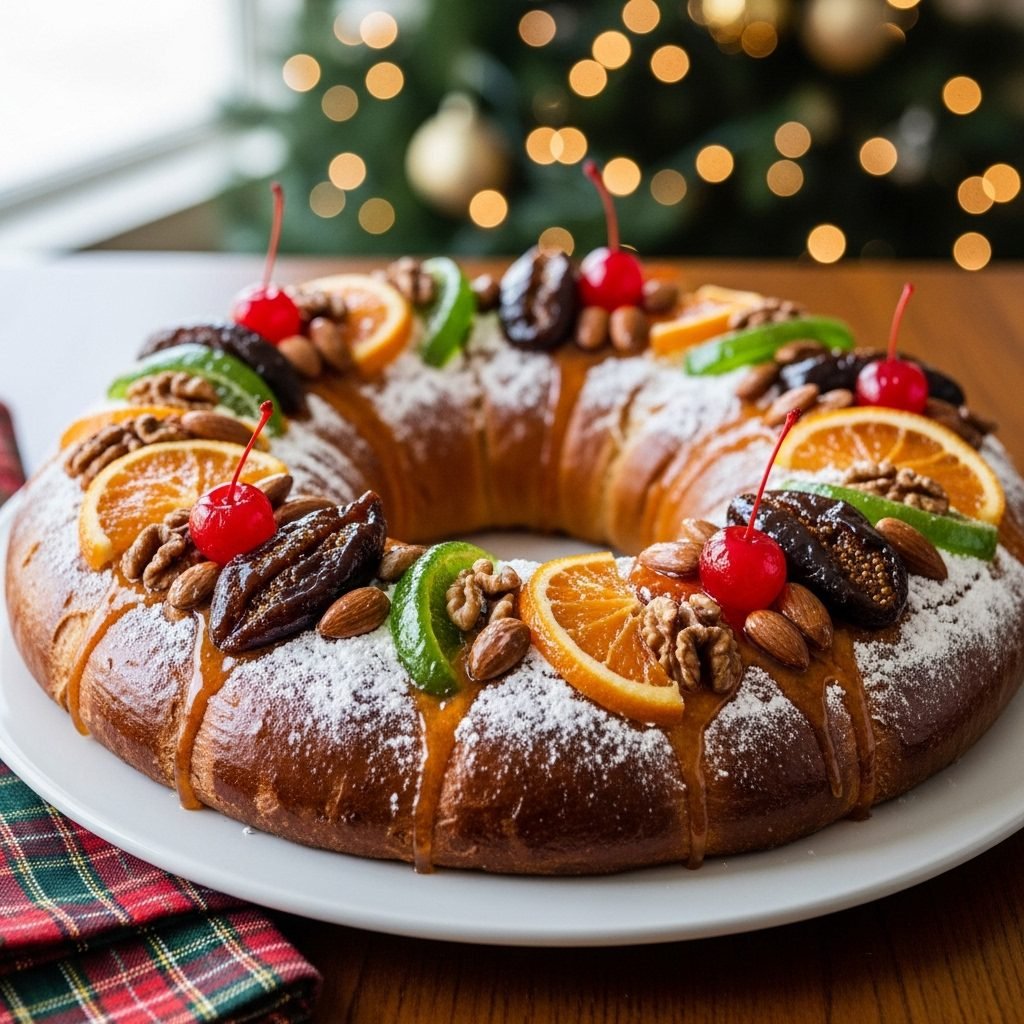
Bolo Rei, or “King Cake,” is a stunning, wreath-shaped sweet bread, meant to look like a crown. And it’s absolutely covered in “jewels”—big, beautiful, glistening pieces of candied fruit and nuts.
But it’s not just a pretty face. The inside is a soft, tender, brioche-like dough that’s rich with butter and eggs. It’s fragrant with fresh citrus zest and a little kick from a splash of Port wine. And as if that weren’t enough, the dough itself is studded with a generous mix of chopped nuts and brandy-soaked fruits.
This is a “project bake,” and it’s one of my favorite holiday traditions. It’s the kind of recipe you make on a cozy weekend, filling the entire house with the smell of warm spices, citrus, and baking bread. It’s a true labor of love, and when you place this golden, jeweled crown on the table, it’s a “wow” moment that’s worth every step.
What Makes This Bolo Rei So Special
This is the king of holiday breads for a reason. Here’s a little peek at what’s waiting for you:
- The Flavor: It’s a symphony of holiday tastes. The bread itself is rich, buttery, and just lightly sweet. The zests and Port wine give it a warm, complex, fruity-floral aroma. The soaked fruits inside are plump and flavorful, and the candied fruits on top add a lovely, chewy sweetness.
- The Texture: The crumb is wonderfully soft, fluffy, and tender, like a classic brioche. This is balanced by the chewy bits of dried fruit and the crunch of toasted nuts, all wrapped in a golden, soft crust.
- The Time: This is a celebration bread, so it takes time. Be prepared for an all-day affair. You’ll need about 45 minutes of active prep, but the real work is in the waiting—at least 2-3 hours of rising time, plus about 40 minutes to bake.
- The Difficulty: I’d call this an “intermediate” bake. If you’ve made cinnamon rolls or any yeasted bread before, you can do this. The enriched dough is sticky, but a stand mixer makes it a breeze.
What You’ll Need
This recipe has a few components, but the ingredients are all about building flavor.
For the Fruit & Nut Soak (Do this first!)
- 1 1/2 cups mixed dried & candied fruits (I use raisins, currants, and chopped dried apricots)
- 1/2 cup chopped walnuts or pecans
- 1/2 cup pine nuts (A traditional, buttery choice!)
- 1/4 cup Port wine (or dark rum, brandy, or even orange juice)
For the Brioche-Style Dough
- 1/2 cup whole milk, warmed (about 105-115°F)
- 1 packet (1/4 oz) active dry yeast
- 1 tsp granulated sugar
- 4 1/2 cups all-purpose flour, divided (plus more for dusting)
- 1/2 cup granulated sugar
- 1 tsp salt
- 1/2 cup (1 stick) unsalted butter, very soft, at room temperature
- 4 large eggs, at room temperature
- Zest of 1 large orange
- Zest of 1 large lemon
For the “Jewel” Topping & Glaze
- 1 large egg, beaten with 1 tbsp water (for an egg wash)
- Assorted large candied fruits (glazed cherries, candied citrus slices, dried figs, etc.)
- Whole nuts (almonds, walnuts)
- 1/4 cup apricot jam
- 1 tbsp water
- 1/2 cup powdered sugar, for dusting
How to Make Your Bolo Rei, Step by Step
Let’s take this one step at a time. The most important virtue is patience!
Step 1: Soak Your Fruits (The Secret to Flavor!)
In a medium bowl, combine your 1 1/2 cups of mixed dried fruits, the chopped nuts, and the pine nuts. Pour the 1/4 cup of Port wine (or your chosen liquid) over the top, stir to combine, and set it aside.
My Tip: You can do this the night before! The longer it soaks, the better.
Step 2: Activate the Yeast (Make the Sponge)
In the bowl of your stand mixer (or a large bowl), add the warm milk (it should feel like a warm bath, not hot). Sprinkle the yeast packet and the 1 tsp of sugar over the milk. Give it a gentle whisk and let it sit for 5-10 minutes. It should become foamy and bubbly. If it doesn’t, your yeast is no good, and you’ll need to start over.
Step 3: Make the Dough
To your bubbly yeast mixture, add 1 cup of the all-purpose flour. Mix to form a “sponge” or “slurry.”
Now, add the rest of your ingredients: the remaining 3 1/2 cups of flour, the 1/2 cup of sugar, the salt, the very soft butter, the 4 eggs, the orange zest, and the lemon zest.
Step 4: Knead the Dough
Place the bowl on your stand mixer fitted with the dough hook. Turn the mixer on low and let it knead the dough for 10-12 minutes.
Heads up: This is a very sticky, enriched dough! It will look messy at first, but after 10 minutes, it should become smooth, elastic, and will start to pull away from the sides of the bowl. Resist the urge to add a lot more flour.
Step 5: The First Rise (The Long Wait)
Scrape the sticky dough into a large, well-oiled bowl. Turn it over to coat. Cover the bowl with plastic wrap or a clean kitchen towel. Place it in a warm, draft-free spot in your kitchen for 1.5 to 2 hours, or until the dough has doubled in size.
Step 6: Incorporate the Fruit
Turn your risen, pillowy dough out onto a lightly floured surface. Gently press it into a flat rectangle. Drain any excess liquid from your fruit and nut mixture, then pour the fruit all over the dough.
Gently knead the dough just 2-3 times to distribute the fruit. Try not to overwork it.
Step 7: Shape the Crown (The Fun Part!)
Form the fruit-studded dough into a loose ball. Line a large baking sheet with parchment paper.
Place the ball in the center of the parchment. Flour your fingers and poke a hole directly through the center of the ball. Gently stretch the hole outwards, working your way around, until you have a large wreath shape about 10-12 inches wide, with a 4-5 inch hole in the center. (The hole needs to be big, as it will shrink during the second rise and baking).
Step 8: The Second Rise
Loosely cover your “crown” with oiled plastic wrap. Let it rise in a warm place for another 45-60 minutes. It should look noticeably puffier. While it’s rising, preheat your oven to 375°F.
Step 9: Decorate Your Crown
Gently brush the entire crown with the beaten egg wash. This is what will give it a beautiful, shiny, golden-brown finish.
Now, decorate! Press your large candied fruits and whole nuts into the top of the dough, arranging them like “jewels.” Be generous!
Step 10: Bake to Golden
Bake at 375°F for 30-40 minutes. It’s done when it’s a deep, rich golden-brown on top and sounds hollow when you tap it. If you have an instant-read thermometer, the center of the bread should register 190°F.
My Tip: If the top starts to get too dark before the bread is cooked, loosely tent it with a piece of aluminum foil.
Step 11: Glaze and Finish
Transfer the hot Bolo Rei (still on its parchment) to a wire rack.
In a small bowl, microwave the apricot jam and 1 tbsp of water for 20-30 seconds, just until it’s runny. Brush this hot glaze all over the warm bread, focusing on the fruit and nuts to make them glisten.
Let the bread cool for at least 30 minutes. Just before serving, dust it generously with powdered sugar.
My Top Tips for Bolo Rei Success
- A Stand Mixer is Your Friend: That brioche dough is sticky. You can knead it by hand (on a well-oiled surface), but it’s a workout. The stand mixer does all the hard work.
- The Big Hole: I’m saying it again: make the hole in the center bigger than you think you need to. It will shrink, and you want it to look like a crown, not a bun.
- Don’t Burn the Jewels: The apricot glaze right out of the oven is key. It not only adds shine and a little flavor, but it also protects the candied fruits.
- Trust the Stickiness: The high amount of fat (butter, eggs) and sugar makes this dough sticky. It’s what makes the final bread so tender. Trust the process and use oiled hands or a scraper, not piles of flour.
Swaps and Variations
- Non-Alcoholic: Swap the Port wine for the same amount of fresh orange juice to soak the fruit. It’s just as lovely.
- The Nuts: Pine nuts are traditional and have a wonderful, buttery texture. But you can use all walnuts, all pecans, or slivered almonds.
- The Fruits: The mix is up to you! As long as you have about 1.5 – 2 cups of fruit and 1 cup of nuts, you’re good.
- Bolo Rainha (“Queen Cake”): Love the bread but not the candied fruit? Make a Bolo Rainha! Use the same dough, but the mix-ins and topping are only nuts and raisins.
Common Pitfalls (and How to Avoid Them)
- “My dough didn’t rise!” Your yeast was old, or your milk was too hot and killed it. Make sure you see that “bubbly” foam in Step 2.
- “My bread is dense and tough.” You likely under-kneaded it (the gluten wasn’t developed) or you didn’t let it rise long enough.
- “My crown hole closed up!” You didn’t stretch it wide enough in Step 7.
- “My fruit on top burned!” You may have forgotten the glaze, or your oven runs hot. Use the foil-tent trick next time.
How to Serve and Store Your King Cake
- Serving: This bread is the star of the show. It’s traditionally served on Christmas and all the way through to Epiphany (Three Kings’ Day on January 6th). Serve it at room temperature, cut into wedges. It’s wonderful for breakfast, brunch, or as a dessert with coffee, tea, or even a small glass of Port.
- Storage: Like all brioche, this bread is best on the day it’s made. It will start to get dry by Day 2. Store it in a very airtight container or a large plastic bag at room temperature for 2-3 days.
- Reheating: Do not microwave the whole bread! The best way to revive a slice is to pop it in the toaster or a 350°F oven for a few minutes. It gets a little toasty and softens up beautifully.
Your Bolo Rei Questions, Answered
What is the tradition of the fava bean? You’re right! Traditionally, a dried fava bean (fava) and a small metal trinket (brinde) were baked into the cake. If you got the trinket, you had good luck! If you got the fava bean… you had to buy the Bolo Rei for the family next year!
So, why isn’t it in the recipe? We leave them out in modern recipes (especially in the US) for safety. They are a choking hazard. But it’s a fun tradition to tell your family about as you serve it!
Can I make this ahead of time? You can! It freezes very well. Let it cool completely (but don’t glaze it). Wrap it tightly in plastic wrap, then a layer of foil. Freeze for up to 3 months. Thaw at room temperature, then warm it in a 350°F oven for 10 minutes before glazing and dusting with sugar.
A New Holiday Tradition
This is so much more than a fruitcake. It’s a soft, fragrant, celebratory bread that is a true joy to make and share. It’s one of those bakes that feels like a real accomplishment.
When you bring that beautiful, glittering crown to the table, and everyone stops to admire it, you’ll know it was worth every minute.
A Quick Summary
This Bolo Rei (Portuguese King Cake) recipe guides you through making the iconic, crown-shaped holiday sweet bread. The base is a soft, tender, brioche-style dough, enriched with butter, eggs, and fragrant with citrus zest and Port wine. The dough is studded with soaked fruits and nuts and then decorated with large, glistening candied fruits (“jewels”) before being baked to a deep golden brown.
If you make this Bolo Rei for your holiday, I would be so honored! Please tag me on [Your Social Media Handle] or share a photo. And if this recipe brought a little bit of Portuguese tradition to your home, please share this post on Pinterest!