Sunshine & Almonds: How to Make French Calissons (A Taste of Provence)
Hello, friends! I want to transport you to the South of France for a minute.
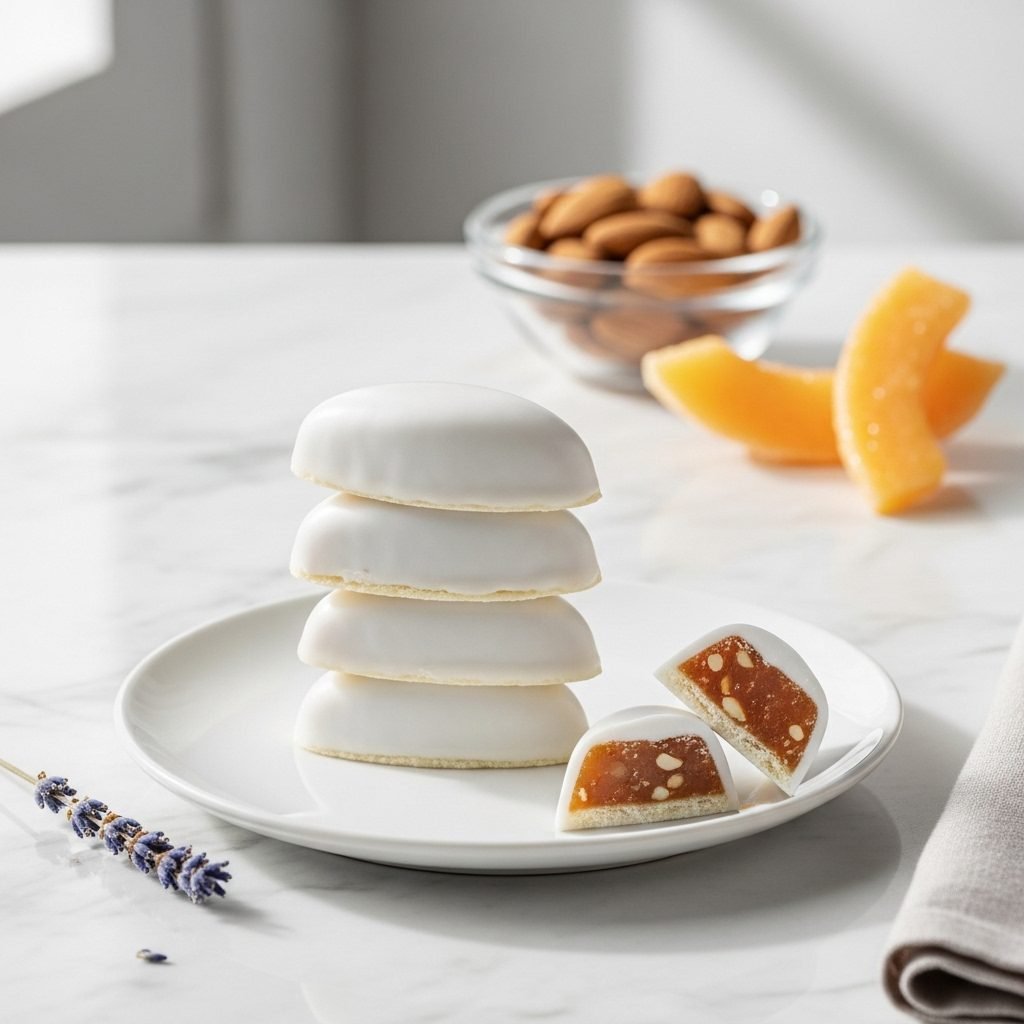
Imagine a sun-drenched market in Aix-en-Provence. The air smells like lavender, herbs, and something sweet, floral, and nutty. In the windows of the confiseries (candy shops), you see these beautiful, pale, leaf-shaped treats, stacked in elegant boxes. These are Calissons.
Calissons are one of the most special and traditional confections in all of France. They are not a cookie, not a cake, and not just marzipan. A true calisson is a delicate, magical thing: a soft, chewy, almond-and-fruit paste, a crisp, paper-thin wafer on the bottom, and a delicate, white royal-icing shell on top.
The flavor is incredible. It’s like marzipan, but a million times better—brighter, more complex, and scented with orange blossom. The secret ingredient? Candied melon.
I know, I know. Candied melon? Stay with me! It doesn’t taste like a watermelon Jolly Rancher. It provides a unique, sweet, floral, and honey-like chew that makes the calisson, well, a calisson.
I’ll be honest with you: this is a “project” bake. This is not a 30-minute, “whip-it-up-on-a-Tuesday” recipe. It’s a traditional confiserie (candy-making) recipe, which means it requires precision, a few special ingredients, and, most of all, a little patience. But I am going to walk you through every single step.
This is the recipe you make when you want to create a truly special, edible gift. It’s the recipe you make on a quiet weekend when you want to feel like a real French pastry chef. And when you take that first bite, you’ll be so, so proud.
Why You’ll Be So Proud of This Bake
- The Flavor: It is truly unique. You get the nutty, rich almond, a bright spark of citrus from candied orange, a sweet, floral, honey-like chew from the melon, and a fragrant wisp of orange blossom.
- The Texture: A perfect journey in every bite. The delicate snap of the icing, the soft, dense, chewy paste, and the paper-thin, dissolving wafer on the bottom.
- The “Wow” Factor: These are just plain elegant. They look like jewels. They are a wonderful homemade gift, especially for the holidays, and so different from the usual cookies.
- The Process: This is a “patient” project. It’s not “hard” so much as “precise.” It’s a wonderful way to spend an afternoon learning a classic, centuries-old technique.
Your Ingredient List
For candy-making, I highly recommend using a kitchen scale. The gram measurements are what will give you a consistent, successful result every time. I’ve provided the cup-based measurements, but they are an approximation for a recipe that demands precision.
For the Calisson Paste (The “Heart”)
- 2 1/4 cups (225g) super-fine blanched almond flour
- 1 1/2 cups (225g) candied melon, roughly chopped
- 1/4 cup (40g) candied orange peel
- 1 cup (200g) granulated sugar
- 1/4 cup (60ml) water
- 2 tsp orange blossom water
- A pinch of kosher salt
For the Base & Top (The “Shell”)
- 1-2 sheets of edible wafer paper (pain azyme)
- 1 1/2 cups (180g) powdered sugar, sifted
- 1 large pasteurized egg white (or about 1.5 tbsp from a carton)
- 1/2 tsp lemon juice
A Quick Note on “Special” Ingredients:
- Candied Melon: This is the key. You cannot substitute it and get a true calisson. Look for it in Italian or French specialty markets, or (most easily) online. It’s worth it!
- Wafer Paper: This is a thin, edible, potato-starch paper. You can find it in specialty baking stores or online.
- Orange Blossom Water: Find this in the baking or international aisle of a good grocery store, or online.
Step-by-Step: Your Guide to Making Calissons
This is a two-day process, which makes it far less stressful. Day 1 is for making and resting the paste. Day 2 is for assembly and drying.
Part 1: The Fruit & Nut Paste
- Get it Fine: In the bowl of a food processor, combine the 225g of almond flour, 225g of candied melon, and 40g of candied orange peel.
- Pulse, Pulse, Pulse: Pulse the mixture until it’s very, very fine, like a crumbly, moist sand. Scrape down the sides of the bowl a few times. This can take 2-3 minutes. You want everything to be in tiny, uniform pieces.
- Transfer: Scrape this beautiful, fragrant mixture into a large, heat-proof bowl.
Part 2: The Syrup (This Requires a Thermometer!)
- Prep Your Tools: This is a candy-making step, so precision is key. You will need a candy thermometer.
- Combine: In a small, heavy-bottomed saucepan, combine the 200g of granulated sugar, the 1/4 cup of water, and the pinch of salt.
- Cook the Syrup: Place the pan over medium heat. Let the sugar dissolve, gently swirling the pan (don’t stir!). Once it’s boiling, clip on your candy thermometer.
- Watch the Temp: You are going to cook this syrup to the “soft-ball” stage, which is 235°F – 240°F (112°C – 115°C). Do not let it go past this, and do not let it get any color. It should remain a clear, bubbling syrup.
- Work Quickly: As soon as it hits 235°F, remove the pan from the heat.
Part 3: Combine & Rest the Paste (Day 1)
- The “Dough”: Immediately and very carefully (this is liquid sugar!), pour the hot syrup into the bowl with your almond-fruit mixture.
- Add Flavor: Add the 2 tsp of orange blossom water.
- Mix: Use a sturdy rubber spatula to mix and fold everything together. It will be very sticky and stiff, but it will come together into a thick, fragrant, paste-like dough.
- Wrap It Up: Lay a large piece of plastic wrap on your counter. Scrape the hot paste onto the wrap. Let it cool for 10 minutes, then wrap it up tightly into a flat disc.
- Rest: This is the “magic” step. Let the paste rest at room temperature for at least 12 hours, or ideally, 24 hours (overnight). This allows the flavors to meld and the paste to firm up. Do not refrigerate it!
Part 4: Assemble & Dry (Day 2)
- Prep Your Station: Lightly dust your work surface with a tiny bit of powdered sugar (not flour!).
- Roll the Paste: Unwrap your firmed-up paste. Knead it for a moment, then roll it out with a rolling pin to about 1/4-inch to 1/3-inch thickness.
- The Base: Lay a sheet of wafer paper on your counter. Gently place your rolled-out calisson paste on top of the wafer paper. Use your rolling pin to press it down gently, making sure it’s stuck. (Don’t worry if it’s not a perfect shape yet).
- The Icing (Royal Icing):
- In a clean, dry bowl, combine the 180g of sifted powdered sugar and the 1 pasteurized egg white.
- Beat with an electric mixer on low speed until combined. Add the 1/2 tsp of lemon juice.
- Turn the speed up to medium-high and beat for 3-5 minutes, or until the icing is very white, thick, and holds stiff peaks.
- Frost the Calissons: Spread the royal icing in a thin, even, perfectly smooth layer all over the top of your calisson paste. An offset spatula is your best friend here.
- The “Drying” (Not Baking): This is the final secret. Calissons are dried, not “baked.”
- Preheat your oven to its absolute lowest setting, ideally 175°F – 200°F (about 80°C – 90°C).
- Place the entire iced slab on a baking sheet.
- Place in the low oven with the oven door cracked open.
- Let it dry for 15-20 minutes. You are not trying to get any color. You are just trying to set the icing so it’s dry to the touch and forms a delicate, crisp shell.
- Cool & Cut: Remove from the oven and let it cool completely. Now, for the cutting.
- If you have a special calisson-shaped cutter, now is its moment to shine.
- If you’re like the rest of us, use a small, sharp knife. The traditional shape is a pointed oval, like a leaf. You can also use a small, leaf-shaped cookie cutter.
- Hot Knife Trick: The best way to cut cleanly is to dip your knife in a tall glass of hot water, wipe it dry, make one cut, and repeat. This will melt-cut through the icing and paste.
My Top Tips for Calisson Success
- A Scale is Your Best Friend: I’ve said it three times, so I mean it. This is a candy. Ratios are everything. A $20 kitchen scale will be the difference between success and a sticky, sugary mess.
- A Candy Thermometer is Not Optional: You cannot “guess” the soft-ball stage. A thermometer is essential.
- Handling the Sticky Paste: If your paste is too sticky to roll, dust your hands and your work surface with powdered sugar, not flour.
- The “Drying” Oven: If your oven doesn’t go as low as 200°F, just turn it on, let it heat, then turn it off and place your calissons inside with the light on. You just want a gentle, dry warmth.
- Be Patient with the Cut: Cutting is the most tedious part. Put on some music. Use the hot knife trick. Your beautiful, uniform shapes will be worth it.
Ingredient Substitutions & Variations
- Candied Melon: I have to be firm here. If you substitute this, you are no longer making calissons. You’d be making a different, (probably lovely) almond candy. The candied melon is the signature flavor. Don’t sub it!
- Candied Orange: You can swap this for candied lemon peel if you prefer a different citrus note.
- Orange Blossom Water: This is also pretty signature. If you must, you could use 1 tsp of vanilla extract or 1/2 tsp of almond extract, but the floral aroma will be lost.
- Gluten-Free & Dairy-Free: Great news! This recipe is naturally gluten-free and dairy-free! (Just double-check that your wafer paper is potato- or rice-starch-based, which 99% of them are).
Common Mistakes to Avoid
- “My syrup turned into caramel!”: You cooked it too hot or too long. It should never get any color. Watch that thermometer!
- “My paste is runny!”: Your syrup probably didn’t get hot enough. If it doesn’t reach the soft-ball stage, it won’t have the structure to set the paste.
- “My icing is gray and ugly.”: Your almond flour might have been from non-blanched almonds (with skins). Always use blanched almond flour for this.
- “My icing is too thin and just soaked in.”: You didn’t beat it long enough, or you added too much liquid. It needs to be a stiff, thick paste.
- “They are rock-hard.”: You over-dried them in the oven. It’s a 15-minute drying session, not an hour-long bake.
How to Serve Your Beautiful Calissons
These are a confiserie (confection), not a cookie.
- They are traditionally served with coffee or espresso after a meal.
- They are a beautiful addition to a holiday dessert platter or a cookie box.
- Gifting: This is what they are made for. Stack them in a beautiful, parchment-lined tin or box, tie it with a ribbon, and you have just made a very impressive, thoughtful, and delicious homemade gift.
Storing Your Calissons
- Do NOT refrigerate them! The refrigerator is humid and will make the icing weep and the wafer paper soggy.
- Store them in an airtight container, at cool room temperature, with layers separated by parchment paper.
- They will last for several weeks. In fact, their flavor often gets better after a few days as the flavors continue to meld.
Your Calisson Questions
What do they really taste like? Imagine high-quality marzipan. Now, make it less one-note-sweet. Add a fruity, honey-like, chewy quality (from the melon) and a bright, floral, citrus smell (from the orange peel and orange blossom). That’s a calisson.
Do I really need to let the paste rest overnight? I mean, I would. It’s the traditional way. It allows the paste to hydrate, firm up, and the flavors to marry. If you’re in a huge hurry, you could probably get away with 4-6 hours, but overnight is best.
My paste is so sticky! What did I do wrong? Nothing! It’s supposed to be sticky. It’s a sugar-and-almond paste. That’s why we let it rest and use powdered sugar to roll it out.
A Final, Sweet Thought
This is not just a recipe. This is a little piece of history, a taste of Provence, and a true baking project. It’s a wonderful, slow, and mindful process. Don’t be intimidated by the steps. Just take them one by one.
When you’re done, you’ll have this beautiful pile of pale, jewel-like candies that you made from scratch. And that is a very, very sweet feeling.
Quick Recipe Summary
This traditional Calisson recipe guides you through making the classic French almond-and-melon candy. A fine paste is made from almond flour, candied melon, and candied orange peel. This paste is bound with a hot sugar syrup, flavored with orange blossom water, and rested overnight. It’s then rolled onto edible wafer paper, topped with a crisp royal icing, and gently dried in a low oven before being cut into the signature, leaf-like shape.