The Secret to French Canelés: How to Get That Famous Crackly Crust and Soft Custard Center
There are “pastries,” and then there are pastries. And the Canelé de Bordeaux is in a league of its own.
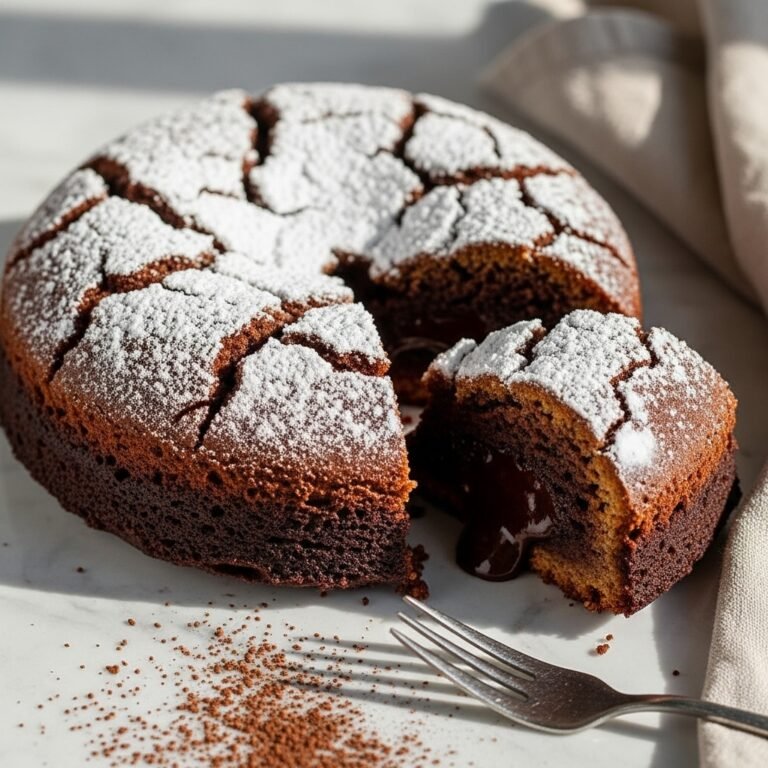
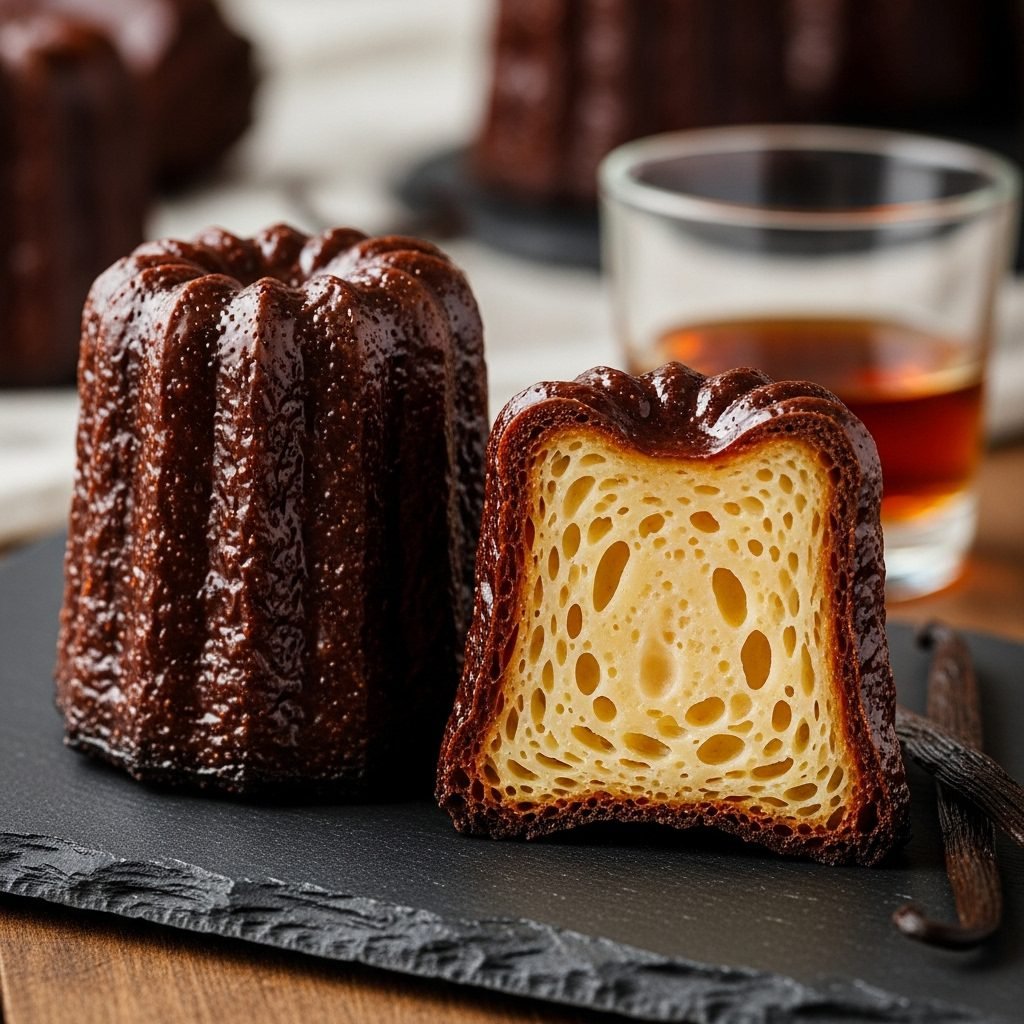
If you’ve never had one, let me try to explain the magic. You first see this little fluted, cylindrical cake that looks almost burnt. It’s a deep, dark, mahogany color, and it’s shiny. You might be skeptical. Then you bite into it.
The first thing you get is CRUNCH. A thin, shattering, caramelized crust that cracks between your teeth. It’s not sticky, just crisp. And right after that, you sink into the most tender, rich, and moist interior, almost like a baked custard. It’s scented with warm vanilla and a sophisticated hint of dark rum.
It’s an absolutely wild texture and flavor contrast, and it’s why these little French gems are so famous.
For the longest time, I was way too intimidated to make them. They’re a specialty of Bordeaux, steeped in tradition, and they have a reputation for being finicky. They require special molds and, most importantly, a ton of patience.
But here’s the secret I learned: they’re not technically hard to make. The active work is incredibly minimal. The ingredients are simple. The entire recipe boils down to two things: a very thin batter and a lot of patience.
I’ve streamlined the process for a home kitchen, skipping the intimidating (and expensive) traditional copper molds for easy-to-use silicone. I’ve tested this over and over to get it right. You can make these. And when you pull these glossy, caramelized treasures out of your own oven, you’ll feel like an absolute baking rockstar.
What to Expect With This Canelé Recipe
- Taste: It’s a “grown-up” sweet. The crust is like a dark, complex crème brûlée. The inside is a rich, eggy custard, beautifully flavored with real vanilla and dark rum.
- Texture: This is the whole point! A super thin, crunchy, crackly shell gives way to a dense, moist, tender, and slightly chewy custard. It’s truly unlike any other pastry.
- Time: This is a 2-day recipe. I’m not kidding. The batter must rest for at least 24 hours, and 48 is even better. Your active time is maybe 30 minutes total, but this is not a last-minute bake.
- Difficulty: I’d call it “Patient Intermediate.” The steps are simple (whisk, pour, wait), but you have to follow the resting and baking times exactly.
What You’ll Need
The list is short and sweet. The magic comes from the technique.
- 2 cups whole milk
- ¼ cup (2 oz / 4 tablespoons) unsalted butter
- 1 vanilla bean, split and scraped (or 1 tablespoon high-quality vanilla extract)
- 1 cup all-purpose flour
- 1 ½ cups granulated sugar
- ½ teaspoon fine sea salt
- 2 large whole eggs
- 2 large egg yolks (this is for richness!)
- ¼ cup dark rum (this is for flavor, not booze, and is traditional)
- Softened butter or baking spray (with flour) for the molds
A Note on Molds: This recipe is written for a 12-cup standard silicone canelé mold. (They look like little fluted cylinders). Traditional molds are made of copper and cost a small fortune. Silicone is affordable, accessible, and gives you a fantastic result.
A Note on Flavor: Don’t skimp on the dark rum and vanilla. They are the entire flavor profile. A spiced rum or light rum won’t give you that deep, traditional taste.
How to Make Canelés de Bordeaux
This is a game of “hurry up and wait.” We’ll make the batter, and then… we’ll see it tomorrow.
Part 1: Make the Infused Milk (The Night Before)
- Prep the Vanilla: If you’re using a vanilla bean, split it lengthwise and scrape all those glorious little seeds out.
- Infuse: In a medium saucepan, combine the whole milk, the 4 tablespoons of butter, the scraped-out vanilla seeds, and the empty vanilla pod itself.
- Heat: Place the pan over medium heat. Bring it just to a simmer—you’ll see little bubbles around the edge and the butter will be fully melted. Don’t let it come to a rolling boil.
- Cool Down: Remove the pan from the heat. Let it sit and cool down for about 10-15 minutes. It needs to be just “warm,” not “scalding hot.” We don’t want to scramble the eggs.
Part 2: Mix the Batter (The Night Before)
- Dry Ingredients: In a large bowl, whisk together the all-purpose flour, granulated sugar, and salt.
- Wet Ingredients: In a separate, medium-sized bowl, lightly beat the 2 whole eggs and 2 egg yolks.
- Temper the Eggs: Fish the empty vanilla pod out of the warm milk. Slowly pour about half of the warm milk mixture into the eggs, whisking the entire time. This gently warms the eggs so they don’t curdle.
- Combine: Pour the egg-milk mixture into the large bowl with the flour mixture. Whisk until it’s just combined. A few small lumps are perfectly fine. DO NOT OVERMIX! We are not trying to develop gluten or add air. Overmixing is the #1 cause of bready canelés.
- Finish the Batter: Whisk in the rest of the milk mixture and the ¼ cup of dark rum. The final batter will be very thin, almost like skim milk or crêpe batter. This is correct.
Part 3: The Crucial Rest (The “Wait” Part)
- Strain: Place a fine-mesh sieve over a pitcher or a large jar. Pour the batter through the sieve. This will catch any lumps or any tiny bits of cooked egg.
- Cover and Chill: Cover the pitcher with plastic wrap, pressing it down so it touches the surface of the batter (this prevents a skin from forming).
- Refrigerate for 24-48 Hours. Yes, really. No cheating. This is the most important step. The flour needs to fully hydrate, the flavors need to meld, and the gluten needs to completely relax. This is what creates the signature custard interior. 24 hours is the minimum. 48 hours is even better.
Part 4: Baking Day!
- Prep Your Pan (Crucial!): Get your silicone canelé mold. Even though it’s silicone, it needs to be prepped. Place the empty mold on a sturdy baking sheet (this is a must for stability).
- Grease the Molds: You have two options, and you must be generous:
- Butter: Thoroughly brush every single fluted nook and cranny with softened butter.
- Spray: Use a baking spray that contains flour (like “Baker’s Joy” or similar). This is honestly the easiest and most foolproof way to use silicone molds. Get in every groove.
- Preheat Oven: Get your oven preheating to 425°F (220°C). Position a rack in the center.
- Fill the Molds: Take your cold batter out of the fridge. It will have separated, with a dark layer on the bottom. This is normal. Give it a gentle stir to re-combine.
- Pour: Carefully pour the cold batter into the prepared molds. Fill them almost to the top, leaving about ¼-inch of headroom.
- The Bake (The 2-Temp Method):
- Stage 1 (High Heat): Place the baking sheet with the filled mold into the 425°F oven. Bake for 15-20 minutes. This initial blast of high heat is what starts to set the crust.
- Stage 2 (Low Heat): Without opening the oven door, reduce the oven temperature to 375°F (190°C).
- Stage 3 (The Long Bake): Continue to bake for another 45 to 65 minutes. This is a big window, and it depends on your oven and your molds.
- How to Know When They’re Done: This is the art of it. You’re looking for a very deep, dark, uniform, mahogany-brown color. Not golden. Not light brown. Dark. If you think they’re almost burnt, they’re probably just right. This is where all that caramelized flavor comes from. Pale canelés are a sad mistake—they’ll be soft and taste eggy.
- Unmold Immediately! This is the other most important step. As soon as you pull them from the oven, you must unmold them. The molten sugar will harden and they will be stuck forever if you let them cool in the pan.
- Cool: Carefully (they are hot) pop each canelé out of its mold and onto a wire cooling rack. They should come out easily if you prepped the molds well.
- Listen: As they cool, you might even hear them “crackle.” Let them cool for at least 30 minutes. This is when the crust gets its signature crunch.
My Top Tips for Canelé Success
- Patience is Ingredient #1: I’m saying it again. Do not skip the 24-hour rest. This is not a suggestion. It is a requirement for the proper texture.
- Don’t Overmix the Batter: Whisk until just combined. Lumps are fine. The sieve will catch them. Overmixing = bready, holey, or muffin-like canelés.
- Embrace the Dark Side: Your brain will tell you “they’re burning!” You have to push past it. That deep, dark color is the goal. It’s not “burnt,” it’s “caramelized.”
- Unmold Hot, Hot, Hot: Have your wire rack ready before you even open the oven. Work quickly and carefully.
Ingredient Notes & Easy Swaps
- Rum: Dark rum is traditional. You can substitute brandy or cognac. For a non-alcoholic version, you’ll lose a key flavor, but you can use 1 tablespoon of rum extract (and add 3 extra tablespoons of milk to make up the liquid).
- Vanilla: A vanilla bean is a luxurious touch and gives you those beautiful black flecks. But 1 tablespoon of high-quality, pure vanilla extract (or even vanilla bean paste) works just as well.
- Dairy-Free / Gluten-Free: Oh, this is a tough one. This recipe is a classic for a reason, and it relies heavily on the proteins in both dairy and gluten for its unique structure. I have not tested this with alternative flours or milks, as the chemistry would be completely different and would likely not produce a true canelé.
Common Canelé Pitfalls & How to Fix Them
- My canelés are pale and soft.
- The Problem: You didn’t bake them long enough! You got scared and pulled them too early.
- The Fix: Next time, trust the process. Let them go until they are a deep, dark brown.
- They puffed up like crazy and spilled!
- The Problem: A little puffing is normal (they’ll settle), but a huge overflow means you either overmixed the batter (too much air) or overfilled the molds.
- The Fix: Whisk gently, and leave that ¼-inch of space at the top.
- The inside is bready, not custardy.
- The Problem: Almost certainly overmixing. You developed the gluten in the flour.
- The Fix: Remember: gently combine.
- They’re stuck in the silicone!
- The Problem: You either didn’t grease the molds well enough, or you let them cool in the pan.
- The Fix: Be obsessive with the baking spray or butter, getting in every single flute. And unmold them the second they come out.
How to Serve and Enjoy
Canelés are meant to be eaten as-is, at room temperature, on the day they are baked. This is when the crust-to-custard contrast is at its absolute peak.
They need no garnish, no sauce, no powdered sugar. They are a perfect, self-contained bite. The ideal companion is a strong, hot cup of coffee or espresso. They are a classic French goûter (afternoon snack) or a lovely, simple dessert.
Storage Tips (A Canelé’s Short, Glorious Life)
I’m going to be very honest with you. Canelés are a one-day pastry.
- Storage: The only way to store them is uncovered, at room temperature, on a wire rack or in a paper bag.
- Why? The enemy of that crisp crust is moisture. The air is your friend. If you put them in an airtight container, the moisture from the custard will steam the crust, and by day two, you’ll have a soft, chewy, (still-delicious, but not a real canelé) pastry.
- Do not refrigerate them.
- Reheating: You can’t. It just won’t be the same. This is a “bake and eat” treat. Plan to share them on baking day!
Your Canelé Questions, Answered
Do I really have to rest the batter for 24 hours? Yes. Yes, you do. I’ve tried to cheat this. I’ve done 2 hours, 6 hours, 12 hours. It’s not the same. The 24-48 hour rest is what allows the flour to fully absorb the liquid, creating the custard texture instead of a bready one.
What about all that stuff with copper molds and beeswax? That is the traditional way, and it’s incredible! The copper molds conduct heat in a unique way, and the beeswax-butter coating gives an unbelievable crust. But… copper molds are wildly expensive (we’re talking $25+ per mold), and “seasoning” them with beeswax is a whole fussy, smoky, dedicated process. The silicone mold + baking spray method I use here gets you 90% of the way there with 10% of the drama. It’s the perfect “pro-level-at-home” compromise.
My batter is totally separated in the fridge. Did I ruin it? Nope! It’s perfectly normal. The flour and sugar will sink. Just give it a very gentle, slow stir to combine it again right before you pour it into the molds.
You Are Now a Canelé Master
Okay, that was a lot of information, but for a pastry this special, the details matter! The process is a quiet, patient ritual, and the reward is so, so worth it.
That first moment when you flip them out of the pan—all dark and glossy—is a huge win. But the real moment is when you share one with someone, they bite into it, their eyes go wide at that crunch, and they ask, “You made this?!”
Go for it. You’ve got this.
Recipe Summary
This recipe guides you through making classic Canelés de Bordeaux at home using accessible silicone molds. The process involves creating a thin, crêpe-like batter from a base of infused milk, butter, vanilla, dark rum, eggs, sugar, and flour. The batter is then strained and must rest in the refrigerator for a minimum of 24 hours. After its rest, the cold batter is poured into generously greased fluted molds and baked using a two-temperature method: starting in a very hot (425°F) oven to set the crust, and finishing at a lower (375°F) temperature to cook the interior. The pastries are baked until they achieve a deep, dark mahogany color, then immediately unmolded to cool, resulting in a signature thin, crunchy, caramelized exterior and a soft, tender, moist custard center.