Golden Caramel & Cream: How to Make a Showstopping Croquembouche
Hello, fellow bakers! Let’s talk about the ultimate “wow” dessert.
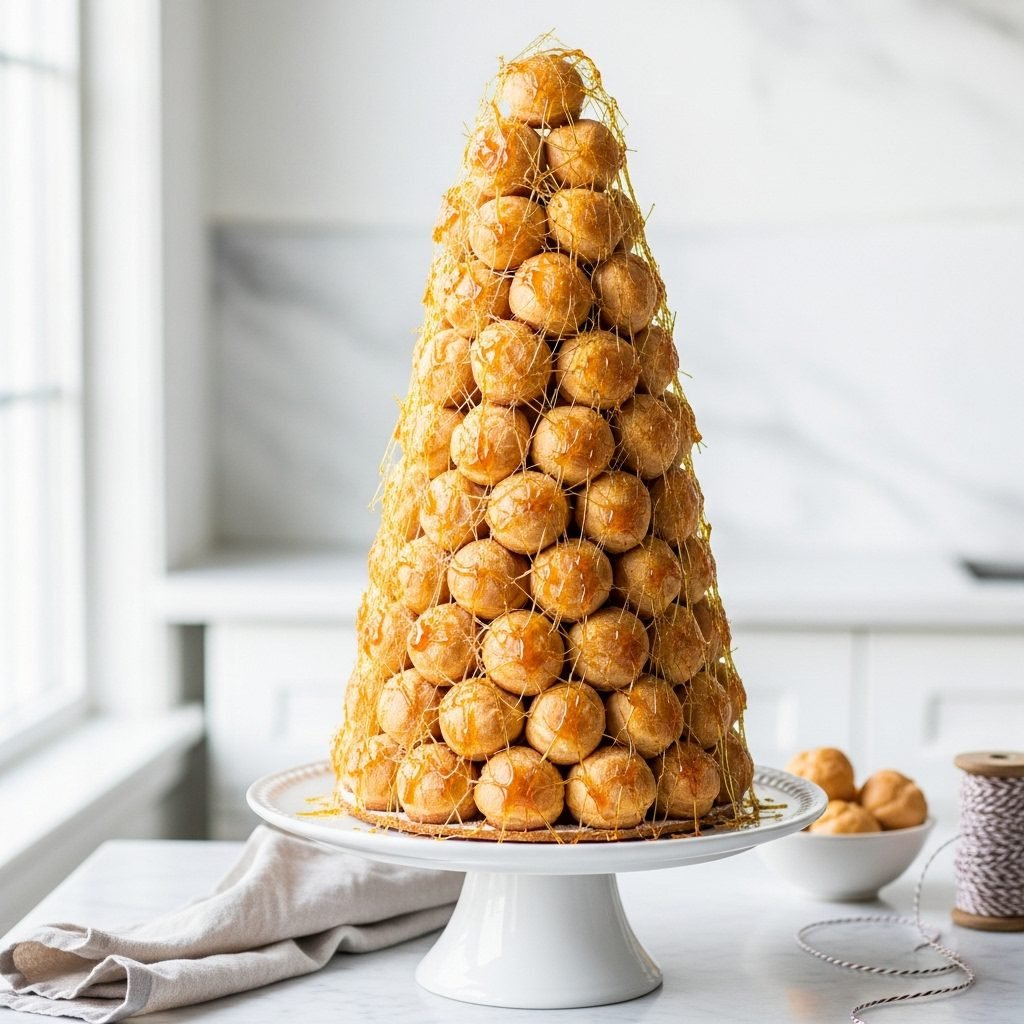
There are cakes, there are pies, and then there is the Croquembouche.
It’s that glittering, golden tower of cream puffs you see at French weddings, holiday parties, or as the showstopper on a baking show. It looks like something from a fairy tale. The name literally means “crunch in the mouth,” and that’s the magic: crisp, delicate puffs filled with creamy custard, all bound together by a crunchy, amber-colored caramel.
I know what you’re thinking. “That’s pastry-chef level. I could never make that.”
I’m here to tell you that you absolutely can. For years, I was too intimidated to even try. It looked like a structural-engineering-meets-pastry-magic project. But here’s the secret I’ve learned: a croquembouche is just three simple things:
- Cream puffs (Pâte à Choux)
- Custard (Crème Pâtissière)
- Caramel
That’s it! When you break it down, this “Mount Everest” of a dessert becomes a completely manageable, and incredibly fun, weekend project. This is the recipe you make when you want to stop the party. It’s a labor of love, but I promise, when you place that glittering tower on the table, you will feel like a baking superhero.
I’ve broken this guide into a simple, two-day process to make it easy and stress-free. We’ll make the components one day and assemble them the next. You can do this!
Why You’ll Be Obsessed with This Recipe
- The Flavor: It’s not one-note. You get the rich, eggy, tender pastry, the cool and creamy vanilla-bean custard, and the bittersweet, crunchy-smoky flavor of the caramel.
- The Texture: It’s a journey! The “crunch” of the caramel shell, the soft, light-as-air puff, and the silky, smooth cream filling. It’s a truly amazing combination.
- The “Wow” Factor: This isn’t just a dessert; it’s a centerpiece. It’s an edible sculpture. Nothing—and I mean nothing—gets a bigger reaction from guests.
- The Guide: This is a roadmap. I’m not just giving you a recipe; I’m giving you a battle plan. We’ll break it down into easy, manageable steps.
Your Ingredients for This Edible Tower
A croquembouche is made of three distinct parts. Mise en place (getting your ingredients in order) is your best friend here.
Part 1: The Crème Pâtissière (Pastry Cream Filling)
- 2 cups whole milk
- 1 vanilla bean, split, or 1 tsp vanilla extract
- 6 large egg yolks
- 3/4 cup granulated sugar
- 1/2 cup cornstarch, sifted
- 1/4 tsp kosher salt
- 4 tbsp unsalted butter, cold, cut into small pieces
Part 2: The Pâte à Choux (Cream Puffs)
- 1 cup water
- 8 tbsp (1 stick) unsalted butter, cut into pieces
- 1/2 tsp kosher salt
- 1 tbsp granulated sugar
- 1 1/4 cups all-purpose flour
- 4-5 large eggs, at room temperature
Part 3: The Caramel “Glue” & Garnish
- 2 1/2 cups granulated sugar
- 1/2 cup water
- 1/4 cup light corn syrup (this helps prevent crystallizing)
Tools You’ll Need:
- A stand mixer (or hand mixer)
- Piping bags and a medium round tip (and a small tip for filling)
- Baking sheets lined with parchment paper
- A heavy-bottomed saucepan for the caramel
- A Croquembouche Cone: This is a highly recommended tool. You can buy a metal one, or…
- DIY Cone (My secret!): Make your own by rolling a large piece of parchment paper or thin cardboard into a tall cone (at least 12-14 inches high). Staple it, and then wrap the outside in aluminum foil. Lightly grease the foil.
A Step-by-Step Guide to Your Masterpiece
We’ll do this over two days to keep it relaxed and fun.
Day 1: Make the Cream and Bake the Puffs
First, Make the Crème Pâtissière (Pastry Cream):
- Warm the Milk: Pour the milk into a medium saucepan. Scrape the seeds from the vanilla bean and add both the seeds and the pod to the milk. Bring just to a simmer over medium heat. Don’t let it boil.
- Whisk the Yolks: While the milk warms, in a large bowl, whisk the egg yolks, sugar, sifted cornstarch, and salt. Whisk until it’s pale yellow and smooth.
- Temper the Eggs: Once the milk is simmering, remove it from the heat. Very slowly, pour about 1/2 cup of the hot milk into the egg yolk mixture, whisking constantly. This is called tempering and prevents the eggs from scrambling.
- Cook the Custard: Pour the tempered egg mixture back into the saucepan with the rest of the milk. Return to medium heat. Whisk constantly and vigorously, making sure to get the corners of the pan. The mixture will get lumpy, then all at once, it will thicken into a smooth, thick custard. Let it bubble for 1 full minute (still whisking!) to cook out the cornstarch taste.
- Finish & Chill: Remove from the heat. Discard the vanilla pod. Add the 4 tbsp of cold butter and whisk until it’s completely melted and incorporated.
- Chill: Pour the custard into a shallow dish (like a 9×13 pan). Press a piece of plastic wrap directly onto the surface of the cream. This prevents a “skin” from forming. Chill in the refrigerator for at least 4 hours, or overnight, until it is completely cold and very thick.
Next, Make and Bake the Pâte à Choux (Cream Puffs):
- Preheat & Prep: Preheat your oven to 400°F (200°C). Line two baking sheets with parchment paper.
- Start the Dough: In a medium, heavy-bottomed saucepan, combine the water, butter, salt, and sugar. Bring to a rolling boil over medium heat.
- Cook the Flour: As soon as it’s boiling, dump in all the flour at once. Reduce the heat to low and stir like crazy with a wooden spoon. The mixture will form a thick, stiff paste. Keep stirring and “cooking” for 2-3 minutes. It will form a ball, and a thin film will form on the bottom of the pan.
- Cool Slightly: Transfer the hot paste to the bowl of a stand mixer fitted with the paddle attachment. Let it beat on low speed for 2-3 minutes, just to release some steam.
- Add the Eggs: Crack your 4 eggs into a separate bowl. With the mixer on low, add the eggs one at a time. This is the most important part! Do not add the next egg until the previous one is completely incorporated. The dough will look like it’s separating and breaking—this is normal! Keep mixing, and it will come back together.
- Check the Texture: After 4 eggs, stop the mixer. The dough should be smooth, shiny, and thick. When you lift the beater, the dough should fall off in a “V” shape. If it’s too stiff, whisk your 5th egg and add it a tiny bit at a time until you get that “V” shape. (You may not need all 5 eggs).
- Pipe the Puffs: Transfer the dough to a piping bag fitted with a 1/2-inch round tip. Pipe small, 1-inch mounds onto your parchment-lined sheets, about 1.5 inches apart. Wet your finger with water and gently pat down any little “peaks.”
- Bake: Place the sheets in the 400°F oven. Bake for 15 minutes, then without opening the oven, reduce the temperature to 350°F (175°C). Bake for another 15-20 minutes, until the puffs are a deep, golden brown, light, and sound hollow.
- The Secret Step: Turn the oven off. Crucial: Poke a small hole in the side or bottom of each puff with a paring knife. This releases the steam and stops them from getting soggy. Let them sit in the turned-off oven with the door ajar for 10 minutes.
- Cool: Transfer the puffs to a wire rack to cool completely.
Finally, Fill the Puffs:
- Whisk your chilled pastry cream to loosen it up. Transfer it to a piping bag fitted with a small, long tip.
- Gently push the tip into the small hole you already made (or the bottom) of each puff.
- Fill the puff with cream. You’ll feel it get heavy. Don’t overfill!
- Place the filled puffs on a tray and store them, covered, in the refrigerator until you’re ready to assemble on Day 2.
Day 2: Assemble Your Croquembouche!
This is the day! Set up your station. Have your filled puffs, your DIY cone (on a flat, parchment-lined platter), and your saucepan ready.
Make the Caramel “Glue”:
- Safety First: Boiling sugar is extremely dangerous. It’s much hotter than boiling water. Have a bowl of ice water nearby in case of any burns. No kids, no pets.
- Combine: In your heavy-bottomed, clean saucepan, combine the 2 1/2 cups sugar, 1/2 cup water, and corn syrup. Stir just to combine.
- Cook: Place over medium-high heat. DO NOT STIR IT. Let it come to a boil. You can gently swirl the pan if you see one spot browning faster.
- Watch the Color: You are looking for a beautiful, medium-amber color, like honey. This will take 10-15 minutes. Don’t walk away. Once it starts to turn yellow, it will go fast.
- Stop the Cooking: As soon as it hits that amber color, remove it from the heat. (You can dip the bottom of the pan in cool water for 3 seconds to stop the cooking, but be careful).
Build the Tower (Work Fast!):
- Set Up: Your caramel will start to cool and harden. If it gets too thick, you can gently reheat it on low.
- Dip & Stick: Carefully pick up one cream puff. Dip the bottom (the flat part) into the hot caramel.
- The Base: Place the puff, caramel-side-down, on your platter, at the base of your cone. Repeat, dipping and sticking puffs side-by-side to create a solid ring (your first layer).
- Build Up: For the second layer, dip the bottom of a puff in caramel and “glue” it on top of the first layer, in the “V” between two puffs.
- Keep Going: Continue dipping puffs (sometimes on the bottom, sometimes on the side, whatever makes contact) and building your way up the cone. The cone is your guide and support. Work quickly and confidently. The caramel is the “mortar” that holds your “bricks” together.
- The Top: Use the prettiest, most perfect puff for the very top.
- The “Big Reveal”: Once the tower is built and the caramel is hard (this only takes a few minutes), gently lift the cone out from the center. You should be left with a beautiful, hollow, stable tower.
Decorate with Spun Sugar (The Final Flourish):
- Gently reheat your caramel until it’s liquid again.
- Dip a fork into the caramel. Lift it out and let the caramel drip. When it forms thin, fast-moving threads, go for it.
- Quickly wave the fork back and forth around the tower (not directly on it). The thin threads of caramel will fly off and wrap around the cone, creating a golden, spun-sugar “nest.” This is messy, but so much fun.
- Keep going until your tower is draped in glittering, sugary threads.
Helpful Tips for Your First Croquembouche
- Read the Recipe. Twice. This is not a “wing it” recipe. Read everything, from start to finish, before you even buy your ingredients.
- A Scale is Your Friend: Pâte à Choux is all about ratios. If you have a kitchen scale, using gram measurements is the most reliable way to get it right.
- Caramel Safety: I’ll say it again. Boiling sugar is a serious burn risk. Be focused, be careful, and be prepared.
- Don’t Overfill: If you overfill the puffs, the cream will ooze out and make the caramel not stick. Just a good, plump-feeling puff is all you need.
- The Clock is Ticking: Once you start building, you’re in a race against the caramel. Have everything ready before you start dipping.
Substitutions & Variations
- Filling: This is the easiest place to play! Add 1/2 cup of melted dark chocolate to your finished pastry cream for a chocolate filling. Or, add 2 tbsp of instant espresso powder to the milk for a coffee-eclairs-meet-croquembouche flavor.
- Non-Alcoholic: My recipe is non-alcoholic! Some recipes add liqueur to the cream, but this one is all-ages-friendly.
- Gluten-Free: I’ll be honest, this is an advanced-level recipe, and GF Pâte à Choux is its own challenge. I would master a specific GF choux recipe before attempting to sub it into a full croquembouche.
- Decor: Instead of spun sugar, you can drizzle with chocolate, or “glue” on almonds, edible flowers, or dragées.
Common Mistakes to Avoid
- Flat, Sad Puffs: Your choux paste was too wet (too much egg) OR you opened the oven door during the initial “puffing” phase.
- Soggy Puffs: This is the #1 enemy. This happens for three reasons: 1) You under-baked them. 2) You didn’t poke the steam hole. 3) You assembled the croquembouche too far in advance. (More on that below).
- Runny Pastry Cream: You didn’t cook it long enough. You must let it boil for that full minute to activate the cornstarch.
- Crystallized Caramel: You either didn’t use corn syrup, or you stirred it. Swirl, don’t stir.
- My Tower is Weeping: You assembled it in a very humid room. Caramel is just cooked sugar, and sugar loves to attract water. This is a “dry day” bake if possible.
Serving & Storage (This is Important!)
Serving: A croquembouche is meant to be eaten the day it is built. This is non-negotiable.
- Present it whole. Let everyone “ooh” and “aah.”
- Traditionally, you can use a small silver hammer, the back of a large spoon, or two spoons to “crack” into it and serve the pieces. Or, you can just be brave and start pulling puffs off from the top.
- It’s a wonderful, interactive dessert. Serve with small forks and napkins. And maybe some champagne!
Storage:
- The Un-Answer: You don’t store an assembled croquembouche.
- The Real Answer: A croquembouche has a 6-8 hour lifespan, tops. The moisture from the cream will soften the puffs, and the caramel will start to weep and get sticky. It is a glorious, fleeting, same-day-only dessert.
- The Prep-Ahead Plan: You can store the unfilled, cooled puffs in an airtight container at room temperature for 2 days. You can store the pastry cream in the fridge for 3 days. Then, fill and assemble on the day you plan to serve it.
Your Croquembouche Questions
How far in advance can I really make it? See above. Make the components 1-2 days ahead. Assemble only on the day of serving, as close to “showtime” as possible (no more than 6-8 hours ahead).
Why did my caramel get rock-hard so fast? It’s supposed to! It’s a hard-crack candy. The trick is to work quickly and gently reheat it on low (without stirring) to keep it liquid enough to work with.
My tower looks… wobbly. Your “glue” (caramel) probably wasn’t hot enough, or your “bricks” (puffs) are too heavy (overfilled). Take a deep breath. You can use extra caramel to “patch” and reinforce the base from the inside if you need to.
A Final, Sweet Pep Talk
Okay, look at that. You just read a novel about cream puffs. I know it seems like a lot, but I promise, the process is pure magic. This is not just a recipe; it’s a celebration. It’s a project that makes you feel like a true artisan.
Don’t be afraid. Break it down. Follow the plan. And get ready to be incredibly proud of what you create. You’ve got this.
Quick Recipe Summary
This guide breaks down the “intimidating” Croquembouche into a manageable, two-day project. Day 1: Make a rich, vanilla bean Crème Pâtissière (custard) and bake dozens of small, crisp Pâte à Choux (cream puffs). Day 2: Fill the puffs, cook a golden caramel “glue,” and assemble the puffs into a stunning tower using a cone mold. The tower is finished with dramatic, festive strands of spun sugar.