That Cozy, Tea-Infused Dream: A No-Fear Earl Grey Macaron Recipe
Let’s just name the elephant in the kitchen: Macarons.
The word itself is enough to make most home bakers break out in a cold sweat. If you’ve ever tried, you know the potential for heartbreak. The cracked shells. The sad, flat disks with no “feet.” The dreaded, gaping hollow center.
I see you. I was you.
For years, I was convinced that perfect, bakery-style macarons were a mix of dark magic, pure luck, and barometric pressure. But this is the recipe that changed everything for me.
This is my “no-fear” guide, and it’s built around one big secret: the Italian Meringue method.
It sounds fancy, I know! But hear me out. Many beginner recipes use the “French” method (just whipping raw egg whites), which is incredibly fussy and unstable. The Italian method, where we pour a hot sugar syrup into the whipping whites, creates a meringue that is so strong, so stable, it’s practically bulletproof. It’s your single best defense against all those classic macaron fails.
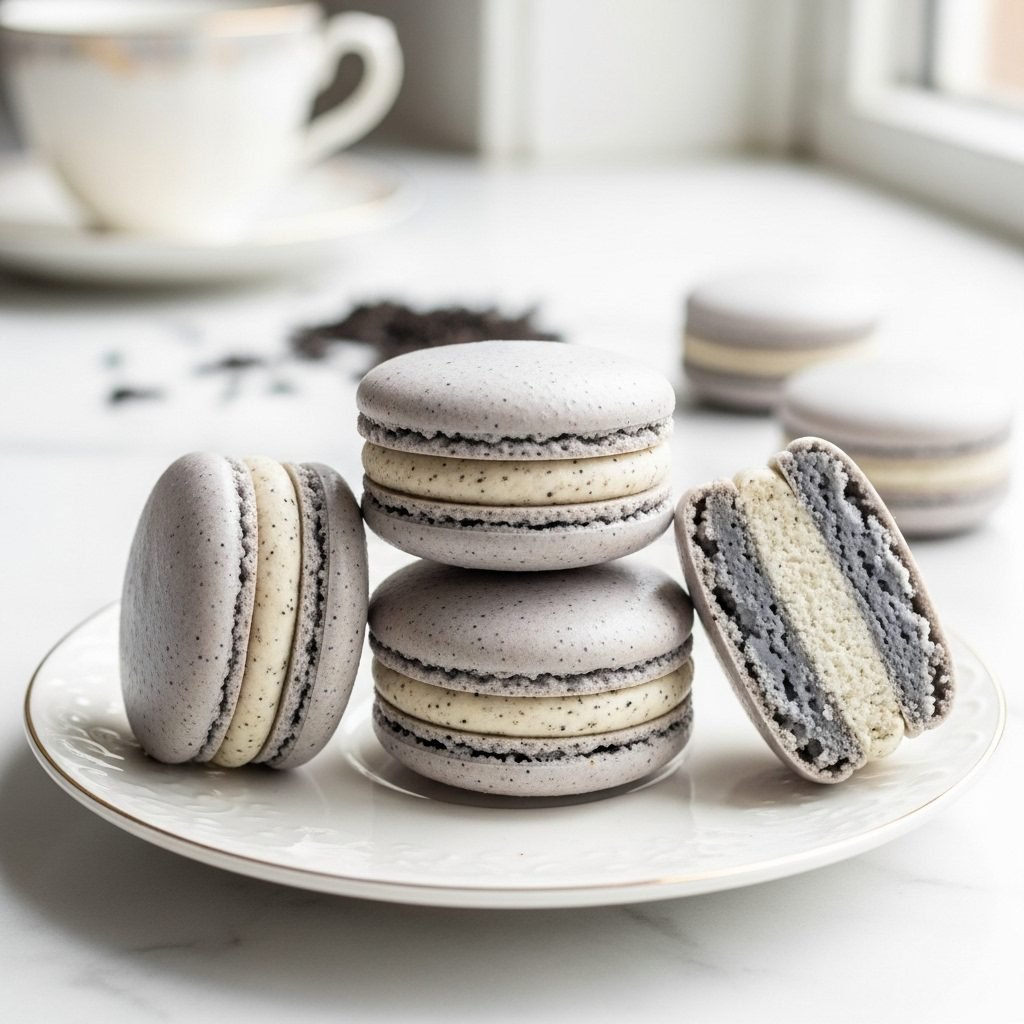
And the flavor? We’re not making a basic vanilla. We’re making a sophisticated, cozy Earl Grey macaron. It’s like a London Fog in a cookie. The shells and the buttercream are both infused with that beautiful, floral, bergamot-kissed tea.
This is a “project bake,” a labor of love. So put on your favorite playlist, take a deep breath, and let’s conquer these gorgeous little cookies for good.
What Makes This Recipe So Special
- The Flavor: This is the star. It’s not just “sweet.” The deep, floral, citrusy notes of real Earl Grey tea are in both the shell and the buttercream. It’s a sophisticated, cozy, and wonderfully aromatic flavor.
- The Texture: This is the macaron holy grail. You get that paper-thin, crisp “skin,” which shatters into a light, airy, and chewy center (that’s full, not hollow!). This all sandwiches a rich, creamy, tea-infused buttercream.
- The Time: This is a weekend project. Be prepared to spend 2-3 hours in the kitchen, not including the crucial 24-hour “maturing” time.
- The Difficulty: I’ll be honest: this is an intermediate bake. But it’s not about “talent.” It’s about precision. We will use a kitchen scale, we will follow the steps, and the stable Italian method gives us a huge advantage.
Your Ingredients (This is a “Must-Measure” Recipe)
This is my #1 tip. You must use a kitchen scale for macarons.
I’ve included cup measurements for reference, but I cannot and will not guarantee they will work. Baking macarons is pure chemistry. Using grams is the only way to get a perfect batch. This is the first, most important step.
For the Earl Grey Shells (Italian Meringue):
- 1 1/2 cups + 1 tbsp (150g) Almond Flour, finely ground
- 1 1/4 cups + 1 tbsp (150g) Powdered Sugar
- 1 tbsp (about 2-3 bags) loose-leaf Earl Grey Tea, ground to a fine powder
- 2/3 cup (55g) Egg Whites, at room temperature (from 1-2 eggs)
- 2/3 cup (55g) Egg Whites, at room temperature (a second 55g!)
- 3/4 cup + 2 tbsp (150g) Granulated Sugar
- 1/4 cup + 1 tbsp (60g) Water
- 1-2 drops Violet or Blue Gel Food Coloring (Optional, for that “London Fog” color)
For the Earl Grey Buttercream Filling:
- 1 cup (2 sticks / 226g) Unsalted Butter, very soft, at room temperature
- 2 1/2 cups (300g) Powdered Sugar, sifted
- 1 1/2 tsp (about 1 bag) loose-leaf Earl Grey Tea, ground to a fine powder
- 1 tsp Vanilla Extract
- 1/4 tsp Salt
- 1-2 tbsp Heavy Cream or Milk, at room temperature
How to Make Earl Grey Macarons, Step by Step
Read all the steps before you start. We’ll do this in parts: Prep, Shells, Filling, and Assembly.
Part 1: The Prep (The “Mise en Place”)
- Grind Your Tea: This is crucial for a smooth shell. Take your 1 tbsp of loose-leaf tea for the shells and your 1 1/2 tsp for the filling. The best tool is a clean coffee or spice grinder. Grind it until it is a super-fine, dusty powder. Sift it if you can.
- Prep Your Station: Line two large baking sheets with parchment paper or silicone macaron mats. Get your stand mixer (with whisk), a small heavy saucepan, and a digital thermometer ready.
Part 2: The Earl Grey Shells
- Sift Your Drys (The “Tant Pour Tant”): Sift the 150g of almond flour, 150g of powdered sugar, and your 1 tbsp of finely ground Earl Grey tea together into a large bowl. Whisk them to combine. Sift them again if you’re feeling ambitious (it really helps).
- Make the Slurry: In a separate, medium bowl, add your first portion of egg whites (55g). Add your sifted drys and the 1-2 drops of gel coloring (if using). Mix with a stiff spatula until it forms a thick, stiff, grainy paste. Set it aside.
- Start the Syrup: In your small saucepan, combine the 150g of granulated sugar and 60g of water. Swirl gently. Clip your thermometer to the side, making sure it’s in the liquid but not touching the bottom. Heat on medium.
- Prep the Meringue: Place your second portion of egg whites (55g) in the spotlessly clean, dry bowl of your stand mixer.
- The Timing: When the sugar syrup hits 230°F (110°C), turn your stand mixer on to medium-high speed to whip the whites.
- The Drizzle: Your goal is to have the whites at “soft peaks” (foamy, peaks just droop) right as your syrup hits 240-244°F (115-118°C).
- Once the syrup is at 240°F, remove it from the heat. Turn the mixer to medium-low. Very carefully, pour the hot syrup in a thin, steady stream down the side of the bowl (don’t hit the whisk, or it will splatter!).
- Whip to Cool: Once all the syrup is in, turn the mixer up to medium-high. Let it whip for 8-10 minutes. You are waiting for the meringue to become stiff, glossy, and—most importantly—for the outside of the bowl to be cool to the touch.
Part 3: The Macaronage (The Most Critical Step!)
This is the folding. This is where the magic happens, and it’s where most people fail.
- Lighten the Paste: Add about 1/3 of your stiff, glossy meringue to the tea-almond paste. Fold it in aggressively with your spatula. You’re just trying to lighten the stiff paste.
- Fold, Fold, Fold: Add the rest of the meringue. Now, you fold gently. Scrape your spatula around the outside of the bowl, then pull it over the top, and press down through the middle. Turn the bowl a quarter turn, and repeat. Scrape, fold, turn.
- The “Lava” Stage: You are folding to combine, but also to gently deflate the meringue. You’re looking for the “lava” or “ribbon” stage. This is when you lift your spatula, and the batter that falls off flows in a thick, continuous, ribbon-like stream. It should “melt” back into the rest of the batter within 15-20 seconds.
- STOP!: The second you reach this stage, stop folding. It’s always better to be slightly under-mixed than over-mixed. Over-mixing (a runny, thin batter) is a fatal error.
Part 4: Piping, Slamming, Resting, and Baking
- Pipe: Transfer the batter to a piping bag with a 1/2-inch round tip (like a Wilton 12). Hold the bag 90 degrees (straight up and down), about 1/2 inch above the baking sheet. Squeeze from the top of the bag until you have a 1.5-inch round. Stop squeezing, and quickly “flick” the tip in a C-shape to finish the circle.
- SLAM: This is crucial. Once your sheet is piped, pick it up and slam it hard on the counter. Do this 4-5 times. You will see little air bubbles rise to the top and pop. This is what prevents cracks!
- Rest (The Skin): This is not optional. Leave the trays of piped macarons on your counter at room temperature for 30-60 minutes. You are waiting for them to form a “skin.” When you can gently touch the top of a macaron, and it doesn’t stick to your finger at all (it feels dry, or “tacky”), they are ready.
- Bake: While your shells are resting, preheat your oven to 300°F (150°C).
- Bake: Place one tray at a time in the center rack of your oven for 14-17 minutes. Do not open the oven for the first 10 minutes. At about 5-6 minutes, you should see them magically rise and form their “feet.”
- Check for Doneness: A finished macaron should not “wiggle” at the top when you (gently) nudge the shell. The feet should be firm and not slide around.
- Cool: Let the shells cool completely on the baking sheet on a wire rack. Do not try to remove them while warm. They will stick.
Part 5: The Earl Grey Buttercream & Assembly
- Make the Buttercream: While the shells cool, make the filling. In your stand mixer, beat the 2 sticks of very soft butter on high for 5 minutes, until pale and fluffy.
- Add Sugar & Tea: Sift in the powdered sugar. Add your 1 1/2 tsp of finely ground Earl Grey tea, the vanilla, and the salt. Mix on low speed until it’s all combined.
- Whip it: Add 1 tbsp of heavy cream. Turn the mixer to medium-high and beat for 3-4 minutes until it’s incredibly light and silky. If it looks too stiff, add the last tbsp of cream.
- Assemble: Match up your cooled, tea-speckled shells by size. Transfer the buttercream to a piping bag. Pipe a generous “kiss” of the filling onto the flat side of one shell.
- Sandwich: Gently press another macaron shell on top, just until the filling comes to the edge.
- STOP! DO NOT EAT THEM. (This is the real secret!)
- Mature: Place your assembled macarons in an airtight container. Put them in the refrigerator for 24-48 hours. This is “maturing.” The moisture from the filling will soften the inside of the shell, creating that perfect, chewy-crisp, melded texture. This is when the magic happens.
My Top Tips for Earl Grey Macarons
- Grind that Tea to DUST: This is the most important part for this specific flavor. If the tea grounds are too coarse, they will clog your piping tip and, more importantly, create bumpy, cracked shells. A clean coffee/spice grinder is your best friend. Sift it with the almond flour.
- Aged Egg Whites: This is a pro-tip. Separate your egg whites 1-2 days before you bake. Leave them in a bowl in the fridge, covered with a paper towel. This dehydrates them slightly, making a stronger meringue.
- Gel Coloring Only: Liquid food coloring from the grocery store will add too much moisture and ruin your meringue. Use a concentrated gel color (like Americolor or Wilton). A tiny drop of violet or blue gives that “London Fog” color, but all-natural and speckled is also beautiful.
- Oven Thermometer: Your oven is lying to you. A $10 oven thermometer is the #1 tool for a macaron baker. 300°F is the sweet spot, but your 300°F might be 315°F or 275°F.
Troubleshooting: The Macaron Autopsy
- My Shells are CRACKED: You didn’t slam the pan hard enough to get the air bubbles out, OR you didn’t let them rest long enough to form a skin.
- My Shells are HOLLOW: The #1 problem. Usually a meringue issue (not stiff enough) or your oven is too low. The Italian method is your best defense against this.
- My Shells have NO “FEET”: Your batter was over-mixed (the macaronage went too long), OR you didn’t let them rest.
- My Shells are BUMPY/LUMPY: You didn’t sift your almond flour and powdered sugar, or your tea was not ground finely enough.
How to Serve and Store
- Serving: After they have “matured” in the fridge, take them out. Let them sit at room temperature for 20-30 minutes before serving. This softens the buttercream slightly and is the perfect eating-texture. They are, of course, a “perfect” partner for a cup of tea!
- Storage: Store your finished macarons in an airtight container in the refrigerator for up to 5 days.
- Freezing: Macarons freeze beautifully! Place them in a single layer in an airtight container. They’ll keep for 3 months. Let them thaw in the fridge.
Earl Grey Macaron FAQ
Why the Italian Meringue method? It seems hard. It’s actually easier in the long run! It’s more steps, but the hot syrup “cooks” the egg whites, making a meringue that is incredibly stable. It’s less prone to collapsing and less fussy about humidity.
Do I really have to use a kitchen scale? Yes. I’m saying this as your friend. Yes. If you use cups, you are gambling. If you use grams, you are baking.
Do I really have to wait 24 hours to eat them? Yes! A “fresh” macaron is all wrong—it’s crunchy and will fall apart. The “maturing” is when the shell and filling become one. It’s the most important (and hardest) step.
You Are a Macaron Baker
This is a journey. This recipe is your map. Your first batch might not be perfect, and that is okay. The goal is to learn.
This recipe, with its stable meringue and precise measurements, is your best shot at success. Take a deep breath, trust the grams, and trust the process. You’ve got this.
A Quick Summary
This “no-fear” recipe guides you through making sophisticated Earl Grey Macarons. It uses the stable Italian Meringue method for full, chewy, tea-speckled shells. The shells and the simple, silky buttercream are both infused with finely-ground Earl Grey tea, creating a deep, floral, “London Fog” flavor. The recipe emphasizes precision (using a scale) and the crucial 24-hour “maturing” step.
If you make these macarons, you must show them off! You earned it. Tag me on [Your Social Media Handle] or share a photo of your beautiful “feet.” And if this guide helped you conquer your macaron fears, please share it on Pinterest!