Dreamy No-Bake Chocolate Wafer Icebox Cake
Ice Box Cake Recipe
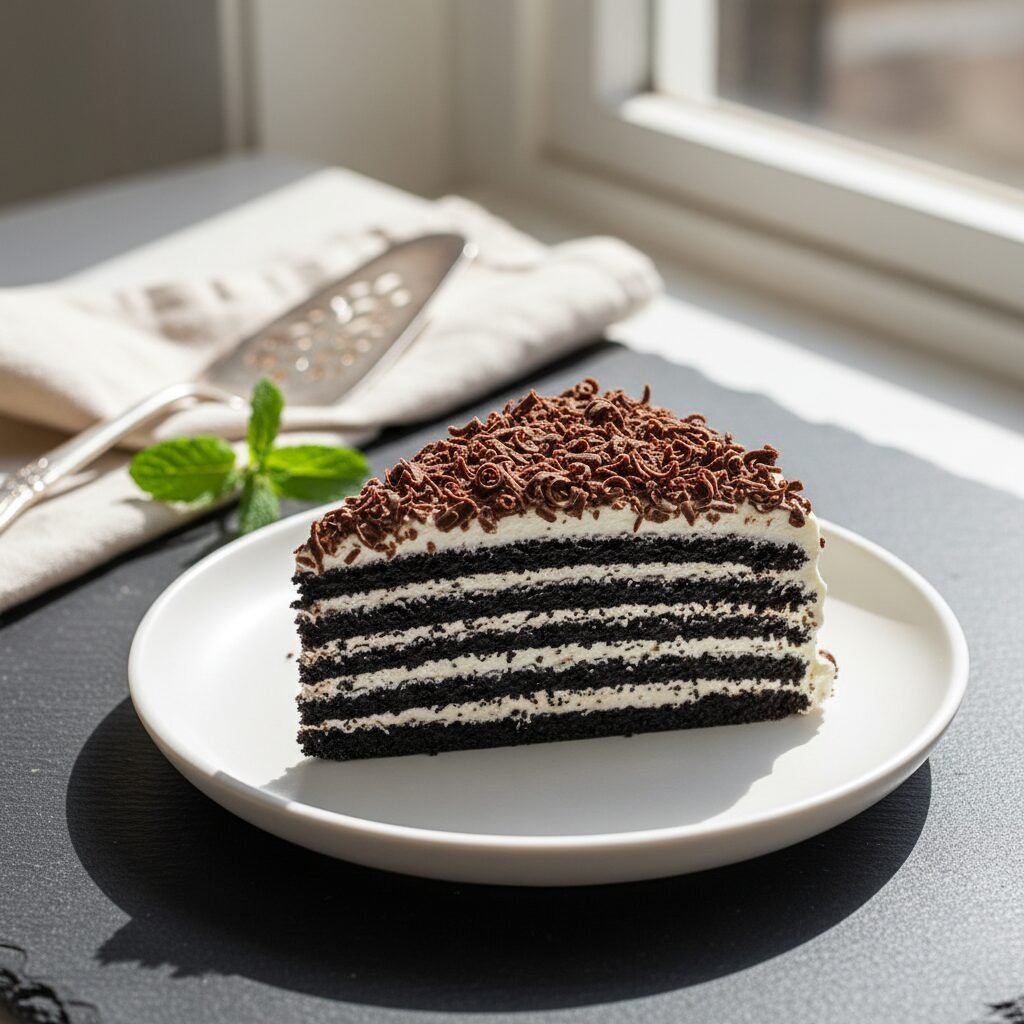
Step into a world of effortless elegance with this classic Chocolate Wafer Icebox Cake! It’s the ultimate no-bake dessert, layering crisp chocolate wafers with billowy, sweet whipped cream until they soften into a dreamy, cake-like texture. This is the simple, show-stopping treat your summer gatherings have been waiting for.
20 minutes
0 minutes
4 hours 20 minutes
8-10 servings
Dessert
No-Bake
American
N/A
Why You’ll Love This Recipe
- Completely no-bake, perfect for hot days!
- Made with just 4 simple ingredients.
- A stunning make-ahead dessert.
- Rich, creamy, and wonderfully nostalgic.
Equipment You’ll Need
- Electric mixer (stand or handheld)
- Large mixing bowl (preferably chilled)
- Rubber spatula
- 8×4 inch or 9×5 inch loaf pan
- Plastic wrap
- Offset spatula (optional, for smooth spreading)
Ingredients
- 2 cups (480 ml) cold heavy whipping cream
- 1/2 cup (60 g) powdered sugar
- 1 1/2 teaspoons pure vanilla extract
- 1 (9-ounce) package chocolate wafer cookies (like Nabisco Famous Chocolate Wafers)
Instructions
- First, prepare your pan. Line an 8×4 or 9×5 inch loaf pan with plastic wrap, leaving a few inches of overhang on the sides. This will make it much easier to lift the cake out later.
- In a large, chilled mixing bowl, combine the cold heavy whipping cream, powdered sugar, and vanilla extract.
- Using an electric mixer on medium-low speed, begin to whip the cream. Gradually increase the speed to medium-high and continue to beat until stiff peaks form. This means when you lift the beaters out, the cream will hold its shape firmly. Be careful not to over-whip, or it will turn grainy.
- Spread a thin layer of the whipped cream on the bottom of the prepared loaf pan. This acts as the ‘glue’ for the first layer of cookies.
- Arrange a single layer of chocolate wafer cookies over the whipped cream, breaking some cookies as needed to fill in any gaps and create a solid layer.
- Gently spread about one-quarter of the remaining whipped cream evenly over the cookie layer, going all the way to the edges.
- Repeat the process, alternating layers of cookies and whipped cream, until you have 4-5 layers of each. End with a final, generous layer of whipped cream on top.
- Smooth the top layer of cream with a spatula. Cover the pan tightly with plastic wrap, pressing it directly onto the surface of the cream to prevent a skin from forming, or use the overhanging plastic wrap to cover it.
- Refrigerate the cake for at least 4 hours, but overnight is even better. This chilling time is crucial; it allows the cookies to absorb moisture from the cream and soften into a tender, cake-like consistency.
- When ready to serve, uncover the cake. Use the plastic wrap overhangs to carefully lift the cake out of the pan and onto a serving platter. Gently peel away the plastic wrap.
- Garnish if desired. You can create beautiful chocolate curls by running a vegetable peeler along the side of a chocolate bar, or simply sprinkle with chocolate shavings or cocoa powder.
- Slice with a sharp knife and serve immediately. Enjoy the creamy, chocolatey goodness!
Expert Cooking Tips
- Chill your tools! For the fluffiest, most stable whipped cream, place your mixing bowl and beaters in the freezer for 15-20 minutes before you start. Cold cream whips up much faster and holds its shape better.
- Don’t skimp on the chill time. Four hours is the minimum, but letting it sit overnight yields the best texture, where the cookies are perfectly soft and meld seamlessly with the cream.
- For a classic ‘zebra’ look when sliced, you can assemble the cake as a log. Stand the cookies on their sides on a platter, spreading cream between each one to form a long log shape. Frost the outside with the remaining cream and chill.
- When layering, don’t be afraid to break cookies to fill in the gaps. A solid layer of cookies ensures the cake holds its structure well when you slice into it.
Substitutions and Variations
This recipe is wonderfully versatile! Swap the chocolate wafers for graham crackers, Biscoff cookies, or even thin gingersnaps for a different flavor profile. For a mocha twist, add 1-2 teaspoons of instant espresso powder to the whipped cream. You can also flavor the cream with almond extract, peppermint extract for a holiday version, or a tablespoon of cocoa powder for a double-chocolate cake. For a dairy-free option, use a high-quality, full-fat canned coconut cream (chilled overnight) and dairy-free cookies.
Common Mistakes to Avoid
The most common mistake is not chilling the cake long enough. If the cookies are still crisp when you serve it, it needs more time in the fridge for the magic to happen. Another frequent error is over-whipping the cream. Stop mixing as soon as you have stiff, firm peaks; if you go too far, the cream will become grainy and start to separate. Lastly, don’t make your cream layers too thick or your cookie layers too sparse, as this can cause the cake to be unstable and slide apart when sliced. Aim for consistent, even layers.
Serving Suggestions
Serve slices of this icebox cake chilled, straight from the refrigerator. It’s stunning on its own, but a garnish of fresh berries like raspberries or strawberries adds a beautiful pop of color and a touch of tartness. For extra decadence, drizzle with hot fudge or caramel sauce just before serving. A light dusting of unsweetened cocoa powder or a pile of delicate chocolate shavings also makes for a simple yet elegant presentation.
Storage and Reheating Tips
Store any leftover icebox cake tightly covered with plastic wrap in the refrigerator for up to 3 days. The cookies will continue to soften over time, making the cake even more tender. You can also freeze the cake for longer storage. Wrap it tightly in plastic wrap and then aluminum foil and freeze for up to 1 month. Let it thaw in the refrigerator for a few hours before serving for the best texture.
Nutrition Facts (Estimated)
| Serving Size | 1 slice |
| Calories | 380 kcal |
| Fat | 28 g |
| Saturated Fat | 17 g |
| Unsaturated Fat | 9 g |
| Trans Fat | 0 g |
| Cholesterol | 100 mg |
| Sodium | 150 mg |
| Carbohydrates | 30 g |
| Fiber | 1 g |
| Sugar | 25 g |
| Protein | 4 g |
Frequently Asked Questions
Can I use store-bought whipped topping instead of making my own whipped cream?
Yes, you can use a product like Cool Whip as a shortcut. It will change the flavor and texture slightly, as it’s often sweeter and more stabilized than homemade whipped cream, but it will work just fine for layering.
Why are my cookies still crunchy after chilling?
This almost always means the cake needs more time in the refrigerator. The cookies need several hours to absorb the moisture from the cream. For the best, truly cake-like texture, chilling it overnight is highly recommended.
Can I make this icebox cake gluten-free?
Absolutely! Simply substitute the chocolate wafers with your favorite gluten-free crisp cookies. Several brands make excellent gluten-free chocolate or vanilla wafers that would work perfectly in this recipe.
My cake seems a little wobbly. How can I make it firmer?
Make sure you are whipping your cream to stiff peaks. If the cream is too soft, the cake won’t set properly. Also, ensure your layers are compact and even. If you’re still concerned, you can add a stabilizer like 1 tablespoon of cornstarch or a packet of unflavored gelatin to your whipped cream to make it extra sturdy.
Conclusion
There you have it – a dessert that’s as simple as it is spectacular. This No-Bake Chocolate Wafer Icebox Cake is a timeless classic for a reason, delivering big on flavor with minimal effort. It’s the perfect recipe to have in your back pocket for potlucks, summer parties, or any time you need a sweet escape. If you make this dreamy cake, I’d love to see it! Please tag me on social media and share your creation on Pinterest!