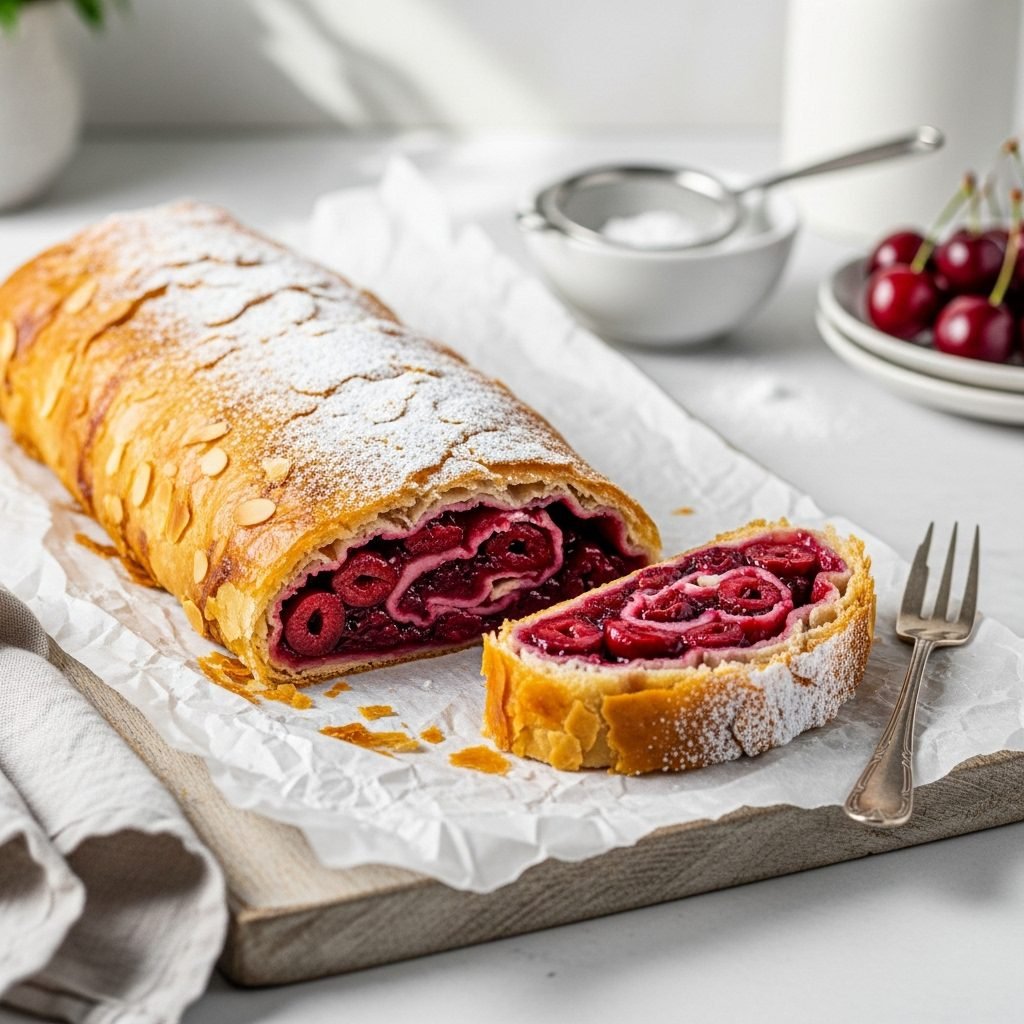
Why This Kirschstrudel Will Be Your New Obsession (It’s So Flaky!)
There’s something magical about a real, bakery-style strudel. That shatteringly crisp, paper-thin pastry that crackles when you cut into it, giving way to a warm, bubbling river of fruit. It feels like a special-occasion dessert, the kind of thing you’d only get from a pastry chef with years of training.
Well, I’m here to tell you that this stunning Kirschstrudel—a beautiful cherry strudel with a little boozy kick—is totally achievable in your own kitchen. And let’s be honest, “Kirschstrudel” just sounds so much more impressive, doesn’t it?
We’re using a brilliant shortcut (hello, phyllo dough) that gives you all of that incredible, flaky-crust-glory without the stress of hand-stretching dough over your entire kitchen table.
What makes this recipe stand out is the filling. We’re not just using cherries; we’re simmering them with a splash of Kirsch (that’s cherry brandy), a hint of almond, and a touch of cinnamon. It creates a “jammy,” complex, and deeply flavorful center that’s tart and sweet, but not too sweet. The Kirsch doesn’t make it taste boozy; it just makes the cherries taste more like themselves.
This is the dessert you make when you want to “wow” your guests. It looks like it took all day, but it’ll be our little secret.
What’s to Love About This Cherry Strudel?
- The Texture: This is a sensory experience. The crust isn’t soft or bready; it’s a celebration of crisp, flaky layers, all thanks to the buttery phyllo dough.
- The Flavor: You get the bright tartness of the cherries, balanced with sweet, warm notes of almond and cinnamon, and that special something from the Kirsch.
- Difficulty: I’d call this “Adventurous Beginner” or “Easy Medium.” It looks harder than it is! As long as you follow the steps for handling the phyllo, you’ll be just fine.
- Time: This comes together in about 90 minutes. That includes 30 minutes of prep (making the filling, toasting the crumbs) and about 45-50 minutes of baking time (plus crucial cooling!).
What You’ll Need for This Kirschstrudel
This recipe uses simple, easy-to-find ingredients. The Kirsch is the only “specialty” item, but you can find it in most liquor stores.
For the Kirsch-Cherry Filling:
- 4 cups Pitted Cherries: You can use fresh (like Bing or Rainier) or frozen (thawed and drained) cherries. Both work wonderfully.
- 3/4 cup Granulated Sugar: You might want a little less if using sweet cherries, or a little more for very tart ones.
- 3 tbsp Cornstarch: This is our thickener. It creates that jammy consistency and prevents a watery filling.
- 3 tbsp Kirsch (Cherry Brandy): This is the star! It adds a wonderful aroma and depth. (See the substitutions section if you don’t have it).
- 1 Lemon: We’ll use both the zest and the juice (about 1 tbsp of juice).
- 1/2 tsp Almond Extract: Cherry and almond are a classic pairing.
- 1/2 tsp Ground Cinnamon: Just a hint for warmth.
- 1/4 tsp Salt: A tiny pinch to balance the sweetness.
For the Strudel Assembly:
- 1 (16 oz) package Frozen Phyllo Dough: You’ll find this in the freezer section, usually near the puff pastry and pie crusts. It must be thawed in the refrigerator overnight.
- 10 tbsp Unsalted Butter (1 stick + 2 tbsp): Melted. This is the liquid gold that makes the phyllo crisp.
- 1/2 cup Plain Breadcrumbs: Not panko, just fine, plain breadcrumbs. This is a classic trick to prevent a soggy bottom!
- 1/2 cup Sliced or Slivered Almonds: For a nutty crunch.
- Powdered Sugar: For dusting generously on top.
Let’s Bake This Beautiful Strudel, Step-by-Step
Ready? This is easier than you think. Put on some good music, and let’s get baking.
First, Make the Cherry Filling
- Combine Filling Ingredients: In a medium saucepan, add your cherries (thawed and drained if frozen), granulated sugar, cornstarch, Kirsch, lemon zest, lemon juice, almond extract, cinnamon, and salt.
- Cook the Filling: Stir everything together before turning on the heat. Once it’s combined, place the saucepan over medium heat. Stir frequently until the mixture comes to a bubble.
- Thicken: Once it’s bubbling, keep stirring for about 1-2 minutes. You’ll see it transform from a watery liquid to a thick, glossy, beautiful filling.
- COOL COMPLETELY: This is the most important step! Pour the filling into a shallow bowl and let it cool to room temperature. You can even pop it in the fridge to speed this up. If you put hot filling on phyllo dough, it will melt, and you’ll have a soggy, leaky mess. Do not skip this!
Next, Toast the Breadcrumbs
- Melt Butter: While the filling cools, melt 2 tablespoons of your butter in a small skillet over medium heat.
- Toast: Add the plain breadcrumbs and stir them constantly until they are golden brown and smell toasty, about 3-5 minutes. They’ll absorb the butter and get lovely and crisp.
- Cool: Remove from the heat and set aside to cool. This buttery breadcrumb layer will be our “moisture barrier.”
Now, Assemble the Strudel
- Pre-Prep: Preheat your oven to 400°F. Line a large, rimmed baking sheet with parchment paper. Melt the remaining 8 tablespoons (1 stick) of butter in a small bowl. Unroll your thawed phyllo dough sheets and lay them on a clean, dry surface.
- The Damp Towel Trick: Phyllo dough dries out extremely fast. To prevent this, cover the stack of phyllo with a sheet of plastic wrap, and then lay a slightly damp (not soaking wet!) kitchen towel on top of the plastic.
- Lay the First Sheet: Take one single sheet of phyllo and lay it on your parchment-lined baking sheet. (I like to assemble right on the pan so I don’t have to move the delicate strudel later).
- Butter It Up: Using a pastry brush, lightly brush the entire sheet of phyllo with melted butter. You don’t need to soak it, just a light, quick coating.
- Layer and Repeat: Place another sheet of phyllo directly on top of the first one, and brush it with butter. Repeat this process until you have used 8 to 10 sheets of phyllo. Don’t worry if a sheet tears! Just patch it up and keep going. The layers are very forgiving.
- Add the “Barrier”: On your top sheet of phyllo, sprinkle the toasted breadcrumbs in an even layer, leaving about a 2-inch border clean on all sides.
- Add the Crunch: Sprinkle the sliced almonds evenly over the breadcrumbs.
- Add the Filling: Spoon the cooled cherry filling in a long log shape over the breadcrumbs and almonds, keeping it to one side (the long side) of the phyllo stack.
- Fold and Roll:
- First, fold the 2-inch border of the short ends (the top and bottom) inward, over the filling.
- Now, starting from the long side with the filling, carefully roll the phyllo up and over the filling, creating a log. Roll it tightly enough to be secure, but not so tight that you squeeze the filling out.
- When you get to the end, make sure the strudel is seam-side down on the parchment paper.
Finally, Bake to Golden-Brown
- Final Buttering: Generously brush the entire top and sides of your strudel log with the last of the melted butter. This is what gives it that deep golden color and extra-crisp finish.
- Cut Vents: Using a sharp paring knife, cut 4-5 shallow diagonal slits into the top of the strudel. This allows steam to escape so your strudel doesn’t burst.
- Bake: Place the baking sheet in your preheated 400°F oven and bake for 20 minutes.
- Reduce Heat: After 20 minutes, reduce the oven temperature to 375°F. Continue baking for another 20-25 minutes, or until the strudel is a deep, rich golden brown and the pastry is visibly crisp.
- COOL AGAIN: This is the second-most important step! Let the strudel cool on the baking sheet for at least 30 minutes before cutting. This allows the filling to set properly. If you cut it too soon, the hot filling will run everywhere.
- Serve: Once cooled slightly, dust generously with powdered sugar, slice with a serrated knife (a bread knife works best), and serve warm.
My Top Tips for Strudel Success
- Phyllo is Your Friend (If You’re Prepared): The key to phyllo is speed and moisture. Have your melted butter and brush ready before you even unroll the dough. And always, always keep the stack you’re not working with covered by that damp towel.
- Cool That Filling (I Can’t Say It Enough): Seriously, I know I’m repeating myself, but this is the #1 mistake. Room temperature or even cold filling is the goal. Hot filling = melted phyllo = a soggy tragedy.
- Embrace the Breadcrumb Barrier: Don’t skip the toasted breadcrumbs! It seems like a weird step, but this is a generations-old trick. That buttery, toasty layer sits between the wet fruit and the bottom pastry, absorbing any extra juice and keeping the bottom crust crisp.
- Don’t Skimp on the Butter: This is not the recipe to try and cut back on butter. Every single layer needs that light brush. The butter is what “fries” the layers of dough in the oven, separating them and creating that signature shatter.
- A Serrated Knife is Best: When it’s time to slice and serve, a serrated knife (like a bread knife) is your best friend. It will cut cleanly through the crisp layers without squishing the whole thing.
Ingredient Swaps and Variations
- No Kirsch? No Problem: If you don’t have Kirsch or prefer to keep it alcohol-free, you can substitute an equal amount of tart cherry juice, apple juice, or even water. To get that “cherry” essence back, add an extra 1/4 teaspoon of almond extract.
- Phyllo vs. Puff Pastry: You can make this with a sheet of puff pastry, but it will be a different dessert—more bready and puffy, less light and shattering. Both are delicious, but for a true strudel, phyllo is the way.
- Go Gluten-Free: This is a tricky one, as gluten-free phyllo dough is very hard to find. Your best bet would be to use a high-quality gluten-free puff pastry sheet. The result will be different, but still delicious.
- Make it Dairy-Free/Vegan: This is an easy swap! Just use a plant-based butter (the stick kind, not a tub margarine) or even a neutral-flavored oil like avocado oil to brush the phyllo. The rest of the recipe is naturally vegan.
Common Pitfalls to Avoid
- The Soggy Bottom: This happens for two reasons: 1) Your filling was too hot, or 2) You skipped the breadcrumb layer. Don’t do either!
- Torn Phyllo Panic: Your phyllo will tear. A sheet will crack. It’s fine! Don’t panic. Once it’s brushed with butter and layered with 7-9 other sheets, you will never know. Just patch it up and move on.
- Cutting Too Soon: I know, it’s so tempting. The strudel is golden, the house smells incredible. But you must wait that 30 minutes. The filling needs time to cool and set.
- A “Naked” Strudel: Forgetting that final, generous brush of butter and the vent-cutting. The butter gives it the gorgeous color, and the vents prevent a cherry explosion in your oven.
How to Serve Your Kirschstrudel
This strudel is a showstopper all on its own, but here’s how I love to serve it:
- A Cloud of Powdered Sugar: This is non-negotiable. It just looks so professional and pretty.
- Vanilla Bean Ice Cream: A scoop of cold, creamy ice cream melting into the warm, flaky strudel… it’s just heaven.
- Whipped Cream: A dollop of lightly sweetened (or unsweetened!) whipped cream is a perfect, light contrast.
- Crème Fraîche: If you want to lean into the European vibe, a spoonful of tangy crème fraîche is an incredible balance to the sweet fruit.
Storing and Reheating Leftovers (If You Have Any!)
Let’s be real: strudel is always best the day it’s made. That’s when the crust is at its peak crispness.
- To Store: Once completely cool, you can store leftovers in an airtight container in the refrigerator for up to 3 days. The crust will soften, but the flavor will still be wonderful.
- To Reheat: Whatever you do, do not use the microwave. It will turn your beautiful, flaky pastry into a sad, soggy, chewy mess.
- The Best Way: Reheat slices in an oven or toaster oven at 350°F for 10-15 minutes. This will re-crisp the pastry and warm the filling, bringing it right back to life.
Your Kirschstrudel Questions, Answered
Can I use canned cherry pie filling? I would strongly advise against it. Canned pie filling is often overly sweet, has a gelatinous texture, and lacks the bright, tart flavor of this homemade filling. The filling in this recipe only takes 10 minutes, and the flavor is a million times better.
Can I make this ahead of time? You can make the cherry filling up to 2 days ahead and store it in an airtight container in the fridge. This actually makes assembly day even faster! However, I don’t recommend assembling the full strudel ahead of time, as the phyllo will get soggy as it sits. It’s best to bake it fresh.
Can I freeze the strudel? Yes! This is a great make-ahead option. You can assemble the entire strudel (but don’t cut the vents yet), and freeze it unbaked. Wrap it tightly in plastic wrap, then a layer of foil. It will keep for up to 3 months. When you’re ready to bake, do not thaw it. Brush with butter, cut the vents, and bake it straight from frozen, adding about 10-15 extra minutes to the baking time.
Enjoy Your Baking!
There is nothing quite like the smell of this Kirschstrudel baking in the oven. It’s the coziest, most wonderful aroma. I hope you love this recipe as much as I do, and I hope you feel like a total pastry-pro when you pull this golden, bubbling, beautiful dessert out of the oven.
It’s a little bit of effort for a whole lot of reward. Happy baking!
A Quick Recap
For a perfect Kirschstrudel:
- Make the cherry filling on the stovetop and let it cool completely.
- Toast the breadcrumbs in a little butter.
- Layer 8-10 sheets of phyllo dough, brushing each layer with melted butter.
- Sprinkle the breadcrumbs and almonds, then top with the cooled filling.
- Roll it up, brush with more butter, and cut vents.
- Bake at 400°F for 20 minutes, then 375°F for 20-25 more, until deep golden brown.
- Let it cool for 30 minutes before dusting with powdered sugar and slicing.