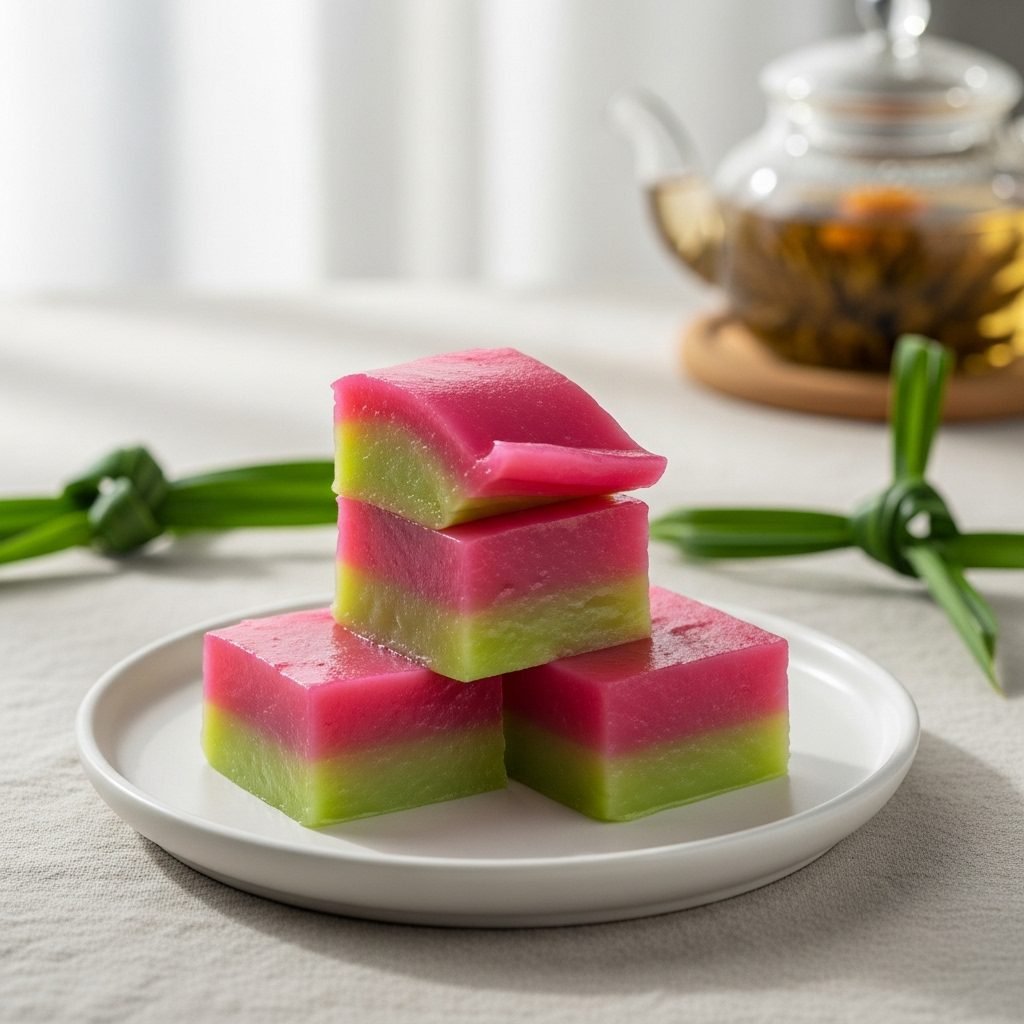
Dreamy Rainbow Pandan Layer Cake (Kuih Lapis)
Kuih Lapis Recipe
Get ready to fall in love with this stunning Southeast Asian treat! This Kuih Lapis recipe guides you through creating a beautifully vibrant, chewy, and fragrant coconut pandan cake with mesmerizing, peelable layers. It’s a true labor of love that’s as fun to make as it is to eat, and the gorgeous result is guaranteed to wow your friends and family.
25 minutes
1 hour 10 minutes
3 hours 35 minutes (includes cooling)
16 small squares
Dessert
Steaming
Southeast Asian
Gluten-Free, Vegan
Why You’ll Love This Recipe
- Perfectly chewy, bouncy texture
- Fragrant with coconut and pandan
- Naturally gluten-free and vegan
- Stunning, vibrant, peelable layers
Equipment You’ll Need
- Large steamer with a lid
- 8×8 inch square cake pan
- Large mixing bowl
- Medium mixing bowl
- Whisk
- Fine-mesh sieve
- Measuring cups and spoons
- Ladle or 1/2 cup measure
- Small bowls for colored batter
- Plastic knife or spatula for cutting
Ingredients
- 1 1/3 cups (160g) tapioca starch (also called tapioca flour)
- 1/3 cup (55g) rice flour
- 1 cup (200g) granulated sugar
- 1/4 teaspoon salt
- 2 cups (480ml) full-fat canned coconut milk
- 1 cup (240ml) water
- 1 teaspoon pandan extract or paste
- Red or pink gel food coloring
- 1 tablespoon neutral oil, for greasing the pan
Instructions
- First, prepare your station. Grease the 8×8 inch square cake pan thoroughly with neutral oil. Fill your steamer with water and bring it to a rolling boil over medium-high heat. Make sure there’s enough water to last for over an hour of steaming.
- In a large mixing bowl, whisk together the tapioca starch, rice flour, granulated sugar, and salt until well combined. This prevents any lumps from forming later.
- In a separate medium bowl, stir together the full-fat coconut milk and water.
- Gradually pour the wet coconut milk mixture into the dry flour mixture, whisking continuously until you have a smooth, thin batter. Don’t dump it all in at once, or you’ll get lumps!
- Pour the entire batter through a fine-mesh sieve into another clean bowl. This is a crucial step for achieving that silky-smooth texture in your final cake.
- Divide the batter evenly into two bowls. In one bowl, stir in the pandan extract. In the other bowl, add a few drops of red or pink gel food coloring until you reach your desired shade.
- Once the steamer is boiling, place the greased pan inside. Let the pan heat up for about 2 minutes.
- Give your first color of batter (let’s start with pandan green) a good stir, as the starch settles quickly. Pour about 1/2 cup of the green batter into the hot pan. Cover with the steamer lid and steam for 5 minutes. The layer should be set and firm to the touch.
- Carefully open the steamer lid, wiping away any condensation from the underside of the lid before closing it again. This prevents water from dripping onto your beautiful cake.
- Stir your pink batter, then pour about 1/2 cup of it over the cooked green layer. Cover and steam again for 5 minutes.
- Repeat this process, alternating between the green and pink batters, until all the batter is used up. Remember to stir each batter right before you pour it. For the very last layer, steam for a longer period, about 15-20 minutes, to ensure the entire cake is cooked through.
- Once done, carefully remove the pan from the steamer and place it on a wire rack. Let it cool completely to room temperature. This is the hardest part, but it’s essential! Do not try to cut it while it’s warm. This can take at least 2-3 hours.
- To release the cake, gently run a plastic knife or oiled spatula around the edges of the pan. Invert the cake onto a lightly oiled cutting board or plate.
- Use a plastic knife or an oiled metal knife to slice the cake into small squares or diamonds. Wiping the knife clean between cuts will give you the cleanest edges. Now you can peel and enjoy!
Expert Cooking Tips
- Always stir your batter right before pouring each layer, as the starch settles at the bottom very quickly.
- For perfectly even layers, use a consistent measuring tool like a 1/2 cup ladle for each pour.
- Wrap the steamer lid with a kitchen towel to prevent condensation from dripping onto the cake, which can cause pitting on the surface.
- To check if a layer is cooked, it should look translucent and feel firm, not sticky, to a light touch.
Substitutions and Variations
While the classic flavor is pandan, feel free to get creative! You can substitute pandan extract with rose water, vanilla extract, or even ube extract for a different flavor and color profile. For natural colors, you can use butterfly pea flower tea for blue, beet juice for pink, or turmeric for yellow, though the vibrancy may be more subtle than with gel coloring.
Common Mistakes to Avoid
The most common mistake is cutting the cake before it’s completely cooled. A warm kuih lapis will be a sticky, gooey mess. Be patient! Another issue is layers separating, which usually means a layer was undercooked before the next one was poured on top. Ensure each 5-minute steam fully sets the layer. Lastly, a lumpy batter comes from not sieving it. Don’t skip the sieve for that signature silky texture!
Serving Suggestions
Kuih Lapis is best served at room temperature as a delightful snack or dessert. It pairs wonderfully with a hot cup of coffee, black tea, or a fragrant herbal tea like jasmine or lemongrass. Arrange the colorful squares on a platter for a stunning addition to any party or gathering.
Storage and Reheating Tips
Store the Kuih Lapis in an airtight container at room temperature for up to 2 days. For longer storage, you can refrigerate it for up to 5 days. Note that it will harden in the fridge. To restore its soft, chewy texture, simply steam the slices for a few minutes until they are soft and warm.
Nutrition Facts (Estimated)
| Serving Size | 1 square |
| Calories | 145 kcal |
| Fat | 5 g |
| Saturated Fat | 4.5 g |
| Unsaturated Fat | 0.5 g |
| Trans Fat | 0 g |
| Cholesterol | 0 mg |
| Sodium | 60 mg |
| Carbohydrates | 24 g |
| Fiber | 1 g |
| Sugar | 16 g |
| Protein | 1 g |
Frequently Asked Questions
Why did my layers separate after cooling?
This usually happens for two reasons: either the layers were undercooked before adding the next one, or the surface of a layer had too much condensation (water) on it, preventing the next layer from adhering properly. Make sure each layer is steamed for the full 5 minutes and always wipe the lid.
Can I use light coconut milk instead of full-fat?
It’s highly recommended to use full-fat canned coconut milk. The fat content is crucial for the rich flavor and the signature soft, chewy, and slightly springy ‘QQ’ texture of the cake. Light coconut milk will result in a less flavorful and potentially harder cake.
How do I get my colors so vibrant and distinct?
Using high-quality gel food coloring is the key. Gels are more concentrated than liquid food colorings, so you only need a few drops to achieve bright, beautiful colors that won’t water down your batter. Start with a little and add more until you reach the desired shade.
Conclusion
Creating this beautiful layered cake is such a rewarding kitchen project! The moment you peel back that first chewy, fragrant layer is pure magic. I hope you and your family adore this taste of Southeast Asia. If you make this Kuih Lapis, I’d be thrilled to see it! Please tag me in your photos on Instagram and share it on Pinterest!