That Sunny, Simple Loaf Cake with the Famous Crack: A Classic Madeira Cake Recipe
Let’s talk about those “simple” bakes that are just so, so good. If you’ve ever traveled through the UK, you’ve seen this cake. It’s a quiet icon, sitting in bakery windows and on cafe counters. It’s the Madeira Cake, and it’s a true classic for a reason.
First, let’s clear up the name. It’s a little confusing! This cake doesn’t contain Madeira wine. It gets its name from the 18th and 19th centuries when it was traditionally served alongside a small glass of Madeira.
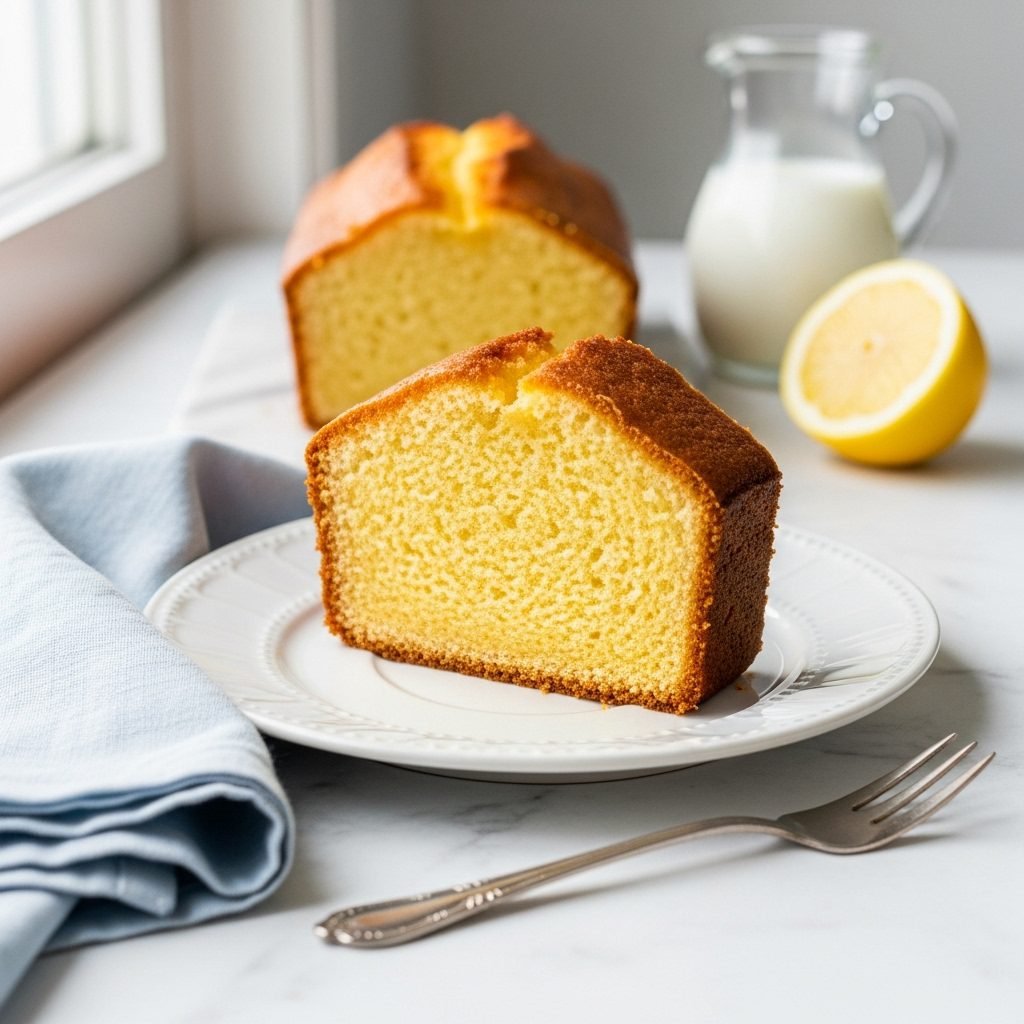
So what is it, exactly? It’s not quite a pound cake, though it’s in the same family. A pound cake is often dense and very rich. A Madeira cake is a firm, close-crumbed cake, but it’s lighter, with a delicate, tender texture. It’s sturdy, but it’s not heavy. It’s defined by its rich, buttery flavor, a bright, fragrant hit of lemon, and that signature crack that runs right down the top.
This is, in my opinion, the quintessential afternoon cake. It’s the cake you bake on a Tuesday just because. It’s the cake you have a slice of with a hot cup of tea or coffee. It’s unpretentious, simple, honest baking, and it’s one of my all-time favorites. It’s a bake that feels like a warm, sunny afternoon.
Why You’ll Love This Recipe
This cake is a timeless classic for a reason. Here’s a little peek at what makes it so special:
- The Flavor: It’s simple in the best way. The taste is a pure, wonderful harmony of rich, sweet butter, bright lemon zest, and a hint of vanilla. It’s not masked by heavy frostings or fillings, so the quality of the ingredients really shines.
- The Texture: This is the best part. It has a wonderfully fine, tender, and moist crumb that’s still sturdy enough to slice cleanly. The outside has a golden, slightly crisp “crust,” and the top has that lovely, rustic, sugary crack.
- The Time: This is a very straightforward bake. You’ll need about 15-20 minutes of active prep time (mostly creaming the butter and sugar) and then about 50-60 minutes for it to bake.
- The “Wow” Factor: This is a “confident beginner” recipe. The technique is all about simple, classic baking, but the result looks so professional. Getting that perfect crack down the middle is so satisfying! It’s a humble cake that looks elegant on any cake stand.
What You’ll Need
The ingredient list is beautifully simple. This is why it’s so important to use good-quality ingredients—you’ll really taste them!
- 1 3/4 cups all-purpose flour
- 1 1/2 tsp baking powder
- 1/2 tsp salt
- 3/4 cup (1 1/2 sticks) unsalted butter, very soft, at room temperature
- 1 cup granulated sugar
- 1 tbsp finely grated lemon zest (from 1 large or 2 small lemons)
- 3 large eggs, at room temperature
- 1 tsp vanilla extract
- 2 tbsp fresh lemon juice
- 3 tbsp whole milk (or 2% milk)
A Note on Temperature: I know I’ve listed “room temperature” a few times, and for this cake, it really matters. Soft butter, room-temp eggs, and room-temp milk will all combine to create a smooth, stable batter (an emulsion) which is the secret to a fine, even crumb.
How to Make a Classic Madeira Cake, Step by Step
Ready? Let’s bake. The whole secret to this cake is in the first two steps.
Step 1: Get Your Station Ready
First things first. Preheat your oven to 325°F (yes, 325°F—a lower, slower bake is key for this cake).
Grease a 9×5-inch loaf pan with butter or baking spray. Line it with parchment paper, leaving some “overhang” or “wings” on the two long sides. This will be your set of handles to lift the cake out later. Grease the parchment paper, too.
Step 2: Whisk Your Dry Ingredients
In a medium bowl, add the all-purpose flour, baking powder, and salt. Whisk them together for about 30 seconds. This does the same job as sifting and makes sure the leavening is evenly spread out. Set it aside.
Step 3: The Creaming Method (The Most Important Step!)
In a large bowl, or the bowl of your stand mixer, place your very soft butter, granulated sugar, and lemon zest.
Beat on medium-high speed for a full 5 to 7 minutes. Yes, really! This is not the time to rush. Set a timer. You are whipping air into the fat, which is what gives the cake its lift and light texture. The mixture should become pale, double in volume, and look almost like a fluffy frosting. This is the whole secret.
Step 4: Add Your Eggs
With the mixer on medium-low, add your room-temperature eggs, one at a time. Beat well after each addition, making sure the egg is fully incorporated before adding the next. Scrape down the sides of the bowl once or twice. If the mixture looks a little “curdled,” don’t panic. It will come together. Add the vanilla extract with the last egg.
Step 5: Combine Your Liquids
In a small measuring cup, stir together your 2 tbsp of lemon juice and 3 tbsp of milk.
Step 6: Alternate Dry and Wet (Gently!)
Now, turn your mixer to its lowest speed (or just use a spatula!). We want to add the flour mixture in three parts, alternating with the milk mixture in two parts.
It looks like this:
- Add one-third of the dry ingredients. Mix on low just until the flour starts to disappear.
- Add half of the milk/lemon juice mixture. Mix on low until it’s just combined.
- Add the second third of the dry ingredients. Mix on low until combined.
- Add the rest of the milk/lemon juice mixture. Mix on low until combined.
- Add the last third of the dry ingredients. Mix on low only until the last streaks of flour are gone.
Step 7: Do Not Overmix!
I’m saying it again because it’s the second most important rule. The moment the flour is gone, stop. Overmixing develops gluten and will give you a tough, rubbery, or gummy cake.
Step 8: Bake Your Cake
Scrape the batter, which will be thick and pale, into your prepared loaf pan. Use your spatula to spread it evenly into the corners and smooth the top.
Bake at 325°F for 50-60 minutes.
The cake is done when it’s a deep golden brown, the top has a rustic crack, and a wooden skewer or toothpick inserted into the center (right through the crack!) comes out clean, with no wet batter.
Step 9: Cool Your Cake (The Patient Part)
Let the cake cool in the pan on a wire rack for 20 minutes. This lets the structure set, so it won’t collapse.
After 20 minutes, use those parchment “wings” to lift the cake straight out of the pan. Place it on the wire rack and let it cool completely to room temperature before slicing. Cutting into a warm loaf cake can make it gummy inside.
My Top Tips for a Flawless Loaf
- That 5-7 Minute Creaming Window: I can’t say it enough. This is where the magic happens. It’s the difference between a light, tender cake and a dense, heavy one.
- The 325°F Oven: A lower, slower oven is your friend. It lets the center of the cake cook through at the same rate as the edges, which prevents that “raw in the middle, burnt on the outside” problem.
- How to Get “The Crack”: This signature feature is a good thing! It’s not a flaw. It happens when the lower oven temp causes the outside of the cake to set while the baking powder is still pushing the (still-liquid) center of the cake up. The “crust” cracks to let the center rise. It’s the sign you did it right!
- Measure Your Flour Correctly: This is the #1 mistake I see in baking. If you just scoop your cup into the flour bag, you’re packing in way too much. Spoon the flour into your measuring cup, then level it off with a knife. Or, for a truly perfect result, use a kitchen scale (it’s 210 grams, if you’re curious).
Ingredient Swaps and Variations
- Citrus: This cake is just as lovely with orange zest and orange juice, or even lime zest, for a different “sunny” flavor.
- Milk: If you only have buttermilk, plain yogurt, or sour cream, you can use that instead of the whole milk. It will add a slight, pleasant tang to the cake.
- Gluten-Free Madeira Cake: This is a sturdy cake, so it takes well to a gluten-free swap. Use a high-quality 1-to-1 gluten-free all-purpose baking blend.
- Dairy-Free Madeira Cake: This is possible! You’ll need to use a high-quality, stick-style vegan butter (not the tub-style margarine) and a good, neutral-flavored plant-based milk like oat or almond.
Common Pitfalls (and How to Avoid Them)
- Why is my cake dense and heavy? You likely didn’t cream the butter and sugar long enough, or your “room temperature” ingredients were still too cold, which “broke” the emulsion.
- Why did my cake sink in the middle? It was underbaked, or you opened the oven door too early, letting cold air in and collapsing the structure before it was set.
- Why does my cake have a “gummy” streak at the bottom? This is almost always from overmixing the flour. As soon as that last streak of flour is gone, stop mixing.
- My cake didn’t crack! That’s okay! It will still be delicious. It could be your oven runs hot, which made the whole thing set at once. A non-cracked Madeira is not a failure, just a different personality.
How to Serve This Simple, Lovely Cake
This cake truly needs nothing. It is designed to be served at room temperature in neat, 1-inch-thick slices.
- The Traditional Way: Serve it on a simple plate with a hot cup of tea (like an English Breakfast or Earl Grey) or a strong coffee.
- The Original Way: Serve it with a small glass of a sweet wine, like a Madeira, Sherry, or Port. It’s a very grown-up and elegant way to have dessert.
- With a Little Something Extra: It’s lovely with a dollop of unsweetened whipped cream and some fresh berries (strawberries or raspberries are perfect).
- For a Fancy Trifle: Because the crumb is so sturdy, it’s a fantastic base for a trifle. Cut it into cubes and layer with custard, fruit, and cream.
Storage Tips
This is the best part: this cake arguably gets better on day two. The flavors have time to settle in and the crumb becomes even more tender.
- Storing: This cake must be stored in an airtight container at room temperature. You can also wrap it very tightly in plastic wrap. Do not refrigerate it! The fridge will dry it out and make it stale. It will last 3-4 days at room temp.
- Freezing: This cake freezes beautifully. You can freeze the entire, cooled loaf or individual slices. Wrap the cake (or slices) tightly in plastic wrap, then a layer of aluminum foil (or place in a freezer bag). It will keep for up to 3 months. Let it thaw at room temperature.
Your Madeira Cake Questions, Answered
What’s the real difference between this and a Pound Cake? A traditional pound cake uses a 1:1:1:1 ratio of flour, butter, sugar, and eggs. A Madeira cake “lightens” this ratio, using less butter and egg and adding milk and a chemical leavener (baking powder) to create a lighter, less-dense, and finer crumb.
Can I use self-rising flour? Yes. If you have self-rising flour, use 1 3/4 cups of it and omit the 1 1/2 tsp of baking powder and 1/2 tsp of salt.
Can I bake this in a round pan? You can, but it’s not traditional and will change the baking time. It’s really designed for the loaf pan, which gives you that signature crust-to-crumb ratio. If you use an 8-inch round pan, start checking for doneness around 35-40 minutes.
A Simple, Honest Bake
I really hope you give this lovely cake a try. It’s a break from the multi-layered, frosted, complicated desserts. It’s a simple, honest bake that relies on good ingredients and good technique.
It’s a reminder that sometimes, the most satisfying baking projects are the ones that end in a simple, golden-brown slice of cake that smells like butter and lemons. It’s a little slice of sunshine.
A Quick Summary
This classic Madeira Cake recipe creates a tender, fine-crumbed loaf cake that’s sturdy yet light. It’s flavored with rich butter and bright lemon zest, and baked at a low temperature to produce its iconic, rustic “crack” down the center. It’s the perfect, simple-but-elegant cake to serve with tea or coffee.
If you make this Madeira Cake, I would be so happy to see it! I especially want to see that crack! Tag me on [Your Social Media Handle] or share a photo. And if you loved this slice of simple, sunny baking, please share this post on Pinterest! It helps others discover this wonderful classic. Happy baking!