That Retro Coconut-Custard Dream: A Classic Manchester Tart Recipe
Let’s take a trip down memory lane, shall we? If you grew up in the UK, you might remember this tart from school dinners. It’s a true retro classic, a bake that just radiates nostalgia. But if you’ve never heard of a Manchester Tart, oh, are you in for a treat.
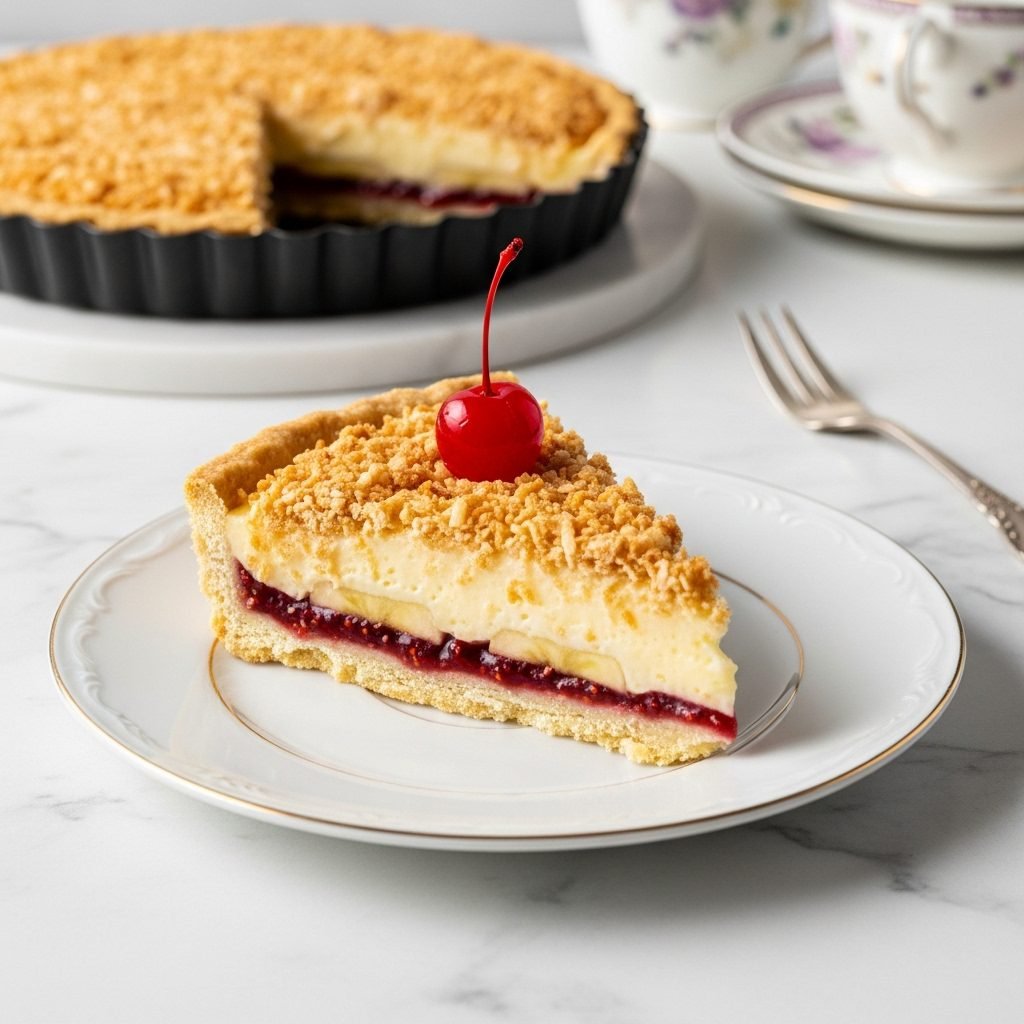
This isn’t just a simple custard tart. This is a masterpiece of layers. It starts with a crisp, buttery shortcrust pastry shell. Then, a sharp, sweet layer of raspberry jam on the bottom. Next, a very thick, very rich, very creamy vanilla custard. And the part that makes it a “Manchester” tart? A generous, crunchy-chewy blanket of toasted coconut, all topped off with a bright red, glossy maraschino cherry.
This is a “project bake” in the best possible way. It has a few components, but each one is simple and so, so satisfying to make. It’s the kind of dessert that feels both humble and incredibly special. It’s pure, old-school comfort in a tart pan, and I’m going to walk you through every single step.
What Makes This Tart a Showstopper
This tart is a whole experience. Here’s what’s waiting for you:
- The Flavor: It’s a perfect balance. The buttery, savory-sweet crust, the bright, tart punch of raspberry jam, the rich, silky, vanilla-bean custard, and the nutty, toasty flavor of the coconut. It’s sweet, but not at all cloying.
- The Texture: This is where it wins everything. You get crisp pastry, sticky jam, velvety-smooth custard, and crunchy-chewy coconut. It’s a symphony of textures in every single bite.
- The Time: This is a multi-step bake. You’ll need about 30 minutes for the pastry (plus chilling), 30 minutes to blind-bake, 20 minutes for the custard, and then time to chill and assemble. Plan on this being a fun afternoon project. The chilling is the most important part!
- The Difficulty: I’d call this a “confident beginner” or “intermediate” bake. Not because any single step is hard, but because it requires a few different components (pastry, custard, assembly). But I promise, you can do this.
What You’ll Need
Let’s get our ingredients in order. We’re building this in layers!
For the Buttery Shortcrust Pastry:
- 1 1/2 cups all-purpose flour
- 1/2 cup (1 stick) cold, unsalted butter, cut into 1/2-inch cubes
- 3 tbsp granulated sugar
- 1/4 tsp salt
- 1 large egg yolk
- 2-3 tbsp ice water
For the Vanilla Custard (Crème Pâtissière):
- 2 cups whole milk
- 1/2 cup heavy cream (This makes it extra rich!)
- 1 vanilla bean, split and scraped (or 2 tsp good vanilla extract)
- 1/2 cup granulated sugar
- 1/4 cup cornstarch
- Pinch of salt
- 5 large egg yolks
- 2 tbsp unsalted butter, at room temperature (for finishing)
For the Assembly & Topping:
- 1/2 cup good-quality, seedless raspberry jam
- 1 large banana, thinly sliced (This is traditional but optional!)
- 1 1/2 cups shredded, sweetened coconut
- Maraschino cherries, for garnish
How to Make Your Manchester Tart, Step by Step
Let’s take this one component at a time. The most important virtue here is patience. Everything must be cold before assembling.
Part 1: The Shortcrust Pastry
- Combine Drys: In a large bowl, whisk the flour, sugar, and salt. Add the cold, cubed butter.
- Cut in Butter: Using a pastry blender or your fingertips, rub the butter into the flour until you have a coarse, sandy mixture with some pea-sized butter bits remaining.
- Add Binder: In a small bowl, lightly whisk the egg yolk with 2 tbsp of ice water. Drizzle this over the flour mixture and toss with a fork until the dough just starts to come together in clumps. If it’s too dry, add the last tbsp of ice water.
- Form & Chill: Gently press the shaggy dough into a flat disc. Do not knead! Wrap it tightly in plastic wrap and refrigerate for at least 1 hour (or up to 2 days).
- Roll Out: On a lightly floured surface, roll the cold dough out into a 12-inch circle.
- Fit Pan: Carefully transfer the dough to a 9-inch fluted tart pan with a removable bottom. Gently press it into the bottom and up the sides. Trim the excess dough so it’s flush with the rim.
- Dock & Chill: Use a fork to poke little holes all over the bottom of the crust (this is “docking”). Place the entire tart pan in the freezer for 30 minutes. This is the secret to preventing shrinkage!
Part 2: Blind-Baking the Crust (No Soggy Bottoms!)
- Prep for Baking: Preheat your oven to 375°F.
- Weigh It Down: Take the tart shell from the freezer. Line it with a piece of crumpled parchment paper (crumpling makes it fit better). Fill the parchment with pie weights, dried beans, or uncooked rice, making sure they go all the way to the edges.
- First Bake: Bake for 20 minutes. The edges should be just starting to turn golden.
- Second Bake: Carefully lift the parchment paper and weights out. Place the tart shell back in the oven and bake for another 10-15 minutes, until the bottom is dry and a light golden brown.
- Cool: Let the tart shell cool completely in the pan on a wire rack.
Part 3: The Silky-Smooth Custard
- Infuse Milk: In a medium saucepan, combine the whole milk, heavy cream, and the scraped vanilla bean seeds (and the pod itself). Heat over medium heat until it’s just simmering (little bubbles around the edge). Turn off the heat and let it sit for 15 minutes to infuse.
- Make Slurry: In a large, heatproof bowl, vigorously whisk together the sugar, cornstarch, salt, and egg yolks. Keep whisking until the mixture is pale yellow, thick, and “ribbony.”
- Temper the Eggs: Fish the vanilla pod out of the milk. Re-warm the milk until it’s simmering again. This is the “scary” part, but it’s easy! While whisking the yolk mixture constantly, very slowly pour about half of the hot milk into the yolks. This gently warms them up so they don’t scramble.
- Cook the Custard: Pour the tempered yolk mixture back into the saucepan with the rest of the milk. Return to medium heat and cook, whisking constantly and vigorously. Don’t walk away!
- Thicken: The custard will start to thicken. Once it starts to bubble, keep whisking for 1-2 full minutes. This is crucial for cooking out the cornstarch taste and ensuring it sets. It will be very thick.
- Finish & Strain: Remove from the heat. Add the 2 tbsp of room-temperature butter and whisk until it’s melted and smooth. (If you’re using vanilla extract, add it now).
- Strain & Chill: Pour the custard through a fine-mesh sieve into a clean bowl. This catches any tiny, accidental lumps and makes it perfectly smooth.
- Cover & Chill: Press a piece of plastic wrap directly onto the surface of the custard. This is the only way to prevent a “skin” from forming. Chill in the refrigerator for at least 2 hours, or until completely cold and thick.
Part 4: Assembly (The Fun Part!)
- Toast Coconut: While the custard is chilling, spread the coconut on a baking sheet. Toast at 325°F for 5-8 minutes, stirring often, until it’s a light, golden brown. Watch it like a hawk; it burns fast! Let it cool.
- Layer 1 (Jam): Take your completely cooled tart shell. Spread the raspberry jam in an even layer over the bottom.
- Layer 2 (Bananas – Optional): If you’re using them, arrange the banana slices in a single layer on top of the jam.
- Layer 3 (Custard): Spoon the completely cold custard into the tart shell. Spread it evenly over the jam and bananas with an offset spatula.
- Layer 4 (Coconut): Cover the entire top of the custard with your toasted coconut. Be generous! It should be a thick blanket.
- Garnish: Dot the top with maraschino cherries.
- Final Chill: Place the finished tart back in the refrigerator for at least 1 hour to set completely. This makes slicing a breeze.
My Top Tips for Tart Success
- No Soggy Bottoms, Ever: I can’t say it enough. That second bake without the pie weights is the secret. You want the bottom of that crust to be dry and golden before any filling goes near it.
- Strain Your Custard: Don’t skip this. It’s the 10-second step that guarantees a professional, silky-smooth texture, even if you got a few small lumps.
- Plastic Wrap on the Surface: This is a non-negotiable for custard. Any air between the plastic and the custard will create a skin. Press it right down onto the surface.
- Shortcut Alert: If you’re short on time, you can absolutely use a high-quality, store-bought, all-butter pie crust. I also won’t tell if you use a premium, store-bought vanilla pudding (though homemade is a game-changer!).
Ingredient Swaps and Variations
- The Jam: Strawberry jam is a common and delicious substitute for raspberry.
- The Bananas: This is the most controversial part of a Manchester Tart! Many traditional recipes have them; many purists insist they don’t belong. It’s 100% up to you. I love the extra fruity, creamy layer they add.
- Gluten-Free: Use your favorite 1-to-1 gluten-free baking flour blend for the shortcrust pastry. The custard is naturally gluten-free.
- Dairy-Free: This is a tougher swap. You’d need to use a stick-style vegan butter for the crust, a high-quality (full-fat!) oat or soy milk for the custard, and omit the heavy cream. It’s possible, but the flavor will be different.
Common Pitfalls (and How to Avoid Them)
- My Crust Shrank! You didn’t chill it enough before baking. That 30-minute freeze is the best trick in the book.
- My Custard is Lumpy! You didn’t whisk constantly, or you poured the hot milk in too fast and scrambled the eggs. Always strain it to save the day.
- My Custard is Runny! You didn’t cook it long enough. You must let it bubble and whisk for at least 1-2 minutes to activate the cornstarch fully.
- My Tart is a Soupy Mess! You tried to assemble it while a component was still warm. A warm crust, warm jam, or (especially) warm custard will melt everything. Patience is the key ingredient.
How to Serve This Retro Beauty
This tart is designed to be served cold, straight from the refrigerator.
Use a sharp, clean knife to slice. For ultra-clean slices, dip the knife in hot water and wipe it clean between each cut. The tart is rich, so a small, neat wedge is all you need.
It needs no accompaniment. It is the star. The only thing that makes it better is a strong cup of British tea, like a PG Tips or Yorkshire Gold.
Storage & Reheating
- Storage: Because of the dairy custard, this tart must be stored in the refrigerator. It will keep, loosely covered, for 2-3 days. The coconut will soften a bit, but it will still be delicious.
- Reheating: Do not reheat this tart. It is a cold dessert.
Your Manchester Tart Questions
Why is it called a Manchester Tart? It’s a classic from the Manchester, England, region. It’s most famous as a staple of school cafeterias (“school dinners”) in the mid-20th century, which is why it holds such a nostalgic place in so many hearts.
Can I make it ahead of time? Yes! You can make the components separately.
- Crust: Bake the crust up to 2 days ahead and store it in an airtight container at room temp.
- Custard: Make the custard up to 2 days ahead and keep it in the fridge (with the plastic on top).
- Assembly: Assemble it on the day you plan to serve it. It needs at least 1-2 hours to chill after assembly.
A Little Slice of Nostalgia
I know this looks like a lot of steps, but it’s such a rewarding, fun bake. It’s a true showstopper.
When you bring this to the table, with its crisp, fluted edges, thick layer of creamy-yellow custard, and the snowy, toasty coconut on top, it’s a pure “wow” moment. That first bite—crisp, jammy, creamy, crunchy—is just pure baking joy.
A Quick Summary
This classic Manchester Tart recipe guides you through creating a beloved British dessert. It features a crisp, buttery shortcrust pastry, a bright layer of raspberry jam (and optional bananas), a thick, silky-smooth vanilla custard filling, and a generous topping of crunchy toasted coconut, all garnished with maraschino cherries.
If you make this retro-classic, I would be so thrilled to see it! Tag me on [Your Social Media Handle] or share a photo. And if this recipe brought a little old-school charm to your kitchen, please share this post on Pinterest! It helps other bakers discover this wonderful tart. Happy baking!