Those Famous Blistered-Top Tarts: A Portuguese Custard Tart (Pastéis de Nata) Recipe
If you have ever been lucky enough to eat a real Pastel de Nata, fresh from a bakery, you know the magic. It’s an experience you don’t forget.
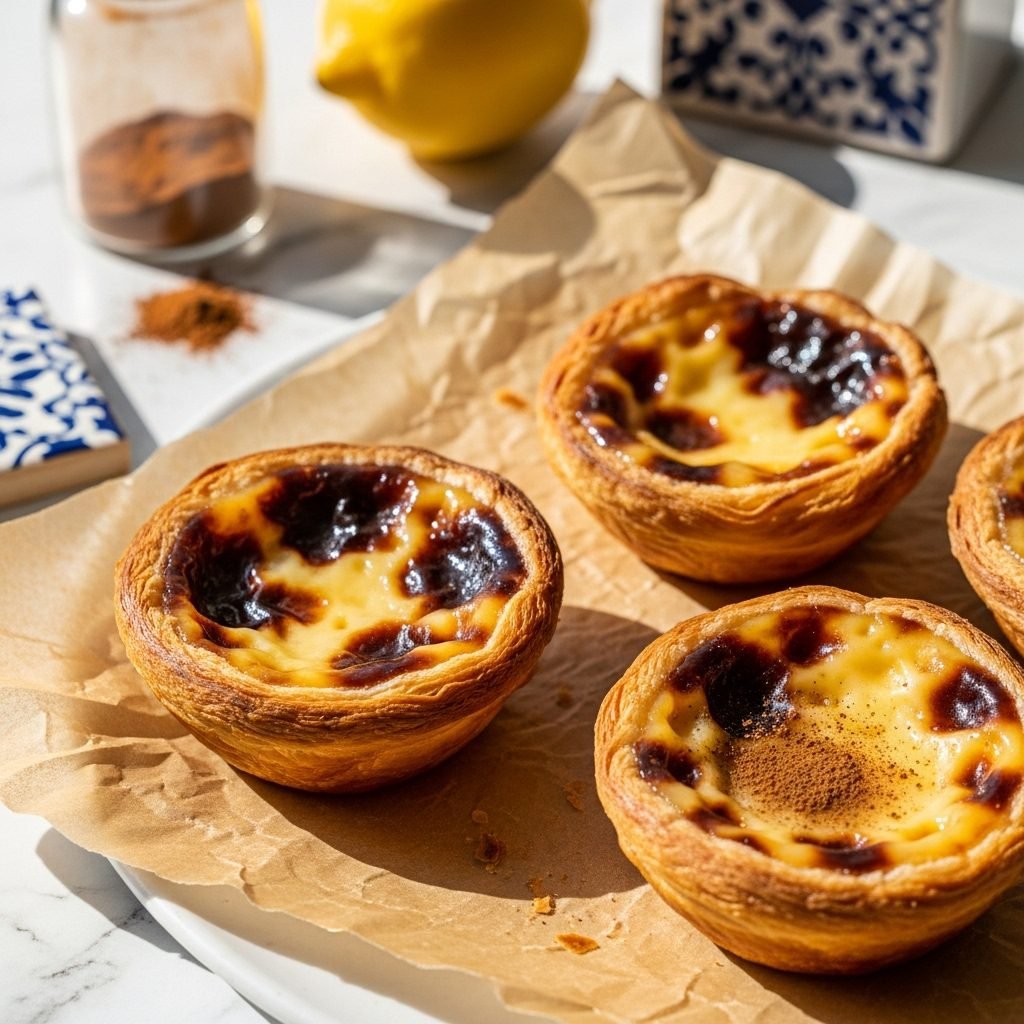
You bite through a crust that doesn’t just flake—it shatters. It’s a thousand paper-thin, buttery layers. Then, you hit the center: a rich, wobbly, not-too-sweet custard, kissed with lemon and cinnamon, all held in that crispy, cup-like shell.
But the real signature? The top. Those iconic, dark, caramelized “leopard spots” that come from a blast of incredibly high heat. It’s a flavor you can’t get from anything else.
They look like a professional, pastry-chef-only-dessert, right? I’m going to let you in on the two big secrets that make these completely achievable at home. First: a good-quality, all-butter, store-bought puff pastry. Second: an oven that is hotter than you’ve ever dared to set it.
This is a “project bake” that is 100% worth your time. Get ready to make your kitchen smell like a Lisbon bakery.
Why You Are Going to Love This Recipe
This isn’t just a recipe; it’s a little bit of magic. Here’s what makes it so special:
- The Flavor: A beautiful, balanced blend of rich egg yolk, sweet vanilla, and a bright, zesty note from lemon peel (or a warm hint of cinnamon). The caramelized, slightly-burnt sugar spots on top add a complex, roasted flavor that cuts the richness.
- The Texture: This is where it’s a 10/10. You get the shattering, crackly, crispy pastry shell, which contrasts with the silky, smooth, creamy, just-set custard center.
- The Time: Using store-bought puff pastry makes this incredibly fast. You’ll need about 30 minutes to make and chill the custard, 15 minutes to prep the pastry, and only 12-15 minutes to bake.
- The “Wow” Factor: This is a “confident beginner” recipe. The steps are easy to follow, but the result looks (and tastes) incredibly impressive. Nailing those black spots feels like a true baking victory.
What You’ll Need
This recipe has two simple parts. The ingredients are humble, but the result is extraordinary.
For the Silky, Blistered-Top Custard:
- 1 cup whole milk
- 1/2 cup granulated sugar
- 3 tbsp all-purpose flour
- A 2-inch strip of lemon peel (use a vegetable peeler)
- 1 cinnamon stick
- 4 large egg yolks (Save the whites for macarons or an omelet!)
- 1 tsp vanilla extract
For the Shatter-Crisp Pastry:
- 1 sheet (about 9-10 oz) all-butter puff pastry, thawed in the fridge
- A little softened butter for the muffin tin (optional, but helpful)
For Serving (The Traditional Way):
- Ground cinnamon
- Powdered sugar
How to Make Portuguese Custard Tarts, Step by Step
Let’s break this down. The most important rule? Your oven needs to be screaming hot.
Part 1: Make the Custard (So It Can Cool)
This custard is thin, which is what helps it bubble and caramelize. Don’t worry!
- Infuse the Milk: In a medium saucepan, combine the 1 cup of whole milk, the strip of lemon peel, and the cinnamon stick. Heat over medium heat until it’s just simmering (little bubbles around the edge). Don’t let it boil. Once it’s simmering, turn off the heat and let it steep for 15-20 minutes for the flavors to infuse.
- Make the Slurry: In a medium, heatproof bowl, whisk together the 1/2 cup of granulated sugar, the 3 tbsp of all-purpose flour, and a small pinch of salt. Whisk in the 4 large egg yolks, one at a time, until you have a thick, pale-yellow paste.
- Temper the Eggs: Fish the lemon peel and cinnamon stick out of the milk and discard them. Re-warm the milk for 30 seconds. This is the key step! While whisking the egg yolk paste constantly, very slowly drizzle about half of the hot milk into the bowl. This gently warms the yolks so they don’t scramble.
- Cook the Custard: Pour the tempered yolk mixture back into the saucepan with the rest of the milk. Return to medium-low heat.
- Whisk, Whisk, Whisk: Whisk constantly (don’t walk away!) for 3-5 minutes. The custard will start to thicken. You’re looking for the consistency of a thin-ish pudding—thick enough to coat the back of a spoon. It will not be a stiff pastry cream.
- Strain and Chill: Pour the custard through a fine-mesh sieve into a clean bowl. This is the secret to a perfectly silky, lump-free texture. Stir in the 1 tsp of vanilla extract.
- Cover: Press a piece of plastic wrap directly onto the surface of the custard. This is the only way to prevent a “skin” from forming. Let it cool on the counter, then chill in the refrigerator for at least 30 minutes.
Part 2: The Oven and the Pastry (The Secrets!)
- THE OVEN: This is the most important step. Place a rack in the upper-third of your oven. Preheat your oven to its absolute, tippy-top hottest setting. For most ovens, this is 500°F or 550°F. Yes, that is not a typo. Let it preheat for a solid 30 minutes.
- Prep the Tin: Lightly grease a standard 12-cup muffin tin with softened butter or baking spray.
- The Pastry “Roll-Up”: Unfold your thawed puff pastry sheet on a lightly floured surface. Gently roll it just to smooth out the creases. Starting from the long end, roll the pastry up as tightly as you can into a long, thin log (like a jelly roll or a cinnamon roll).
- Cut the Discs: Use a sharp knife to trim off the uneven ends. Cut the log into 12 equal 1-inch discs. You’ll see beautiful swirls in each cut.
- Form the Shells: Place one disc, swirl-side-up, into each muffin cup. Now, get a small cup of cold water. Dip your thumb in the water (this is the real baker’s trick!), and press it into the center of the pastry swirl.
- Press It Out: Using your wet thumb, press from the center outwards, “smearing” the dough up the sides of the muffin cup. You want to create a thin, even shell that’s slightly thinner on the bottom than the sides. Try to get the pastry to come up just a tiny bit higher than the rim of the cup.
Part 3: The Bake (The Magic)
- Fill ‘Em Up: Give your chilled custard a good whisk—it will have set up. Fill each pastry shell about 3/4 of the way full. Do not overfill! They will bubble up.
- Bake Hot and Fast: Place the muffin tin on the hot, upper rack of your 500°F+ oven.
- Bake for 12-15 minutes. This is where you watch. The pastry will puff and turn golden-brown. The custard will bubble. And then, the magic: the tops of the tarts will start to blister and char in spots. This is what you want!
- Watch for the Spots: You’re done when the pastry is deeply golden and the tops have several dark-brown or black “leopard spots.”
- Cool: Carefully remove the tin from the oven. Let the tarts cool in the tin for 10-15 minutes. This is crucial—the hot, bubbly custard needs to set.
- Remove: Use a small offset spatula or a butter knife to gently loosen the tarts and transfer them to a wire rack to cool a bit more.
My Top Tips for a Flawless Batch
- “Is My Oven Really Hot Enough?” If you are nervous, trust me. A 400°F oven will just make a regular, pale custard tart. It will be tasty, but it won’t be a Pastel de Nata. You need that blistering 500°F+ heat to get the signature spots.
- The “Cinnamon Roll” Pastry Hack: Why do we roll up the pastry? This is the real secret. When you press that swirled disc into the tin, you’re creating hundreds of horizontal, concentric layers. This is what gives that unique, shatter-crisp, almost-glass-like texture, instead of just a few “puffy” layers.
- The Wet Thumb Trick: This is a game-changer. Puff pastry is sticky. A dry thumb will just pull the dough. A wet thumb glides, letting you press the pastry into the perfect cup shape.
- Strain That Custard: Don’t skip this. It’s 15 seconds of work that guarantees your custard is perfectly, luxuriously smooth.
Swaps and Variations
- The Flavoring: I love the combination of lemon and cinnamon. If you’re a purist, pick one. A lemon peel will give a bright, zesty flavor. A cinnamon stick will be warmer and spicier. Using both is my favorite.
- Gluten-Free: This is very possible! You can find high-quality, all-butter, gluten-free puff pastry in the freezer section of many stores.
- Dairy-Free: This is a bit trickier, as the flavor comes from butter and milk. However, you can use a high-quality vegan puff pastry, full-fat oat milk for the custard, and a vegan butter/flour-based “slurry” instead of egg yolks. The flavor will be different, but it can be done.
Common Pitfalls (and How to Avoid Them)
- “My tarts have no black spots!” Your oven was not hot enough. That’s it. It’s the only reason. Crank it to 500°F or 550°F, preheat it for a long time, and use the top rack.
- “My custard is lumpy.” You didn’t whisk constantly, or your milk was too hot when you tempered, or you didn’t strain it. Always strain it.
- “My pastry is soggy.” This can happen if your custard was too hot when you filled the shells, or if your oven wasn’t hot enough. That blast of heat is what “sets” and fries the pastry in its own butter, making it crisp.
- “My filling boiled over and made a mess.” You overfilled them. 3/4 of the way full is the absolute limit!
How to Serve and Store These Tarts
This is, in my opinion, the most important rule.
- Serving: A Pastel de Nata must be eaten the day it is made, preferably within a few hours of coming out of the oven. They are best served slightly warm, not hot. The traditional way to serve them is with a small shaker of ground cinnamon and a shaker of powdered sugar, so people can dust their own. They are made to be eaten with a strong shot of espresso.
- Storage: These do not store well. I mean, they’ll keep, but they won’t be the same. The pastry will lose its shattering-crispness and go soft. If you must, store them in a single layer in a paper-towel-lined airtight container at room temperature for 1 day, or in the fridge for 2.
- Reheating (The ONLY Way): Do not, ever, microwave a Pastel de Nata. You will turn that glorious pastry into a hot, soggy, chewy tragedy. The only way to revive one is in a 400°F oven or an air fryer for 3-5 minutes. This will re-crisp the pastry.
Your Pastéis de Nata Questions
Can I make these ahead of time? Sort of. You can make the custard 2-3 days ahead and keep it chilled. You can even form the pastry shells in the muffin tin and freeze them solid. Then, you can bake from frozen, filling the frozen shells with the cold custard. This is a great party trick!
What’s the difference between this and a Chinese Egg Tart? They are cousins! The biggest differences are the crust and the top. Portuguese tarts use a laminated, flaky puff pastry and are meant to be blistered. Chinese tarts (the Hong Kong style) typically use a “shortcrust” (like a pie dough) and have a smooth, glossy, un-blistered top.
Do I really need an all-butter puff pastry? Please, if you can, yes. The ones made with vegetable shortening are fine, but the flavor of an all-butter pastry is what makes these so rich and decadent.
A Little Bite of Lisbon in Your Kitchen
I know this recipe looks long, but it’s just a few simple steps. The process is so much fun, and the result is truly special.
When you pull that tin from the oven and see those puffed, golden, blistered-black tarts, you will feel like a professional pastry chef. And when you take that first bite—the crunch, the cream, the warmth—you’ll know that every second was worth it.
A Quick Summary
This Portuguese Custard Tart (Pastéis de Nata) recipe uses a simple, all-butter puff pastry “hack” to create the signature shatter-crisp, layered shell. The tarts are filled with a simple, silky, lemon-and-cinnamon-infused custard. The secret is baking them in a “screaming hot” 500°F+ oven to achieve the iconic, blistered, caramelized “leopard spots” on top.
If you make these Pastéis de Nata, I need to see those spots! Tag me on [Your Social Media Handle] or share a photo. And if this recipe brought a little bit of Lisbon to your kitchen, please share this post on Pinterest! It helps other bakers find the courage to turn their ovens up! Happy baking!