That Showstopping No-Bake Dome Cake: A Classic Zuccotto Recipe
If you’ve ever walked past a truly authentic Italian bakery, you’ve probably seen it: a stunning, white, dome-shaped cake that looks impossibly elegant. That, my friends, is a Zuccotto.
It looks like the kind of dessert that requires a pastry degree and a kitchen full of special equipment. But I’m going to let you in on a huge secret: it’s a no-bake cake.
Yes. No-bake.
A Zuccotto (which means “little pumpkin” or “skullcap” in Italian, after its shape) is a semifreddo dessert. It’s a clever, brilliant act of assembly. You use a simple bowl as a mold, line it with slices of soft cake, soak those slices in a delicious liqueur, and then fill the whole thing with a cloud-like, creamy, two-part filling.
The magic happens in the fridge. After a long chill, you simply invert the bowl, and… ecco! You’re left with a gorgeous, self-contained, showstopping dessert that will make your dinner guests gasp. It’s the ultimate “I-can’t-believe-you-made-this” dessert, and it’s one of my favorite secrets.
Why You Will Be Obsessed With This Recipe
- The Flavor: This is a classic Italian flavor profile, which means it’s all about balance, not just sugar. You get the creamy, tangy-sweetness from the ricotta, a deep, rich note from the chocolate-almond center, and a warm, fragrant kick from the brandy or rum-soaked cake.
- The Texture: This is the best part. It’s a symphony of “soft.” The center is a light, airy, mousse-like cloud. The outer layer is tender, moist, boozy sponge. It’s unbelievably luxurious.
- The Time: This is the ultimate “hurry up and wait” dessert. The active prep time is only about 45 minutes. The real work is done by your refrigerator. It needs to chill for at least 6 hours, or overnight. This is a non-negotiable step.
- The “Wow” Factor: This is an “easy-to-intermediate” bake. The steps are just mixing and lining a bowl, but the final presentation is a 10/10 showstopper. It’s the perfect make-ahead dinner party dessert.
What You’ll Need
The ingredients are surprisingly simple and come together in three parts.
For the Cake & Soaking Syrup:
- 1 (16-oz) store-bought Pound Cake (or a plain sponge cake, or about 24-30 ladyfingers)
- 1/4 cup Brandy or Dark Rum (See notes for non-alcoholic)
- 1/4 cup fresh Orange Juice
For the Creamy Filling:
- 2 cups (16 oz) heavy whipping cream, very cold
- 2 cups (15 oz) full-fat Ricotta cheese, preferably drained
- 1 cup (120g) powdered sugar, sifted
- 1 1/2 tsp vanilla extract
- 1/4 tsp salt
For the Chocolate Core:
- 1/4 cup (25g) unsweetened cocoa powder
- 1/2 cup (about 3 oz) mini chocolate chips
- 1/2 cup (about 2.5 oz) sliced or slivered almonds, lightly toasted
For the Garnish:
- Powdered sugar
- Chocolate shavings (optional)
How to Build Your Zuccotto, Step by Step
Ready? The most important part is your bowl and your plastic wrap.
Step 1: Prepare Your “Mold” (The Most Important Step!)
Find a 2-quart, round-bottomed glass or metal bowl (about 8-9 inches wide).
Tear off two very long pieces of plastic wrap. Lay them inside the bowl in a “plus sign” (+) shape, pressing them down to get rid of any air bubbles. You want a lot of overhang on all sides—this is what you’ll use to “seal” the cake and pull it out later.
Step 2: Prepare the Cake and Liqueur
Using a serrated knife, slice your pound cake into 1/4-inch thick slices. You’ll need about 12-15 slices, depending on your bowl.
In a small bowl, whisk together the brandy (or rum) and the orange juice.
Step 3: Line the Bowl with Cake
This is the fun part, it’s like a puzzle. Start at the very bottom-center of the bowl. Cut a small circle of cake to fit.
Then, arrange the cake slices all around the inside of the bowl, pressing them against the plastic wrap. Cut them, trim them, and piece them together to create a tight, solid “shell” of cake. You must not leave any large gaps! Set aside a few slices (about 4-5) to use for the “lid” or “base.”
Step 4: Soak the Cake Shell
Using a pastry brush, generously dab the cake-lined bowl with your brandy-orange juice mixture. You want the cake to be moist and flavorful, but not falling-apart soggy.
Step 5: Make the Creamy Filling (Base)
In the bowl of a stand mixer (or in a large bowl with a hand mixer), whip the 2 cups of very cold heavy cream until it holds stiff peaks. Transfer this to a separate bowl and set it aside.
In the now-empty mixer bowl, add the ricotta, sifted powdered sugar, vanilla extract, and salt. Beat on medium-high speed for 3-4 minutes. You want it to be perfectly smooth and creamy. (See my tip below for extra smooth ricotta!)
Step 6: Fold in the Cream
Take your whipped cream and, in three additions, gently fold it into the smooth ricotta mixture. Use a spatula to fold until it’s light, airy, and just combined. Do not stir, or you’ll deflate the cream.
Step 7: Divide and Conquer (Make the Chocolate Core)
Scoop out about two-thirds of this creamy white filling and set it aside.
To the remaining one-third of the filling (which is still in your mixer bowl), add the sifted cocoa powder, mini chocolate chips, and toasted almonds. Fold this together until it’s just combined. This is your chocolate core.
Step 8: Assemble the Layers
Take your bowl with the cake-liner. Spoon in the white filling (the 2/3 portion). Spread it all over the cake, pressing it up the sides. Use your spatula to create a large “well” or “nest” in the center.
Now, spoon the chocolate-almond filling into that well. Spread it out so it fills the center completely.
Step 9: Put a “Lid” On It
Take your remaining 4-5 slices of pound cake and lay them on top of the filling to create a flat, solid “base” for the cake. Gently press them down.
Step 10: Soak the Lid
Use your pastry brush to dab the rest of the brandy-orange juice mixture all over this top layer of cake.
Step 11: Chill, Chill, Chill (The Non-Negotiable Step)
Fold the overhanging plastic wrap tightly over the cake base, sealing the entire dessert inside the bowl.
Place the bowl in the refrigerator for at least 6 hours, or overnight. You cannot rush this. This time is what allows the filling to set firm (like a mousse) and the flavors to meld.
Step 12: The Big Reveal
When you’re ready to serve, unwrap the plastic wrap on top. Place a large, flat serving platter or cake stand upside-down on top of the bowl.
Take a deep breath. In one confident motion, flip the bowl and the platter over.
Let it sit for a minute to allow gravity to help. Then, gently lift the bowl off. The Zuccotto should be left sitting on the platter. Slowly peel off all the plastic wrap.
Step 13: Garnish
Just before serving, dust the entire dome generously with powdered sugar. A blizzard of it. Add chocolate shavings if you’re feeling extra.
My Top Tips for a Flawless Zuccotto
- The Ricotta Secret: Want a truly silky, luxurious, non-grainy filling? Before you do anything, put your 2 cups of ricotta in a blender or food processor and blend it for 60 seconds. This is the #1 trick for a professional-tasting Zuccotto.
- The “Cake” Hack: Seriously, use a store-bought pound cake. A Sara Lee pound cake is perfect for this. It’s dense, moist, and cuts cleanly. It saves you an hour of baking, and no one will ever know.
- The “Flip” Confidence: The only way to mess up the unmolding is to hesitate. Be bold! A quick, confident flip is all you need.
- Garnish Just Before Serving: That powdered sugar will be absorbed by the moist cake over time. For that beautiful, snowy-white look, dust it right before you walk it to the table.
Ingredient Swaps and Variations
- Non-Alcoholic Zuccotto: Easy! Just omit the brandy or rum. Make a simple soaking syrup by mixing 1/2 cup of orange juice with 2 tablespoons of granulated sugar and 1/2 tsp of almond extract.
- The Filling: Not a ricotta fan? You can use mascarpone cheese for an even richer, more decadent (and less tangy) filling.
- The Liqueur: You can use any liqueur you love. Amaretto (almond) is traditional, as is a sweet Marsala wine.
- The Cake: Ladyfingers are a very common (and more traditional) substitute for pound cake. You just have to work faster as they soak up the liquid quickly.
- Nut-Free: Simply omit the toasted almonds from the chocolate filling.
Common Pitfalls (and How to Avoid Them)
- “My Zuccotto Collapsed!” You didn’t chill it long enough. I’m sorry, there are no shortcuts. 6 hours is the bare minimum. Overnight is better.
- “It’s Stuck in the Bowl!” You didn’t line the bowl with plastic wrap, or you didn’t use enough. You must have that plastic-wrap barrier.
- “My Filling Leaked Out the Sides.” You left gaps in your cake “puzzle.” You have to piece the cake slices together tightly so they form a solid wall.
- “My Filling is Grainy/Lumpy.” You didn’t blend your ricotta first (see tips!) or you didn’t sift your powdered sugar and cocoa.
How to Serve and Store
- Serving: This is the centerpiece. Bring the whole, un-sliced dome to the table for the “wow” moment. Slice it into thick wedges, like a cake.
- It’s gorgeous on its own, but it’s also lovely served with a drizzle of chocolate sauce or a small handful of fresh raspberries (their tartness is a great contrast).
- Storage: This is the ultimate make-ahead dessert! It must be stored, covered, in the refrigerator. It will keep for 3-4 days. In my opinion, it’s even better on Day 2, when all the flavors have had time to get to know each other.
- Freezing: Zuccotto freezes like a dream. Wrap the whole, unmolded cake (or individual slices) tightly in plastic wrap and then a layer of foil. It will keep for up to 1 month. Thaw it in the refrigerator.
Your Zuccotto Questions
Can I use cottage cheese instead of ricotta? I would advise against it, as the flavor is much saltier and the texture is harder to get smooth. If you must, you need to use full-fat, and you must blend it in a high-powered blender until it is 100% silky smooth.
Can I use store-bought sponge cake? Yes! A store-bought pound cake, angel food cake (though it’s a bit too light), or a plain sponge will all work. Pound cake is my favorite for its sturdiness.
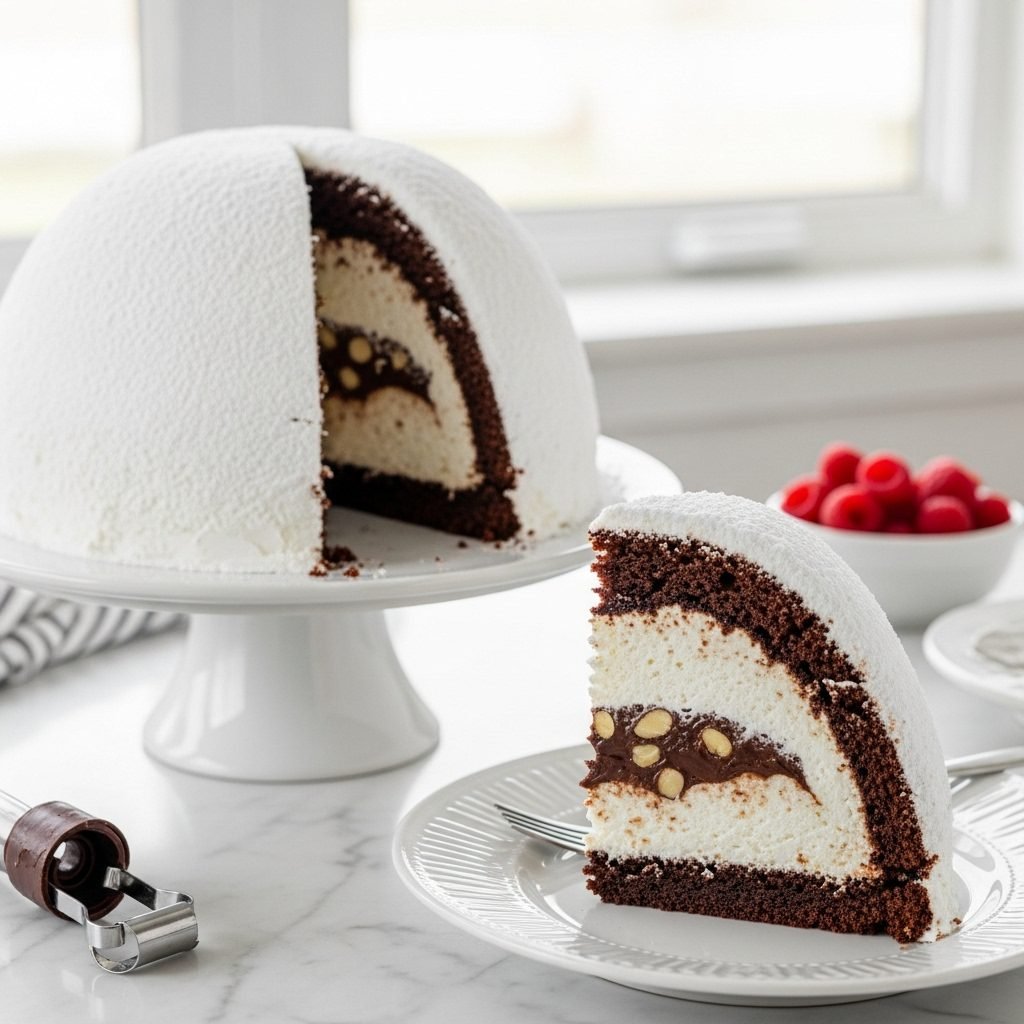
Why is my filling two different colors? That’s the classic way to make it! The outer “ring” of filling is a light vanilla-ricotta cream, and the inner “core” is a rich chocolate-almond filling. It gives you two flavors in every bite.
A True Italian Showstopper
This is one of those desserts that feels like a real “event,” yet it’s so beautifully simple in its method. It’s a taste of Florence, and it’s a recipe that relies on time, not technique.
When you make that first slice, and you see that perfect cross-section of cake, white cream, and dark chocolate filling, you’ll feel like a true pastry chef.
A Quick Summary
This no-bake, classic Zuccotto recipe guides you through making a stunning Italian dome-shaped dessert. Slices of liqueur-soaked pound cake are used to line a bowl, which is then filled with a light, two-part creamy ricotta filling: a white vanilla-cream “shell” and a rich, chocolate-almond “core.” After chilling overnight, the dessert is inverted to reveal a beautiful, impressive dome.